我看到过这个问题,但是没有找到完整的回答。我有一个简单的shapely多边形,称为“polygon”。我想提取出这个多边形作为二进制掩模(最好是numpy数组)。我该怎么做?
我也成功地将shapely转换为geopandas,如此处所示,因此从geopandas中提取掩模也可以工作,但不幸的是,我真的没有能够找到相关的线索。
编辑: 要明确一点,如果我使用坐标网格,我的网格包含x和y笛卡尔坐标(未排序),对应于构成形状轮廓的点。这些都是浮点数,因此需要int输入的解决方案不太适用。理想情况下,我希望起始点是一个shapely多边形,而不是一组点,但如果更喜欢这样做,我可以使用无序的点集(或者从shapely多边形中提取顺时针定点)。
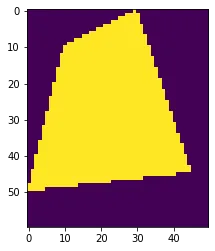
我已经尝试了Yusuke的方法,但是我得到的掩模效果并不完全正确。
Yusuke's 方法:
导致该图的结果为: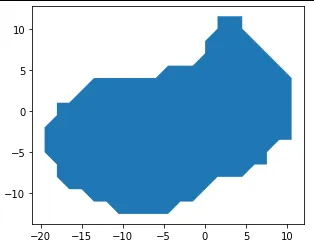 编辑2:
这是我使用的坐标网格的元组列表副本。
编辑2:
这是我使用的坐标网格的元组列表副本。
我也成功地将shapely转换为geopandas,如此处所示,因此从geopandas中提取掩模也可以工作,但不幸的是,我真的没有能够找到相关的线索。
编辑: 要明确一点,如果我使用坐标网格,我的网格包含x和y笛卡尔坐标(未排序),对应于构成形状轮廓的点。这些都是浮点数,因此需要int输入的解决方案不太适用。理想情况下,我希望起始点是一个shapely多边形,而不是一组点,但如果更喜欢这样做,我可以使用无序的点集(或者从shapely多边形中提取顺时针定点)。
我已经尝试了Yusuke的方法,但是我得到的掩模效果并不完全正确。
Yusuke's 方法:
#%% create grid and plot
nx, ny = 100, 100
poly_verts = Plane1verts #this is a list of tuples containing cartesian coordinate pairs of the shape contour in x and y
# Create vertex coordinates for each grid cell...
# (<0,0> is at the top left of the grid in this system)
x, y = np.meshgrid(np.arange(nx), np.arange(ny))
x, y = x.flatten(), y.flatten()

points = np.vstack((x,y)).T

path = Path(poly_verts)
grid = path.contains_points(points)
grid = grid.reshape((ny,nx))

plt.imshow(grid)
plt.title('Grid plot')
plt.show()
掩码的结果图是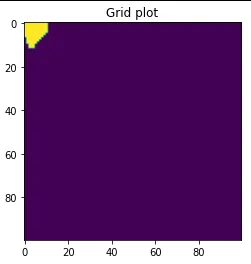
这不是我预期的。而使用下面描述的geopandas绘制可以显示正确的形状。
#%% create shapely and plot for comparison
from shapely.geometry import Polygon
#convert the sets of points dict to a shapely object
polygon1_plane1=Polygon(Plane1vert_tuple)

p = gpd.GeoSeries(polygon1_plane1)
p.plot()
plt.show()
导致该图的结果为:
编辑2:
这是我使用的坐标网格的元组列表副本。[(-8.982, -12.535), (-7.478, -12.535), (-5.975, -12.535), (-4.471, -12.535), (-4.471, -12.535), (-2.967, -11.031), (-1.463, -11.031), (-1.463, -11.031), (0.041, -9.527), (0.041, -9.527), (1.544, -8.023), (3.048, -8.023), (4.552, -8.023), (4.552, -8.023), (6.056, -6.52), (7.559, -6.52), (7.559, -6.52), (7.559, -5.016), (9.063, -3.512), (10.567, -3.512), (10.567, -3.512), (10.567, -2.008), (10.567, -0.505), (10.567, 0.999), (10.567, 2.503), (10.567, 4.007), (10.567, 4.007), (9.063, 5.51), (9.063, 5.51), (7.559, 7.014), (7.559, 7.014), (6.056, 8.518), (6.056, 8.518), (4.552, 10.022), (4.552, 11.526), (4.552, 11.526), (3.048, 11.526), (1.544, 11.526), (1.544, 11.526), (1.544, 10.022), (0.041, 8.518), (0.041, 8.518), (0.041, 7.014), (-1.463, 5.51), (-2.967, 5.51), (-4.471, 5.51), (-4.471, 5.51), (-5.975, 4.007), (-7.478, 4.007), (-8.982, 4.007), (-10.486, 4.007), (-11.99, 4.007), (-13.493, 4.007), (-13.493, 4.007), (-14.997, 2.503), (-14.997, 2.503), (-16.501, 0.999), (-18.005, 0.999), (-18.005, 0.999), (-18.005, -0.505), (-19.508, -2.008), (-19.508, -2.008), (-19.508, -3.512), (-19.508, -5.016), (-19.508, -5.016), (-18.005, -6.52), (-18.005, -8.023), (-18.005, -8.023), (-16.501, -9.527), (-16.501, -9.527), (-14.997, -9.527), (-13.493, -11.031), (-13.493, -11.031), (-11.99, -11.031), (-10.486, -12.535), (-10.486, -12.535)]