你的方案可以适用于正交投影,但是在透视投影下会失败。请注意,在透视投影中,投影矩阵描述了从针孔相机中看到的世界中的3D点到视口中的2D点的映射。
眼睛和目标位置的位移量取决于拖动视口上的对象的深度。
如果物体靠近眼睛位置,则在视口上的平移会导致眼睛和目标位置的小位移:
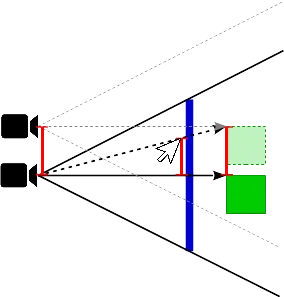
如果物体到眼睛的距离很远,则在视口上的平移会导致眼睛和目标位置的大位移:

要实现您想要的效果,您需要知道视口的大小、视图矩阵和投影矩阵:
self.width
self.height
self.view
self.proj
修改
pane 方法,使其接收新的和旧的鼠标位置。请注意,Y轴必须翻转(
self.height-y)。使用格式类型为
GL_DEPTH_COMPONENT 的
glReadPixels 获取命中点(物体)的深度。
def glut_mouse(self, button, state, x, y):
self.drag = state == GLUT_DOWN
self.last_mouse_pos = glm.vec2(x, self.height-y)
self.mouse_down_pos = glm.vec2(x, self.height-y)
if self.drag:
depth_buffer = glReadPixels(x, self.height-y, 1, 1, GL_DEPTH_COMPONENT, GL_FLOAT)
self.last_depth = depth_buffer[0][0]
print(self.last_depth)
def glut_motion(self, x, y):
if not self.drag:
return
old_pos = self.last_mouse_pos
new_pos = glm.vec2(x, self.__vp_size[1]-y)
self.last_mouse_pos = new_pos
self.pan(self.last_depth, old_pos, new_pos)
def pan(self, depth, old_pos, new_pos):
鼠标位置提供了窗口空间中的一个位置,其中z坐标是相应命中点或物体的深度:
wnd_from    = glm.vec3(old_pos[0], old_pos[1], float(depth))
wnd_to      = glm.vec3(new_pos[0], new_pos[1], float(depth))
可以使用glm.unProject将这些位置转换为世界空间:
vp_rect     = glm.vec4(0, 0, self.width, self.height)
world_from  = glm.unProject(wnd_from, self.view, self.proj, vp_rect)
world_to    = glm.unProject(wnd_to, self.view, self.proj, vp_rect)
眼睛和目标位置的世界空间位移是从旧的到新的世界位置的距离:
world_vec = world_to - world_from
最后计算新的眼睛和目标位置并更新视图矩阵:
self.eye    = self.eye - world_vec
self.target = self.target - world_vec
self.view   = glm.lookAt(self.eye, self.target, self.up)
另请参阅Python OpenGL 4.6,GLM导航
我使用以下示例测试了该代码:
预览:
完整的Python代码:
import os
import math
import numpy as np
import glm
from OpenGL.GLUT import *
from OpenGL.GL import *
from OpenGL.GL.shaders import *
from OpenGL.arrays import *
from ctypes import c_void_p

class MyWindow:

    __caption = 'OpenGL Window'
    __vp_size = [800, 600]
    __vp_valid = False
    __glut_wnd = None

    __glsl_vert = """
        #version 450 core

        layout (location = 0) in vec3 a_pos;
        layout (location = 1) in vec3 a_nv;
        layout (location = 2) in vec4 a_col;

        out vec3 v_pos;
        out vec3 v_nv;
        out vec4 v_color;

        uniform mat4 u_proj;
        uniform mat4 u_view;
        uniform mat4 u_model;

        void main()
        {
            mat4 model_view = u_view * u_model;
            mat3 normal     = transpose(inverse(mat3(model_view)));

            vec4 view_pos   = model_view * vec4(a_pos.xyz, 1.0);

            v_pos       = view_pos.xyz;
            v_nv        = normal * a_nv;
            v_color     = a_col;
            gl_Position = u_proj * view_pos;
        }
    """

    __glsl_frag = """
        #version 450 core

        out vec4 frag_color;
        in  vec3 v_pos;
        in  vec3 v_nv;
        in  vec4 v_color;

        void main()
        {
            vec3  N    = normalize(v_nv);
            vec3  V    = -normalize(v_pos);
            float ka   = 0.1;
            float kd   = max(0.0, dot(N, V)) * 0.9;
            frag_color = vec4(v_color.rgb * (ka + kd), v_color.a);
        }
    """

    __program = None
    __vao = None
    __vbo = None
    __no_vert = 0

    def __init__(self, w, h):

        self.__vp_size = [w, h]

        glutInit()
        glutInitDisplayMode(GLUT_DOUBLE | GLUT_RGB | GLUT_DEPTH)
        glutInitWindowSize(self.__vp_size[0], self.__vp_size[1])
        __glut_wnd = glutCreateWindow(self.__caption)

        self.__program = compileProgram(
            compileShader( self.__glsl_vert, GL_VERTEX_SHADER ),
            compileShader( self.__glsl_frag, GL_FRAGMENT_SHADER ),
        )

        self.___attrib = { a : glGetAttribLocation (self.__program, a) for a in ['a_pos', 'a_nv', 'a_col'] }
        print(self.___attrib)

        self.___uniform = { u : glGetUniformLocation (self.__program, u) for u in ['u_model', 'u_view', 'u_proj'] }
        print(self.___uniform)

        v = [ -1,-1,1,  1,-1,1,  1,1,1, -1,1,1, -1,-1,-1,  1,-1,-1,  1,1,-1, -1,1,-1 ]
        c = [ 1.0, 0.0, 0.0,   1.0, 0.5, 0.0,    1.0, 0.0, 1.0,   1.0, 1.0, 0.0,   0.0, 1.0, 0.0,   0.0, 0.0, 1.0 ]
        n = [ 0,0,1, 1,0,0, 0,0,-1, -1,0,0, 0,1,0, 0,-1,0 ]
        e = [ 0,1,2,3, 1,5,6,2, 5,4,7,6, 4,0,3,7, 3,2,6,7, 1,0,4,5 ]
        attr_array = []
        for si in range(6):
            for vi in range(6):
                ci = [0, 1, 2, 0, 2, 3][vi]
                i = si*4+ci
                attr_array.extend( [ v[e[i]*3], v[e[i]*3+1], v[e[i]*3+2] ] )
                attr_array.extend( [ n[si*3], n[si*3+1], n[si*3+2] ] )
                attr_array.extend( [ c[si*3], c[si*3+1], c[si*3+2], 1 ] );
        self.__no_vert = len(attr_array) // 10

        vertex_attributes = np.array(attr_array, dtype=np.float32)

        self.__vbo = glGenBuffers(1)
        glBindBuffer(GL_ARRAY_BUFFER, self.__vbo)
        glBufferData(GL_ARRAY_BUFFER, vertex_attributes, GL_STATIC_DRAW)

        self.__vao = glGenVertexArrays(1)
        glBindVertexArray(self.__vao)
        glVertexAttribPointer(0, 3, GL_FLOAT, False, 10*vertex_attributes.itemsize, None)
        glEnableVertexAttribArray(0)
        glVertexAttribPointer(1, 3, GL_FLOAT, False, 10*vertex_attributes.itemsize, c_void_p(3*vertex_attributes.itemsize))
        glEnableVertexAttribArray(1)
        glVertexAttribPointer(2, 4, GL_FLOAT, False, 10*vertex_attributes.itemsize, c_void_p(6*vertex_attributes.itemsize))
        glEnableVertexAttribArray(2)

        glEnable(GL_DEPTH_TEST)
        glUseProgram(self.__program)

        glutReshapeFunc(self.__reshape)
        glutDisplayFunc(self.__mainloop)
        glutMouseFunc(self.glut_mouse)
        glutMotionFunc(self.glut_motion)

        self.drag = False

        self.eye    = glm.vec3(-3, -7, 6)
        self.target = glm.vec3(0, 0, 0)
        self.up     = glm.vec3(0, 0, 1)

        self.near  = 0.1
        self.far   = 100.0
        aspect     = self.__vp_size[0]/self.__vp_size[1]
        self.proj  = glm.perspective(glm.radians(90.0), aspect, self.near, self.far)
        self.view  = glm.lookAt(self.eye, self.target, self.up)
        self.model = glm.mat4(1)

    def run(self):
        self.__starttime = 0
        self.__starttime = self.elapsed_ms()
        glutMainLoop()

    def elapsed_ms(self):
      return glutGet(GLUT_ELAPSED_TIME) - self.__starttime

    def __reshape(self, w, h):
        self.__vp_valid = False

    def __mainloop(self):

        if not self.__vp_valid:
            self.width      = glutGet(GLUT_WINDOW_WIDTH)
            self.height     = glutGet(GLUT_WINDOW_HEIGHT)
            self.__vp_size  = [self.width, self.height]
            self.__vp_valid = True
            aspect          = self.width / self.height
            self.proj       = glm.perspective(glm.radians(90.0), aspect, self.near, self.far)

        glUniformMatrix4fv(self.___uniform['u_proj'], 1, GL_FALSE, glm.value_ptr(self.proj) )
        glUniformMatrix4fv(self.___uniform['u_view'], 1, GL_FALSE, glm.value_ptr(self.view) )
        glUniformMatrix4fv(self.___uniform['u_model'], 1, GL_FALSE, glm.value_ptr(self.model) )

        glClearColor(0.2, 0.3, 0.3, 1.0)
        glClear(GL_COLOR_BUFFER_BIT | GL_DEPTH_BUFFER_BIT)

        glDrawArrays(GL_TRIANGLES, 0, self.__no_vert)

        glutSwapBuffers()
        glutPostRedisplay()

    def glut_mouse(self, button, state, x, y):
        self.drag = state == GLUT_DOWN
        self.last_mouse_pos = glm.vec2(x, self.height-y)
        self.mouse_down_pos = glm.vec2(x, self.height-y)
        if self.drag:
            depth_buffer = glReadPixels(x, self.height-y, 1, 1, GL_DEPTH_COMPONENT, GL_FLOAT)
            self.last_depth = depth_buffer[0][0]
            print(self.last_depth)

    def glut_motion(self, x, y):
        if not self.drag:
          return
        old_pos = self.last_mouse_pos
        new_pos = glm.vec2(x, self.__vp_size[1]-y)
        self.last_mouse_pos = new_pos
        self.pan(self.last_depth, old_pos, new_pos)

    def pan(self, depth, old_pos, new_pos):

        wnd_from    = glm.vec3(old_pos[0], old_pos[1], float(depth))
        wnd_to      = glm.vec3(new_pos[0], new_pos[1], float(depth))

        vp_rect     = glm.vec4(0, 0, self.width, self.height)
        world_from  = glm.unProject(wnd_from, self.view, self.proj, vp_rect)
        world_to    = glm.unProject(wnd_to, self.view, self.proj, vp_rect)

        world_vec   = world_to - world_from

        self.eye    = self.eye - world_vec
        self.target = self.target - world_vec
        self.view   = glm.lookAt(self.eye, self.target, self.up)

window = MyWindow(800, 600)
window.run()
self类及其字段和行为,例如如何使用eye和target字段来计算相机矩阵。 - meowgoesthedog