Swift和Xcode - 如何创建自定义选项卡图标

29
我正在使用Swift(Xcode 6.3和Swift 1.2)在Xcode中开发一个选项卡应用程序项目。我遇到了很多自定义选项卡图标的问题。我用Photoshop(CS6)设计了一张图片,保存为PNG格式,在Prepo中调整大小为30x30,并将其导入到Xcode的资源库中。然后,我将选项卡视图控制器的图标设置为该图片。但是,它没有显示出来。
我查看了这些页面,但没有找到任何帮助:
https://www.youtube.com/watch?v=4qqqoAWNfZA 自定义选项卡栏图标颜色 http://www.raywenderlich.com/forums/viewtopic.php?f=2&t=19333
http://www.appcoda.com/ios-programming-how-to-customize-tab-bar-background-appearance/ https://www.youtube.com/watch?v=4Tj_SeApUrs

如何正确创建自定义选项卡栏图标的过程是什么?


当我在模拟器中运行应用程序时,选定该选项卡时,选项卡栏图标为空白,并且在选择其他选项卡时为灰色正方形。 - Matt Kelly
4个回答

60

经过一番研究后,我解决了这个问题,所以想在这里发布一下,以防其他人也遇到类似的问题。 在Photoshop中,我做了以下几步:

  1. 导入要用作选项卡栏图标的图像(最好使用黑白图像,这样不必去除颜色)。
  2. 将背景设置为“透明”,而不是白色。
  3. 将所有白色从图像中删除,使其成为一个具有透明背景的黑色图像。
  4. 将图像保存为 .png 格式。
  5. 将图像大小调整为正方形,尺寸为 75x75 像素 (并命名为 imageName@3x.png)、50x50 像素 (并命名为 imageName@2x.png)和 25x25 像素 (并命名为 imageName.png)。

在Xcode中,我做了以下几步:

  1. 将图像拖入Xcode,并将图片组重命名为 icoImageName
  2. 在Xcode中的故事板中选择要设置图像的选项卡,并将“图像”(在“检查器”窗格的“栏目项”下)设置为 icoImageName。请注意,我没有设置“选中的图像”(将其留空即可)。

完成。

希望这能帮助到某些人。感谢大家的帮助。


1
从Xcode 8.2(2017年3月)开始,您可以在属性检查器的第7步中找到“Bar Item”类别,而不是检查器面板。 - fi12

4

看起来您在xCode中已经设置好了一切。问题在于您使用的png文件。

下载此图片http://i.stack.imgur.com/zluev.png,并查看问题是否仍然存在。

根据UITabBarItem images just appear as a grey block答案:

iOS中标准的选项卡图标仅从alpha通道渲染。颜色完全被忽略。您可以使用不同的alpha值代替颜色,这会导致不同的灰色(或蓝色如果选择了)。

使您的图标背景透明。


1
你是否在界面构建器中创建了选项卡视图?如果是这样,由于您将图像添加为资源,它们应该显示在检查器侧边栏下每个选项卡按钮的“图像”属性中。此外,我知道你已经发布了很多教程,但这篇文章非常新,并且解释得很透彻:http://codewithchris.com/ios-tab-bar-app/

谢谢@Luke。是的,我看过那个教程,但它没有详细介绍如何创建图像。是的,我在界面构建器中创建了选项卡视图,并将“选定的图像”和“图像”设置为侧栏检查器中的PNG。不幸的是,这仍然导致了上述描述的结果。 - Matt Kelly
@MattKelly 这是一个奇怪的问题,但是当您在图像属性中输入图像名称时,图像名称是否自动完成?如果没有,则可能未正确添加到资产文件中。 - Luke
@MattKelly 你能发一下xcasset文件的截图吗? - Luke

0

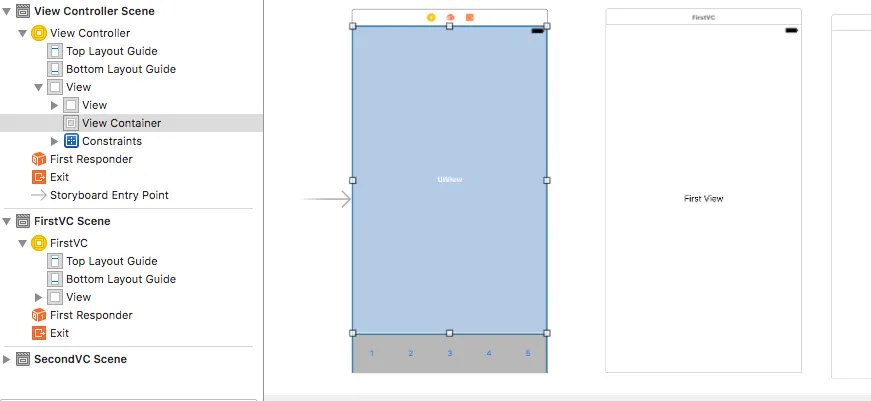
enter image description here

class ViewController: UIViewController {

    @IBOutlet var btnHome : UIButton!
    @IBOutlet var btnInvoice : UIButton!
    @IBOutlet var btnSettings : UIButton!
    @IBOutlet var btnMyOrder : UIButton!
    @IBOutlet var btnLogout : UIButton!

    @IBOutlet weak var viewContainer: UIView!

    var navController : UINavigationController!

    var selectedIndex : Int! = 0

    var arrTabColor  = [UIColor(red: 35.0/255.0, green: 93.0/255.0, blue: 175.0/255.0, alpha: 1.0),
                        UIColor(red: 29.0/255.0, green: 86.0/255.0, blue: 167.0/255.0, alpha: 1.0),
                        UIColor(red: 35.0/255.0, green: 93.0/255.0, blue: 175.0/255.0, alpha: 1.0),
                        UIColor(red: 29.0/255.0, green: 86.0/255.0, blue: 167.0/255.0, alpha: 1.0),
                        UIColor(red: 35.0/255.0, green: 93.0/255.0, blue: 175.0/255.0, alpha: 1.0)]

    var arrTabIdentiFierVC       = ["FirstVC","SecondVC","FirstVC","FirstVC","SecondVC"]


    // MARK: - Life Cycle

    override func viewDidLoad()
    {
        super.viewDidLoad()
        setTabbarImage(0)

        // Do any additional setup after loading the view, typically from a nib.
    }

    override func didReceiveMemoryWarning() {
        super.didReceiveMemoryWarning()
        // Dispose of any resources that can be recreated.
    }

    func setTabBarClicked(_ storyIdentifier : String,identifier : String)
    {
        let aStoryboard  = UIStoryboard.init(name: storyIdentifier, bundle: nil)
        let newViewController = aStoryboard.instantiateViewController(withIdentifier: identifier)

        navController = UINavigationController(rootViewController: newViewController)
        self.addChildViewController(navController)

        navController.view.frame = viewContainer.frame
        newViewController.view.frame = viewContainer.frame

        self.viewContainer.addSubview(navController.view)
        newViewController.didMove(toParentViewController: self)


    }

    func setTabbarImage(_ selectedIndex : Int!)
    {
        btnHome.backgroundColor = arrTabColor[0]
        btnInvoice.backgroundColor = arrTabColor[1]
        btnSettings.backgroundColor = arrTabColor[2]
        btnMyOrder.backgroundColor = arrTabColor[3]
        btnLogout.backgroundColor = arrTabColor[4]

        let selectedColor = UIColor(red: 40/255, green: 142/255, blue: 206.0/255, alpha: 1.0)

        if selectedIndex == 0
        {
            btnHome.backgroundColor = selectedColor

        }
        else if selectedIndex == 1
        {
            btnInvoice.backgroundColor = selectedColor

        }
        else if selectedIndex == 2
        {
            btnSettings.backgroundColor = selectedColor

        }
        else if selectedIndex == 3
        {
            btnMyOrder.backgroundColor = selectedColor
        }
        else if selectedIndex == 4
        {
            btnLogout.backgroundColor = selectedColor

        }
    }

    // MARK: - Action Method
    @IBAction func HomeClicked(_ sender : AnyObject?)
    {

        setTabbarImage(0)

        setTabBarClicked("Main",identifier: arrTabIdentiFierVC[0])

    }
    @IBAction func InvoiceClicked(_ sender : AnyObject?)
    {
        setTabbarImage(1)

        setTabBarClicked("Main",identifier: arrTabIdentiFierVC[1])

    }
    @IBAction func SettingClicked(_ sender : AnyObject?)
    {
        setTabbarImage(2)
        setTabBarClicked("Main",identifier: arrTabIdentiFierVC[2])


    }
    @IBAction func MyorderClicked(_ sender : AnyObject?)
    {
        setTabbarImage(3)
        setTabBarClicked("Main",identifier: arrTabIdentiFierVC[3])

    }
    @IBAction func logoutClicked(_ sender : AnyObject?)
    {
        setTabbarImage(4)


        let alert = UIAlertController(title: "", message: "Are you sure want to logout?", preferredStyle: UIAlertControllerStyle.alert)

        let CancelAction = UIAlertAction(title: "NO", style: .default) { (action:UIAlertAction!) in

        }
        alert.addAction(CancelAction)

        let OKAction = UIAlertAction(title: "YES", style: .default) { (action:UIAlertAction!) in

          //  var isNav : Bool! = false

            //for objChild in (self.parent?.childViewControllers)!
           // {
//                if objChild.isKind(of: LoginVC.self)
//                {
//                    self.navigationController!.popToViewController(objChild, animated: true)
//                    CommonMethods.removeCustomObject(Constants.kUserProfile)
//                    
//                    isNav = true
//                    break
//                    
//                }
           // }
           // if !isNav
           // {
//                CommonMethods.removeCustomObject(Constants.kUserProfile)
//                let aNavController = (AppDelegate.getDelegate().window!.rootViewController! as! UINavigationController)
//                let storyboard = UIStoryboard(name: "Main", bundle: nil)
//                var aVCObj = UIViewController()
//                aVCObj = storyboard.instantiateViewController(withIdentifier: "LoginVC")
//                var aMutArr = aNavController.viewControllers
//                aMutArr.insert(aVCObj, at: 0)
//                aNavController.viewControllers = aMutArr
//                aNavController.popToRootViewController(animated: true)
          //  }
        }
        alert.addAction(OKAction)
        self.present(alert, animated: true, completion: nil)
    }

    // MARK: - Action Method


}

网页内容由stack overflow 提供, 点击上面的
可以查看英文原文,
原文链接