我正在尝试理解如何使用Swift创建三角形形状。我找到了这段代码可以创建一个三角形。
这段代码创建了一个形状,就像这样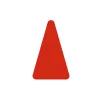 出现在屏幕中央。
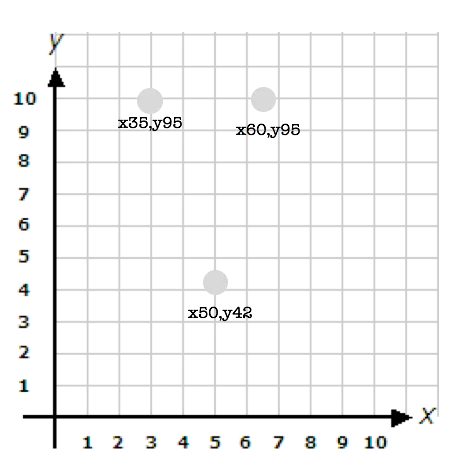
我试着调整和玩弄它来理解它的工作原理;然而,到了这个时候,我意识到我有点迷失了逻辑。我在脑海中将上面三角形的CGPoint放在了一个x-y坐标系上,它看起来像是:
但如果我将这些点放在x-y轴上,三角形就会倒过来。
class TriangleLayer: CAShapeLayer {

  let innerPadding: CGFloat = 30.0

  override init() {
    super.init()
    fillColor = Colors.red.CGColor
    strokeColor = Colors.red.CGColor
    lineWidth = 7.0
    lineCap = kCALineCapRound
    lineJoin = kCALineJoinRound
    path = trianglePathSmall.CGPath
  }

  required init?(coder aDecoder: NSCoder) {
    fatalError("init(coder:) has not been implemented")
  }

  var trianglePathSmall: UIBezierPath {
     let trianglePath = UIBezierPath()
     trianglePath.moveToPoint(CGPoint(x: 5.0 + innerPadding, y: 95.0))     // #1
     trianglePath.addLineToPoint(CGPoint(x: 50.0, y: 12.5 + innerPadding)) // #2
     trianglePath.addLineToPoint(CGPoint(x: 95.0 - innerPadding, y: 95.0)) // #3
     trianglePath.closePath()
     return trianglePath
 }
这段代码创建了一个形状,就像这样
出现在屏幕中央。我试着调整和玩弄它来理解它的工作原理;然而,到了这个时候,我意识到我有点迷失了逻辑。我在脑海中将上面三角形的CGPoint放在了一个x-y坐标系上,它看起来像是:
 #1 x:35, y:95          #3 x:65, y:95
           #2 x:50, y: 42.5
但如果我将这些点放在x-y轴上,三角形就会倒过来。
         .   .                                .
                 <like this.   not this>
           .                                .   .