三角形UIView - Swift

43

所以我正在制作一个游戏,其中我会通过用户控制,在屏幕底部投放需要被一个钉子(三角形)摧毁的物体。

我现在无法弄清楚如何创建一个三角形的 UIView。不过,我已经能够将其作为一个矩形来实现,就像这样:

 let barrier = UIView(frame: CGRect(x:125, y: 650, width: 130, height:20))
 barrier.backgroundColor = UIColor.orangeColor()
 view.addSubview(barrier)

这个方法已经可行了,但我不知道如何制作一个三角形。我之所以要将其作为UIView使用,是因为我需要在其上进行碰撞检测并让用户移动它。我尝试使用PNG格式的三角形,但它会将碰撞检测区域识别为图像边框而不是三角形的起点。

我已经尝试过这个方法,但它并没有起作用...

 let square = UIView(frame: CGPathMoveToPoint(path, nil, 50, 0), CGPathAddLineToPoint(path, nil, 100, 50), CGPathAddLineToPoint(path, nil, 0, 100))
 square.backgroundColor = UIColor.purpleColor()
 view.addSubview(square)

任何帮助都将不胜感激,

谢谢,

Alex


将一个 CAShapeLayer 添加到你的视图中,并给它一个三角形路径(使用 UIBezierPath 创建)。 - rdelmar
4
听起来你正在使用UIKit进行一项适合使用SpriteKit的任务。 - johnpatrickmorgan
7个回答

110

更新至Swift 3:

class TriangleView : UIView {

    override init(frame: CGRect) {
        super.init(frame: frame)
    }

    required init?(coder aDecoder: NSCoder) {
        super.init(coder: aDecoder)
    }

    override func draw(_ rect: CGRect) {

        guard let context = UIGraphicsGetCurrentContext() else { return }

        context.beginPath()
        context.move(to: CGPoint(x: rect.minX, y: rect.maxY))
        context.addLine(to: CGPoint(x: rect.maxX, y: rect.maxY))
        context.addLine(to: CGPoint(x: (rect.maxX / 2.0), y: rect.minY))
        context.closePath()

        context.setFillColor(red: 1.0, green: 0.5, blue: 0.0, alpha: 0.60)
        context.fillPath()
    }
}
Swift 2:
import UIKit

class TriangleView : UIView {

    override init(frame: CGRect) {
        super.init(frame: frame)
    }

    required init(coder aDecoder: NSCoder) {
        super.init(coder: aDecoder)
    }

    override func drawRect(rect: CGRect) {

        var ctx : CGContextRef = UIGraphicsGetCurrentContext()

        CGContextBeginPath(ctx)
        CGContextMoveToPoint(ctx, CGRectGetMinX(rect), CGRectGetMaxY(rect))
        CGContextAddLineToPoint(ctx, CGRectGetMaxX(rect), CGRectGetMaxY(rect))
        CGContextAddLineToPoint(ctx, (CGRectGetMaxX(rect)/2.0), CGRectGetMinY(rect))
        CGContextClosePath(ctx)

        CGContextSetRGBFillColor(ctx, 1.0, 0.5, 0.0, 0.60);
        CGContextFillPath(ctx);
       }
 } 

This will start from MinX, MaxY;
Draw a line from the start to MaxX, MaxY;
Draw a line from MaxX,MaxY to MaxX/2, MinY;
Then close the path to the start location.

The next part sets the color you want to use. In this example 255,127,0, Alpha 0.6 Then will fill the path you just drew above with the set color.

Then in your View Controller

Swift 3:

class ViewController: UIViewController {

    override func viewDidLoad() {
        super.viewDidLoad()

        let triangle = TriangleView(frame: CGRect(x: 10, y: 20, width: 25 , height: 30))
        triangle.backgroundColor = .white
        view.addSubview(triangle)
    }

    override func didReceiveMemoryWarning() {
        super.didReceiveMemoryWarning()
    }
}


Swift 2:

class ViewController: UIViewController {

    override func viewDidLoad() {
        super.viewDidLoad()
        // Do any additional setup after loading the view, typically from a nib.

        let triangle = TriangleView(frame: CGRectMake(10, 20, 25, 30))
        triangle.backgroundColor = .whiteColor()
        view.addSubview(triangle)
    }

    override func didReceiveMemoryWarning() {
        super.didReceiveMemoryWarning()
        // Dispose of any resources that can be recreated.
    }
}

However, this is going to cause the same problem as the frame of this view is still going to be a rectangle. UIKit works with rectangles, you would have to use another framework, like Sprite Kit.
1
我相信 triange 是一个打字错误? :) - He Yifei 何一非
1
@Arefly 谢谢!已修复。 - Taylor M
1
为了动态更改颜色,请向TriangleView添加一个属性来保存颜色,并使用它来设置填充颜色。还可以查看文档中的“视图绘制周期”。 - Taylor M
1
我本来不是想画三角形的,但这却帮助我画了梯形 :D - Abdul Waheed
1
它会绘制黑色背景,我们应该在“init”中添加“self.isOpaque = false”来修复它。 - user924
显示剩余3条评论

26

Swift 5:

这段代码适用于不同的视图,对于使用CGMutablePath()CAShapeLayer()UIView

*假设您的视图的高度和宽度相同。

*将您的视图的背景颜色设置为clearColor。

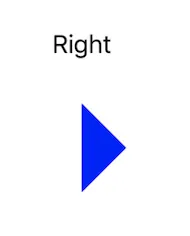
A)右侧

 @IBOutlet weak var triangleView: UIView!

 override func viewDidLoad() {
        super.viewDidLoad()
        self.setRightTriangle()   
    }

 func setRightTriangle(){
        let heightWidth = triangleView.frame.size.width //you can use triangleView.frame.size.height
        let path = CGMutablePath()

        path.move(to: CGPoint(x: heightWidth/2, y: 0))
        path.addLine(to: CGPoint(x:heightWidth, y: heightWidth/2))
        path.addLine(to: CGPoint(x:heightWidth/2, y:heightWidth))
        path.addLine(to: CGPoint(x:heightWidth/2, y:0))

        let shape = CAShapeLayer()
        shape.path = path
        shape.fillColor = UIColor.blue.cgColor

        triangleView.layer.insertSublayer(shape, at: 0)
    }

enter image description here


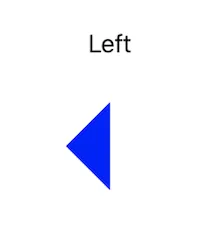
B) 左边

 func setLeftTriangle(){
        let heightWidth = triangleView.frame.size.width
        let path = CGMutablePath()

        path.move(to: CGPoint(x: heightWidth/2, y: 0))
        path.addLine(to: CGPoint(x:0, y: heightWidth/2))
        path.addLine(to: CGPoint(x:heightWidth/2, y:heightWidth))
        path.addLine(to: CGPoint(x:heightWidth/2, y:0))

        let shape = CAShapeLayer()
        shape.path = path
        shape.fillColor = UIColor.blue.cgColor

        triangleView.layer.insertSublayer(shape, at: 0)
    }

enter image description here


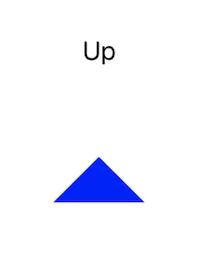
C) 上侧

  func setUpTriangle(){
        let heightWidth = triangleView.frame.size.width
           let path = CGMutablePath()

           path.move(to: CGPoint(x: 0, y: heightWidth))
           path.addLine(to: CGPoint(x:heightWidth/2, y: heightWidth/2))
           path.addLine(to: CGPoint(x:heightWidth, y:heightWidth))
           path.addLine(to: CGPoint(x:0, y:heightWidth))

           let shape = CAShapeLayer()
           shape.path = path
           shape.fillColor = UIColor.blue.cgColor

           triangleView.layer.insertSublayer(shape, at: 0)
       }

图片描述


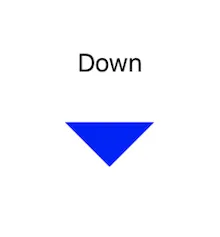
D) 下降趋势

  func setDownTriangle(){
        let heightWidth = triangleView.frame.size.width
        let path = CGMutablePath()

        path.move(to: CGPoint(x: 0, y: 0))
        path.addLine(to: CGPoint(x:heightWidth/2, y: heightWidth/2))
        path.addLine(to: CGPoint(x:heightWidth, y:0))
        path.addLine(to: CGPoint(x:0, y:0))

        let shape = CAShapeLayer()
        shape.path = path
        shape.fillColor = UIColor.blue.cgColor

        triangleView.layer.insertSublayer(shape, at: 0)
    }

输入图像描述

*根据您的需求更改X和Y的任何值。


如果有人需要在视图中间上方显示三角形,可以使用以下路径: path.move(to:CGPoint(x:0,y:heightWidth / 2)) path.addLine(to:CGPoint(x:heightWidth / 2,y:0)) path.addLine(to:CGPoint(x:heightWidth,y:heightWidth / 2)) path.addLine(to:CGPoint(x:0,y:heightWidth / 2)) - User18474728

9

CAShapeLayer可以更改图层的形状。

    var mask = CAShapeLayer()
    mask.frame = self.layer.bounds

    let width = self.layer.frame.size.width
    let height = self.layer.frame.size.height

    var path = CGPathCreateMutable()

    CGPathMoveToPoint(path, nil, 30, 0)
    CGPathAddLineToPoint(path, nil, width, 0)
    CGPathAddLineToPoint(path, nil, width, height)
    CGPathAddLineToPoint(path, nil, 0, height)
    CGPathAddLineToPoint(path, nil, 30, 0)

    mask.path = path

    // CGPathRelease(path); - not needed

    self.layer.mask = mask

    var shape = CAShapeLayer()
    shape.frame = self.bounds
    shape.path = path
    shape.lineWidth = 3.0
    shape.strokeColor = UIColor.whiteColor().CGColor
    shape.fillColor = UIColor.clearColor().CGColor

    self.layer.insertSublayer(shape, atIndex: 0)

9

我稍微修改了之前的代码,将边距和填充颜色作为可检查项添加进去,它能够在Swift4中很好地运行:

import UIKit

@IBDesignable
class TriangleView : UIView {
    var _color: UIColor! = UIColor.blue
    var _margin: CGFloat! = 0

    @IBInspectable var margin: Double {
        get { return Double(_margin)}
        set { _margin = CGFloat(newValue)}
    }


    @IBInspectable var fillColor: UIColor? {
        get { return _color }
        set{ _color = newValue }
    }

    override init(frame: CGRect) {
        super.init(frame: frame)
    }

    required init?(coder aDecoder: NSCoder) {
        super.init(coder: aDecoder)
    }

    override func draw(_ rect: CGRect) {

        guard let context = UIGraphicsGetCurrentContext() else { return }

        context.beginPath()
        context.move(to: CGPoint(x: rect.minX + _margin, y: rect.maxY - _margin))
        context.addLine(to: CGPoint(x: rect.maxX - _margin, y: rect.maxY - _margin))
        context.addLine(to: CGPoint(x: (rect.maxX / 2.0), y: rect.minY + _margin))
        context.closePath()

        context.setFillColor(_color.cgColor)
        context.fillPath()
    }
}

1
我尝试使用PNG三角形,但它将碰撞检测视为图像的边框而不是三角形的起点。如果您要使用简单的碰撞(例如内置的UIKit Dynamics - 它仅执行矩形视图碰撞),则无法解决此问题。如果您想要高级形状碰撞,则必须自己实现或使用Sprites。
对于用户移动它,这要容易得多:只需覆盖此视图的hitTest并在用户触摸的位置超出三角形图像的边界时返回nil即可。

关于如何对绘制的形状进行命中测试,请参阅我书中的讨论:http://www.apeth.com/iOSBook/ch18.html#_hit_testing_for_drawings - matt

0

这将为您提供4个方向中的任何一个,较短较长的点。易于使用:

1-创建一个类(c+p):

import UIKit

class PointingTriangleView: UIView {
    
    override init(frame: CGRect) {
        super.init(frame: frame)

        self.backgroundColor = UIColor.clear
    }
    
    var fillColorCGColor = UIColor.brown.cgColor
    
    var pointingLongDown = false
    var pointingShortDown = false

    var pointingLongUp = false        
    var pointingShortUp = false
    
    var pointingLongLeft = false
    var pointingShortLeft = false
    
    var pointingLongRight = false
    var pointingShortRight = false
    
    override func draw(_ rect: CGRect) {
        
        guard let context = UIGraphicsGetCurrentContext() else { return }
        
        context.beginPath()
        
        if pointingLongDown {
            context.move(to: CGPoint(x: rect.minX, y: rect.minY))
            context.addLine(to: CGPoint(x: rect.maxX, y: rect.minY))
            context.addLine(to: CGPoint(x: rect.midX, y: rect.maxY))
        }
        
        if pointingShortDown {
            context.move(to: CGPoint(x: rect.minX, y: rect.midY))
            context.addLine(to: CGPoint(x: rect.maxX, y: rect.midY))
            context.addLine(to: CGPoint(x: rect.midX, y: rect.maxY))
        }
        
        if pointingLongUp {
            context.move(to: CGPoint(x: rect.minX, y: rect.maxY))
            context.addLine(to: CGPoint(x: rect.maxX, y: rect.maxY))
            context.addLine(to: CGPoint(x: rect.midX, y: rect.minY))
        }
        
        if pointingShortUp {
            context.move(to: CGPoint(x: rect.minX, y: rect.maxY))
            context.addLine(to: CGPoint(x: rect.maxX, y: rect.maxY))
            context.addLine(to: CGPoint(x: rect.midX, y: rect.midY))
        }
        
        if pointingLongLeft {
            context.move(to: CGPoint(x: rect.minX, y: rect.midY))
            context.addLine(to: CGPoint(x: rect.maxX, y: rect.maxY))
            context.addLine(to: CGPoint(x: rect.maxX, y: rect.minY))
        }
        
        if pointingShortLeft {
            context.move(to: CGPoint(x: rect.midX, y: rect.midY))
            context.addLine(to: CGPoint(x: rect.maxX, y: rect.maxY))
            context.addLine(to: CGPoint(x: rect.maxX, y: rect.minY))
        }
        
        if pointingLongRight {
            context.move(to: CGPoint(x: rect.maxX, y: rect.midY))
            context.addLine(to: CGPoint(x: rect.minX, y: rect.maxY))
            context.addLine(to: CGPoint(x: rect.minX, y: rect.minY))
        }
        
        if pointingShortRight {
            context.move(to: CGPoint(x: rect.midX, y: rect.midY))
            context.addLine(to: CGPoint(x: rect.minX, y: rect.maxY))
            context.addLine(to: CGPoint(x: rect.minX, y: rect.minY))
        }
        
        context.closePath()
        
        context.setFillColor(fillColorCGColor)
        context.fillPath()
    }
    
    required init?(coder aDecoder: NSCoder) {
        super.init(coder: aDecoder)
    }
}

2-创建一个对象,确保设置方向和您喜欢的颜色:

lazy var pointingArrow: PointingTriangleView = {
    let v = PointingTriangleView()
    v.translatesAutoresizingMaskIntoConstraints = false

    v.pointingShortUp = true // *** set the direction that you prefer here ***

    v.fillColorCGColor = UIColor.blue.cgColor // select your preferred color and make sure it ends in .cgColor 
    return v
}()

3-设置Anchors

view.addSubview(pointingArrow)

pointingArrow.centerXAnchor.constraint(equalTo: view.centerXAnchor).isActive = true 
pointingArrow.centerYAnchor.constraint(equalTo: view.centerYAnchor).isActive = true
pointingArrow.widthAnchor.constraint(equalToConstant: 20).isActive = true
pointingArrow.heightAnchor.constraint(equalToConstant: 20).isActive = true

0

试试这个

struct Triangle: Shape {
    func path(in rect: CGRect) -> Path {
        var path = Path()
        
        path.move(to: CGPoint(x: 200.0, y: 40.0))
        path.addLine(to: CGPoint(x: 40.0, y: 40.0))
        path.addLine(to: CGPoint(x: 120.0, y: 200.0))
        
        path.closeSubpath()


        return path
    }
    
}

网页内容由stack overflow 提供, 点击上面的
可以查看英文原文,
原文链接