将图像转换为CVPixelBuffer以用于机器学习Swift

26

我正在尝试正确使用苹果在2017年WWDC上演示的示例Core ML模型。我正在使用GoogLeNet尝试对图像进行分类(请参见Apple机器学习页面)。该模型以CVPixelBuffer作为输入。我有一张名为imageSample.jpg的图片用于此演示。我的代码如下:

        var sample = UIImage(named: "imageSample")?.cgImage
        let bufferThree = getCVPixelBuffer(sample!)

        let model = GoogLeNetPlaces()
        guard let output = try? model.prediction(input: GoogLeNetPlacesInput.init(sceneImage: bufferThree!)) else {
            fatalError("Unexpected runtime error.")
        }

        print(output.sceneLabel)

我总是在输出中遇到意外的运行时错误,而不是图像分类。 我用于转换图像的代码如下:

func getCVPixelBuffer(_ image: CGImage) -> CVPixelBuffer? {
        let imageWidth = Int(image.width)
        let imageHeight = Int(image.height)

        let attributes : [NSObject:AnyObject] = [
            kCVPixelBufferCGImageCompatibilityKey : true as AnyObject,
            kCVPixelBufferCGBitmapContextCompatibilityKey : true as AnyObject
        ]

        var pxbuffer: CVPixelBuffer? = nil
        CVPixelBufferCreate(kCFAllocatorDefault,
                            imageWidth,
                            imageHeight,
                            kCVPixelFormatType_32ARGB,
                            attributes as CFDictionary?,
                            &pxbuffer)

        if let _pxbuffer = pxbuffer {
            let flags = CVPixelBufferLockFlags(rawValue: 0)
            CVPixelBufferLockBaseAddress(_pxbuffer, flags)
            let pxdata = CVPixelBufferGetBaseAddress(_pxbuffer)

            let rgbColorSpace = CGColorSpaceCreateDeviceRGB();
            let context = CGContext(data: pxdata,
                                    width: imageWidth,
                                    height: imageHeight,
                                    bitsPerComponent: 8,
                                    bytesPerRow: CVPixelBufferGetBytesPerRow(_pxbuffer),
                                    space: rgbColorSpace,
                                    bitmapInfo: CGImageAlphaInfo.premultipliedFirst.rawValue)

            if let _context = context {
                _context.draw(image, in: CGRect.init(x: 0, y: 0, width: imageWidth, height: imageHeight))
            }
            else {
                CVPixelBufferUnlockBaseAddress(_pxbuffer, flags);
                return nil
            }

            CVPixelBufferUnlockBaseAddress(_pxbuffer, flags);
            return _pxbuffer;
        }

        return nil
    }

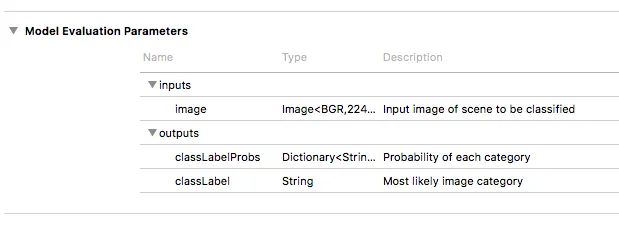
我从之前的StackOverflow帖子中获取了这段代码(最后一个答案在这里)。我知道这段代码可能不正确,但是我不知道该如何自己编写。我相信这是包含错误的部分。模型需要以下类型的输入:Image<RGB,224,224>


我创建了一个示例项目,其中包含完整的代码,可以在此处找到:https://hackernoon.com/swift-tutorial-native-machine-learning-and-machine-vision-in-ios-11-11e1e88aa397 - Alex Wulff
3个回答

46

您不需要自己进行大量图像处理,就可以使用Core ML模型与图像一起使用 - 新的Vision框架可以代替您完成这项工作。

import Vision
import CoreML

let model = try VNCoreMLModel(for: MyCoreMLGeneratedModelClass().model)
let request = VNCoreMLRequest(model: model, completionHandler: myResultsMethod)
let handler = VNImageRequestHandler(url: myImageURL)
handler.perform([request])

func myResultsMethod(request: VNRequest, error: Error?) {
    guard let results = request.results as? [VNClassificationObservation]
        else { fatalError("huh") }
    for classification in results {
        print(classification.identifier, // the scene label
              classification.confidence)
    }

}

WWDC17 Vision的会议应该会提供更多信息 - 明天下午举行。


非常好用(需要一些修改),谢谢。我没有意识到Vision针对从图像输入输出信息的模型有特定类型的请求。我想我应该更加注意文档... - Alex Wulff
对于原始问题,VNImageRequestHandler(cgImage: CGImage) 更为合适。 - chengsam
@chengsam 不完全是这样——原始问题是从磁盘上的资源开始的。将其作为 UIImage 读入,转换为 CGImage,并将其传递给 Vision 会丢失元数据,但传递资源 URL 可以使该元数据对 Vision 可用。 - rickster
4
如果MLModel需要灰度图像,VNImageRequestHandler会将其转换为灰度图像吗? - mskw

15

你可以使用纯CoreML,但是你需要将图片调整大小为(224,224)

    DispatchQueue.global(qos: .userInitiated).async {
        // Resnet50 expects an image 224 x 224, so we should resize and crop the source image
        let inputImageSize: CGFloat = 224.0
        let minLen = min(image.size.width, image.size.height)
        let resizedImage = image.resize(to: CGSize(width: inputImageSize * image.size.width / minLen, height: inputImageSize * image.size.height / minLen))
        let cropedToSquareImage = resizedImage.cropToSquare()

        guard let pixelBuffer = cropedToSquareImage?.pixelBuffer() else {
            fatalError()
        }
        guard let classifierOutput = try? self.classifier.prediction(image: pixelBuffer) else {
            fatalError()
        }

        DispatchQueue.main.async {
            self.title = classifierOutput.classLabel
        }
    }

// ...

extension UIImage {

    func resize(to newSize: CGSize) -> UIImage {
        UIGraphicsBeginImageContextWithOptions(CGSize(width: newSize.width, height: newSize.height), true, 1.0)
        self.draw(in: CGRect(x: 0, y: 0, width: newSize.width, height: newSize.height))
        let resizedImage = UIGraphicsGetImageFromCurrentImageContext()!
        UIGraphicsEndImageContext()

        return resizedImage
    }

    func cropToSquare() -> UIImage? {
        guard let cgImage = self.cgImage else {
            return nil
        }
        var imageHeight = self.size.height
        var imageWidth = self.size.width

        if imageHeight > imageWidth {
            imageHeight = imageWidth
        }
        else {
            imageWidth = imageHeight
        }

        let size = CGSize(width: imageWidth, height: imageHeight)

        let x = ((CGFloat(cgImage.width) - size.width) / 2).rounded()
        let y = ((CGFloat(cgImage.height) - size.height) / 2).rounded()

        let cropRect = CGRect(x: x, y: y, width: size.height, height: size.width)
        if let croppedCgImage = cgImage.cropping(to: cropRect) {
            return UIImage(cgImage: croppedCgImage, scale: 0, orientation: self.imageOrientation)
        }

        return nil
    }

    func pixelBuffer() -> CVPixelBuffer? {
        let width = self.size.width
        let height = self.size.height
        let attrs = [kCVPixelBufferCGImageCompatibilityKey: kCFBooleanTrue,
                     kCVPixelBufferCGBitmapContextCompatibilityKey: kCFBooleanTrue] as CFDictionary
        var pixelBuffer: CVPixelBuffer?
        let status = CVPixelBufferCreate(kCFAllocatorDefault,
                                         Int(width),
                                         Int(height),
                                         kCVPixelFormatType_32ARGB,
                                         attrs,
                                         &pixelBuffer)

        guard let resultPixelBuffer = pixelBuffer, status == kCVReturnSuccess else {
            return nil
        }

        CVPixelBufferLockBaseAddress(resultPixelBuffer, CVPixelBufferLockFlags(rawValue: 0))
        let pixelData = CVPixelBufferGetBaseAddress(resultPixelBuffer)

        let rgbColorSpace = CGColorSpaceCreateDeviceRGB()
        guard let context = CGContext(data: pixelData,
                                      width: Int(width),
                                      height: Int(height),
                                      bitsPerComponent: 8,
                                      bytesPerRow: CVPixelBufferGetBytesPerRow(resultPixelBuffer),
                                      space: rgbColorSpace,
                                      bitmapInfo: CGImageAlphaInfo.noneSkipFirst.rawValue) else {
                                        return nil
        }

        context.translateBy(x: 0, y: height)
        context.scaleBy(x: 1.0, y: -1.0)

        UIGraphicsPushContext(context)
        self.draw(in: CGRect(x: 0, y: 0, width: width, height: height))
        UIGraphicsPopContext()
        CVPixelBufferUnlockBaseAddress(resultPixelBuffer, CVPixelBufferLockFlags(rawValue: 0))

        return resultPixelBuffer
    }
}

mimodel文件中,您可以找到输入的预期图像大小: enter image description here

您可以在此处找到使用纯CoreML和Vision变体的演示项目:https://github.com/handsomecode/iOS11-Demos/tree/coreml_vision/CoreML/CoreMLDemo


我记得在Vision会议上(或者其他机器学习会议上)听说过不需要调整图像大小...也许我错了。 - pinkeerach
4
如果您使用Vision API(如我在回答中提到的VNCoreMLRequest),则无需调整图像大小,因为Vision会为您处理图像处理部分。如果您直接使用Core ML(不使用Vision),则需要自行调整图像大小和格式(根据您使用的特定模型所需)并将其转换为CVPixelBuffer - rickster
@mauryat,你的示例项目什么也没做。实际上没有任何代码。 - zumzum
@zumzum,你可以在这里查看我的示例 https://github.com/handsomecode/iOS11-Demos/tree/coreml_vision ,我已经实现了两种方法。 - coldfire
@zumzum 不好意思,我想我在没有提交的情况下进行了推送。在我修复之前,我将从评论中删除我的链接。 - mauryat

2
如果输入是 UIImage,而不是 URL,并且您想使用 VNImageRequestHandler,则可以使用 CIImage
func updateClassifications(for image: UIImage) {

    let orientation = CGImagePropertyOrientation(image.imageOrientation)

    guard let ciImage = CIImage(image: image) else { return }

    let handler = VNImageRequestHandler(ciImage: ciImage, orientation: orientation)

}

来自使用Vision和Core ML对图像进行分类的内容。


网页内容由stack overflow 提供, 点击上面的
可以查看英文原文,
原文链接