我有一个继承了AppCompatPreferenceActivity的SettingsActivity。
我的 pref_headers.xml 看起来像这样:
<preference-headers xmlns:android="http://schemas.android.com/apk/res/android">
    <header
        android:fragment="com.blabla.activities.fragments.ProfileFragment"
        android:icon="@drawable/ic_users"
        android:title="Profil">
    </header>
</preference-headers>
代码片段如下:
@TargetApi(Build.VERSION_CODES.HONEYCOMB)
public class ProfileFragment extends PreferenceFragment {
    @BindView(R.id.email)
    TextView email;
    @BindView(R.id.username)
    TextView username;
    @BindView(R.id.loadingPanel)
    RelativeLayout loadingPanel;

    @Override
    public View onCreateView(LayoutInflater inflater, ViewGroup container, Bundle savedInstanceState) {
        View rootView = inflater.inflate(R.layout.fragment_profile, container, false);
        ButterKnife.bind(this, rootView);

        if (setActionbarListener != null) {
            setActionbarListener.setActionbarTitle("Profil");
        }

        loadingPanel.setVisibility(View.VISIBLE);
        UsernameHandler uHandler = UsernameHandler.getInstance(new UsernameResult() {
            @Override
            public void finished(String uname) {
                username.setText(uname);
                loadingPanel.setVisibility(View.GONE);  // hide loading spinner
            }
        });
        email.setText(MainActivity.getFbUser().getEmail());

        return rootView;
    }
}
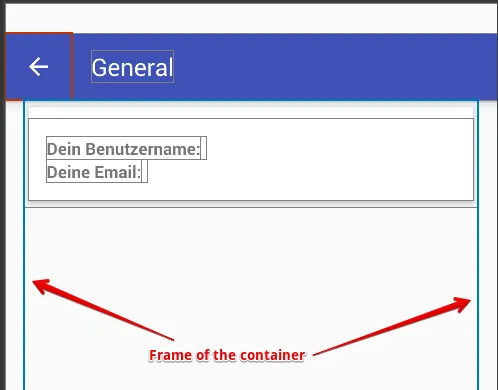
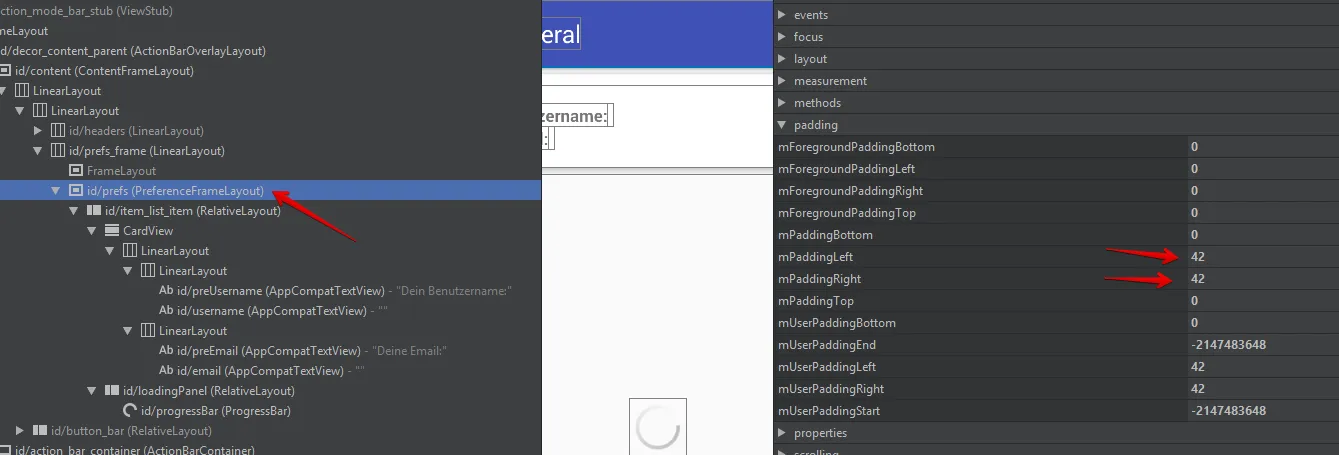
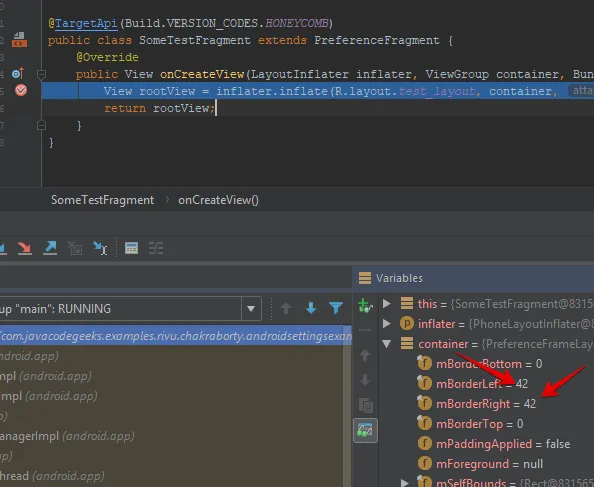
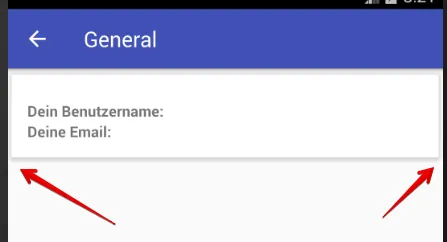
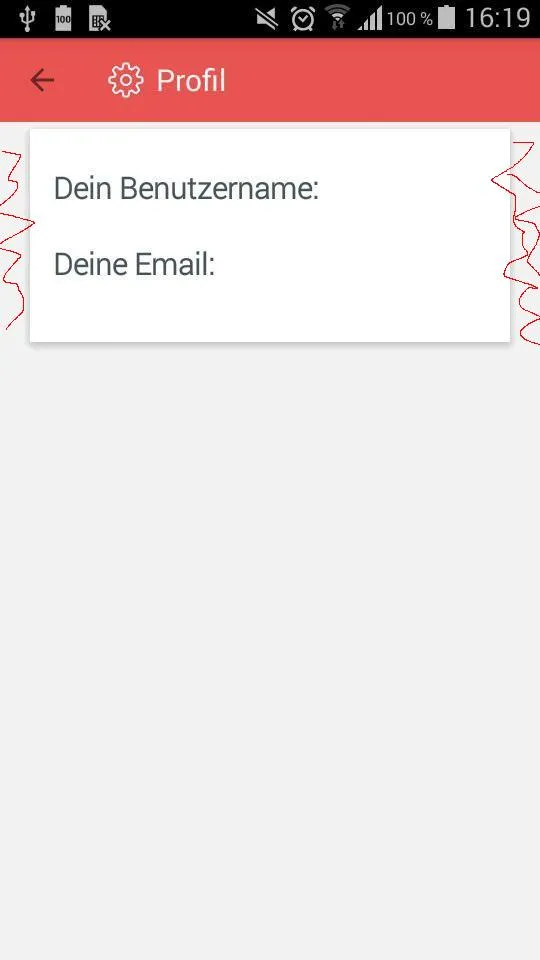
我的问题是,我加载的布局左右两侧有些空白。这个内边距明显不是来自于布局本身。在Android 8.1中启动应用程序时,没有这样的内边距/外边距。
请看图片:
最后是SettingsActivity的代码:
public class SettingsActivity extends AppCompatPreferenceActivity implements OnSetActionbarTitleListener {

    /**
     * A preference value change listener that updates the preference's summary
     * to reflect its new value.
     */
    private static Preference.OnPreferenceChangeListener sBindPreferenceSummaryToValueListener = new Preference.OnPreferenceChangeListener() {
        @Override
        public boolean onPreferenceChange(Preference preference, Object value) {
            String stringValue = value.toString();

            if (preference instanceof ListPreference) {
                // For list preferences, look up the correct display value in
                // the preference's 'entries' list.
                ListPreference listPreference = (ListPreference) preference;
                int index = listPreference.findIndexOfValue(stringValue);

                // Set the summary to reflect the new value.
                preference.setSummary(
                        index >= 0
                                ? listPreference.getEntries()[index]
                                : null);

            } else if (preference instanceof RingtonePreference) {
                // For ringtone preferences, look up the correct display value
                // using RingtoneManager.
                if (TextUtils.isEmpty(stringValue)) {
                    // Empty values correspond to 'silent' (no ringtone).
                    preference.setSummary(R.string.pref_ringtone_silent);

                } else {
                    Ringtone ringtone = RingtoneManager.getRingtone(
                            preference.getContext(), Uri.parse(stringValue));

                    if (ringtone == null) {
                        // Clear the summary if there was a lookup error.
                        preference.setSummary(null);
                    } else {
                        // Set the summary to reflect the new ringtone display
                        // name.
                        String name = ringtone.getTitle(preference.getContext());
                        preference.setSummary(name);
                    }
                }

            } else {
                // For all other preferences, set the summary to the value's
                // simple string representation.
                preference.setSummary(stringValue);
            }
            return true;
        }
    };

    /**
     * Helper method to determine if the device has an extra-large screen. For
     * example, 10" tablets are extra-large.
     */
    private static boolean isXLargeTablet(Context context) {
        return (context.getResources().getConfiguration().screenLayout
                & Configuration.SCREENLAYOUT_SIZE_MASK) >= Configuration.SCREENLAYOUT_SIZE_XLARGE;
    }

    /**
     * Binds a preference's summary to its value. More specifically, when the
     * preference's value is changed, its summary (line of text below the
     * preference title) is updated to reflect the value. The summary is also
     * immediately updated upon calling this method. The exact display format is
     * dependent on the type of preference.
     *
     * @see #sBindPreferenceSummaryToValueListener
     */
    public static void bindPreferenceSummaryToValue(Preference preference) {
        // Set the listener to watch for value changes.
        preference.setOnPreferenceChangeListener(sBindPreferenceSummaryToValueListener);

        // Trigger the listener immediately with the preference's
        // current value.
        sBindPreferenceSummaryToValueListener.onPreferenceChange(preference,
                PreferenceManager
                        .getDefaultSharedPreferences(preference.getContext())
                        .getString(preference.getKey(), ""));
    }

    @Override
    protected void onCreate(Bundle savedInstanceState) {
        super.onCreate(savedInstanceState);
        setupActionBar();
    }


    /**
     * Set up the {@link android.app.ActionBar}, if the API is available.
     */
    private void setupActionBar() {
        getLayoutInflater().inflate(R.layout.pref_toolbar, (ViewGroup)findViewById(android.R.id.content));
        Toolbar toolbar = findViewById(R.id.toolbar);
        setSupportActionBar(toolbar);

        if (toolbar != null) {
            getSupportActionBar().setDisplayHomeAsUpEnabled(true);
        }

        setActionBarBelowContent();
    }

    private void setActionBarBelowContent() {
        int horizontalMargin = (int) TypedValue.applyDimension(TypedValue.COMPLEX_UNIT_DIP, 2, getResources().getDisplayMetrics());
        int verticalMargin = (int) TypedValue.applyDimension(TypedValue.COMPLEX_UNIT_DIP, 2, getResources().getDisplayMetrics());
        int actionBarHeight = UserInterfaceUtils.getActionBarHeight(MainActivity.context);
        getListView().setPadding(0, actionBarHeight+10, 0, verticalMargin);
    }

    @Override
    public void onHeaderClick(Header header, int position) {
        setActionBarBelowContent();
        super.onHeaderClick(header, position);
    }

    @Override
    public boolean onMenuItemSelected(int featureId, MenuItem item) {
        int id = item.getItemId();
        if (id == android.R.id.home) {
            onBackPressed();
            return true;
        }
        return super.onMenuItemSelected(featureId, item);
    }

    /**
     * {@inheritDoc}
     */
    @Override
    public boolean onIsMultiPane() {
        return isXLargeTablet(this);
    }

    /**
     * {@inheritDoc}
     */
    @Override
    @TargetApi(Build.VERSION_CODES.HONEYCOMB)
    public void onBuildHeaders(List<Header> target) {
        loadHeadersFromResource(R.xml.pref_headers, target);
    }

    /**
     * This method stops fragment injection in malicious applications.
     * Make sure to deny any unknown fragments here.
     */
    @Override
    protected boolean isValidFragment(String fragmentName) {
        return PreferenceFragment.class.getName().equals(fragmentName)
                || SettingsFragment.class.getName().equals(fragmentName)
                || FeedbackFragment.class.getName().equals(fragmentName)
                || ProfileFragment.class.getName().equals(fragmentName)
                || AGBFragment.class.getName().equals(fragmentName)
                || PrivacyFragment.class.getName().equals(fragmentName)
                || FAQFragment.class.getName().equals(fragmentName)
                || LicenseFragment.class.getName().equals(fragmentName);
    }

    @Override
    public void onBackPressed() {
        super.onBackPressed();
        setActionbarTitle("Einstellungen");
    }

    @Override
    public void setActionbarTitle(String title) {
        getSupportActionBar().setTitle(title);
    }
}
编辑 - 添加布局
<RelativeLayout xmlns:android="http://schemas.android.com/apk/res/android"
    xmlns:app="http://schemas.android.com/apk/res-auto"
    android:id="@+id/item_list_item"
    android:layout_width="match_parent"
    android:layout_height="match_parent">

    <android.support.v7.widget.CardView
        android:layout_width="match_parent"
        android:layout_height="wrap_content"
        app:cardUseCompatPadding="true"
        app:cardElevation="4dp"
        app:cardCornerRadius="0dp">

        <LinearLayout
            android:layout_width="match_parent"
            android:layout_height="match_parent"
            android:layout_marginTop="10dp"
            android:padding="15dp"
            android:orientation="vertical">

            <LinearLayout
                android:layout_width="wrap_content"
                android:layout_height="wrap_content"
                android:orientation="horizontal">

                <TextView
                    android:id="@+id/preUsername"
                    android:layout_width="match_parent"
                    android:layout_height="wrap_content"
                    android:text="Dein Benutzername:"
                    android:textAppearance="@style/profileText"
                    android:textStyle="bold"/>

                <TextView
                    android:id="@+id/username"
                    android:layout_width="match_parent"
                    android:layout_height="wrap_content"
                    android:textAppearance="@style/profileText"
                    android:layout_marginLeft="5dp"/>

            </LinearLayout>

            <LinearLayout
                android:layout_width="wrap_content"
                android:layout_height="wrap_content"
                android:orientation="horizontal">

                <TextView
                    android:id="@+id/preEmail"
                    android:layout_width="match_parent"
                    android:layout_height="wrap_content"
                    android:textAppearance="@style/profileText"
                    android:textStyle="bold"
                    android:text="Deine Email:"/>

                <TextView
                    android:id="@+id/email"
                    android:layout_width="match_parent"
                    android:layout_height="wrap_content"
                    android:textAppearance="@style/profileText"
                    android:layout_marginLeft="5dp"/>

            </LinearLayout>

        </LinearLayout>
    </android.support.v7.widget.CardView>

    <RelativeLayout
        android:id="@+id/loadingPanel"
        android:layout_width="match_parent"
        android:layout_height="match_parent"
        android:layout_gravity="center_vertical|center_horizontal"
        android:gravity="center">

        <ProgressBar
            android:id="@+id/progressBar"
            style="@style/MyProgressBarSpinner"
            android:layout_width="wrap_content"
            android:layout_height="wrap_content"
            android:indeterminate="true" />
    </RelativeLayout>

</RelativeLayout>