如何在tkinter画布上绘制弧线?

7

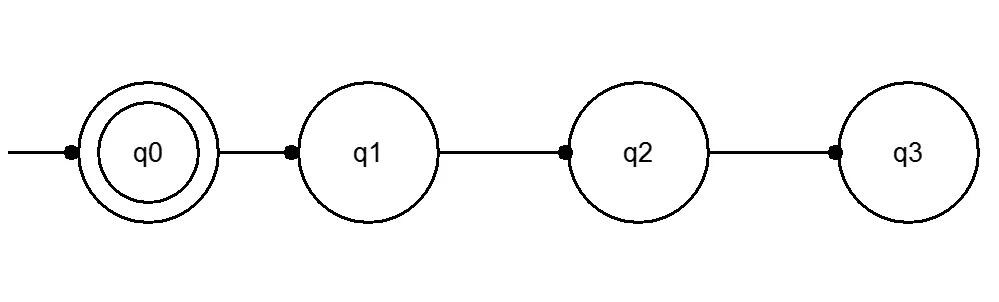
我正在学习自动机理论,需要编写一个类似下图所示的自动机图形(树形结构):
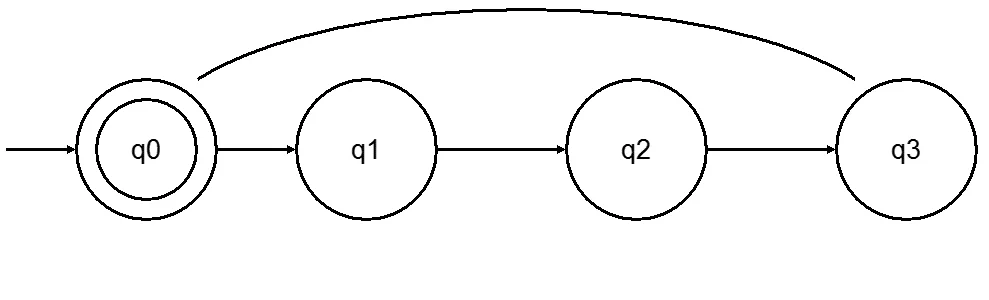
this

目前我已经得到了以下结果(使用tkintercanvas进行绘制):

from tkinter import Tk, Canvas, mainloop

def circle(canvas, x, y, r, width):
   id = canvas.create_oval (x-r, y-r, x+r, y+r, width = width)
   return id

def line (canvas, x1, y1, x2, y2, width):
    canvas.create_line (x1, y1, x2, y2, width = width)

def text (canvas, x, y, text):
    canvas.create_text (x, y, text = text, font = ("bold", 20))

w = Canvas(Tk (), width=1000, height=600, bg = "white")

circle (w , 150, 300, 70, 3)
circle (w , 150, 300, 50, 3)
circle (w , 370, 300, 70, 3)
circle (w , 640, 300, 70, 3)
circle (w , 910, 300, 70, 3)

line (w, 10, 300, 80, 300, 3)
circle (w, 73, 300, 5, 6)
line (w, 220, 300, 300, 300, 3)
circle (w, 293, 300, 5, 6)
line (w, 440, 300, 570, 300, 3)
circle (w, 567, 300, 5, 6)
line (w, 710, 300, 840, 300, 3)
circle (w, 837, 300, 5, 6)

text (w, 150, 300, "q0")
text (w, 370, 300, "q1")
text (w, 640, 300, "q2")
text (w, 910, 300, "q3")

w.pack()
mainloop()

这会显示出以下内容:

当前代码创建的图像的屏幕截图

我不需要箭头,因为我要用点代替它们。问题是我需要从圆圈q3到圆圈q0画一条线,并且也需要从圆圈q0到圆圈q0画一条线(一个“bucle”)。我尝试了canvas.create_arc()方法,但我无法掌握它。还有其他方法吗?有没有关于如何绘制“bucle”的想法?


你对
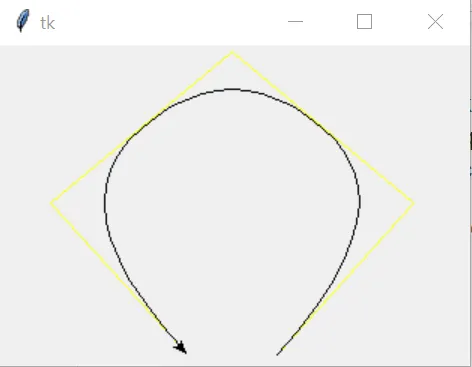
canvas.create_arc()方法有什么不理解的地方呢?请具体说明或者展示你尝试使用它的代码。顺便提一句,canvas.create_line()方法支持箭头。 - martineau
我不理解该方法需要的坐标,以便我可以在任何圆上绘制一个循环(我认为它是起始点、结束点和高度)。我该如何绘制箭头?谢谢! - abhera
你读过这个吗?http://infohost.nmt.edu/tcc/help/pubs/tkinter/web/create_arc.html“画布上的弧对象,在其最一般形式中,是从椭圆中取出的楔形切片。点(x0, y0)是矩形左上角,而(x1, y1)是右下角,在这个矩形中可以契合椭圆。如果这个矩形是正方形,则会得到一个圆。” - jcfollower
范围:切片的宽度(以度为单位)。切片从起始选项给定的角度开始,逆时针延伸至范围度数。 - jcfollower
对于任何感兴趣的人,这里是 canvas.create_arc()canvas.create_line() 方法的更新文档链接。 - martineau
显示剩余3条评论
2个回答

7
这里提供了一些实用函数,可以在tkinter.Canvas上绘制弧形的另一种方式。这些弧形函数不同于通常的通过两个点((x0, y0)(x1, y1))定义一个包围矩形的方式,而是接受一个起始角度和结束角度,范围为开区间[0..360)度。
此外,它还演示了如何在直线末端绘制箭头(但不适用于弧形),因为你也问到了这个问题。
from tkinter import Canvas, mainloop, Tk

def circle(canvas, x, y, r, width):
    return canvas.create_oval(x+r, y+r, x-r, y-r, width=width)

def circular_arc(canvas, x, y, r, t0, t1, width):
    return canvas.create_arc(x-r, y-r, x+r, y+r, start=t0, extent=t1-t0,
                             style='arc', width=width)

def ellipse(canvas, x, y, r1, r2, width):
    return canvas.create_oval(x+r1, y+r2, x-r1, y-r2, width=width)

def elliptical_arc(canvas, x, y, r1, r2, t0, t1, width):
    return canvas.create_arc(x-r1, y-r2, x+r1, y+r2, start=t0, extent=t1-t0,
                             style='arc', width=width)

def line(canvas, x1, y1, x2, y2, width, start_arrow=0, end_arrow=0):
    arrow_opts = start_arrow << 1 | end_arrow
    arrows = {0b10: 'first', 0b01: 'last', 0b11: 'both'}.get(arrow_opts, None)
    return canvas.create_line(x1, y1, x2, y2, width=width, arrow=arrows)

def text(canvas, x, y, text):
    return canvas.create_text(x, y, text=text, font=('bold', 20))


w = Canvas(Tk(), width=1000, height=600, bg='white')

circle(w, 150, 300, 70, 3)  # q0 outer edge
circle(w, 150, 300, 50, 3)  # q0 inner edge
circle(w, 370, 300, 70, 3)  # q1
circle(w, 640, 300, 70, 3)  # q2
circle(w, 910, 300, 70, 3)  # q3

# Draw arc from circle q3 to q0.
midx, midy = (150+910) / 2, 300
r1, r2 = 910-midx, 70+70
elliptical_arc(w, midx, midy, r1, r2, 30, 180-30, 3)

line(w,  10, 300,  80, 300, 3, end_arrow=1)
line(w, 220, 300, 300, 300, 3, end_arrow=1)
line(w, 440, 300, 570, 300, 3, end_arrow=1)
line(w, 710, 300, 840, 300, 3, end_arrow=1)

text(w, 150, 300, 'q0')
text(w, 370, 300, 'q1')
text(w, 640, 300, 'q2')
text(w, 910, 300, 'q3')

w.pack()
mainloop()

这是它绘制的内容:

screenshot showing output

它没有像您想要的那样画出一个“扣环”,部分原因是因为“从圆q3到圆q0画一条线,然后从圆q0到圆q0画一条线”并不像您问题开头的插图,那是在两个圆之间画的(如果我正确理解了您使用的术语)。但是,它提供了另一种在画布上绘制弧线的方法。

1

您可以使用tkinter画布(Canvas)来绘制您的“桶”形状,方法是通过一系列排列好的点绘制线条(应该是一个圆形)。下面是我的示例代码,展示如何绘制一个带有“桶”形状的返回角度。我使用的是Python 3.9版本。

import tkinter as tk

def P(x,y):
    """
    For convenience only.
    Transform point in cartesian (x,y) to Canvas (X,Y)
    As both system has difference y direction:
    Cartesian y-axis from bottom-left - up 
    Canvas Y-axis from top-left - down 
    """
    X = M + (x/xmax) * (W-2*M)
    Y = M + (1-(y/ymax)) * (H-2*M)
    return (X,Y)

def draw(window):
    """"
    Draw the lines
    """
    c = tk.Canvas(window, width=W, height=H)
    c.grid()
    
    # tuple of points to shape a 'bucket'
    points = P(60,0), P(90,50), P(50,100), P(10,50), P(40,0)
    
    fracture = c.create_line(points, arrow='last', fill='yellow')
    smooth = c.create_line(points, arrow='last', smooth=1)
   
"""
xmin is minimum value along cartesian x-axis
xmax is maximum value along cartesian x-axis
ymin is minimum value along cartesian y-axis
ymax is maximum value along cartesian y-axis
W is canvas width, in pixel
H is canvas height, in pixel
M is minimum margin inside canvas to ensure objects like arrow fully shown.

"""
M = 4  
W = 310
H = 210
xmin = 0
xmax = 100
ymin = 0
ymax = 100    

window = tk.Tk()
draw(window)
window.mainloop()

如果您运行上述代码,您将看到一个黄色的断裂线,这是原始点线,以及一条黑色的平滑线,与选项smooth设置为1和选项arrow设置为'last'相同。
这里是结果。

enter image description here


网页内容由stack overflow 提供, 点击上面的
可以查看英文原文,
原文链接