谷歌地图iOS SDK:自定义图标用作标记

20
Android API有一个非常方便的类IconGenerator,可以在我的Android应用中使用IconGenerator轻松制作一个标记,该标记具有以下特点:
  1. 是我选择的颜色的简单矩形。
  2. 调整大小以容纳任意长度的文本。
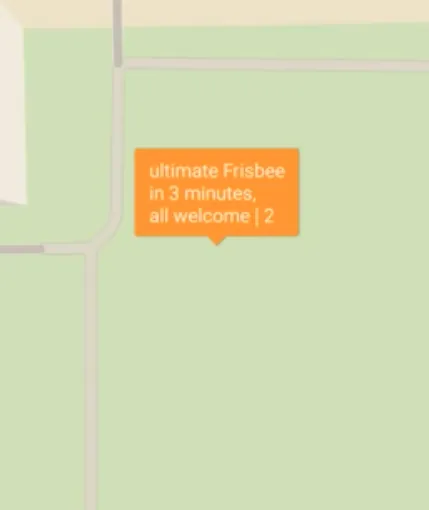
  3. 不是信息窗口 - 我希望标记本身包含如下图所示的文本。

enter image description here

// Android - problem solved with IconGenerator
IconGenerator iconGenerator = new IconGenerator(context);
iconGenerator.setStyle(IconGenerator.STYLE_GREEN); // or any other color
Bitmap iconBitmap = iconGenerator.makeIcon(myString);
Marker m = new MarkerOptions().icon(BitmapDescriptorFactory.fromBitmap(iconBitmap))
                              .position(myLatLng);
map.addMarker(m); // map is a com.google.android.gms.maps.GoogleMap

有没有一种方法可以在iOS中使用Swift来执行这么简单的操作? 最近发布了iOS API的最新版本,允许“标记定制”,但我不知道如何将其应用于此用例。

// iOS (Swift) - I don't know how to create the icon as in code above
let marker = GMSMarker(position: myLatLng)
marker.icon = // How can I set to a rectangle with color/text of my choosing?
marker.map = map // map is a GMSMapView

1
这就是我所提到的,创建一个与你的Android相同的UIView,其中包含你的$价格,然后从中创建一个UIImage,我已经为此提供了相同的函数。 - Rajan Maheshwari
我在看到你更新的答案之前编辑了我的问题。我明天会实现这个。同时,您能否更具体地说明UIVIew/label代码的样子。 - lf215
1
好的,我会尝试制作一个类似于您想要的视图。它只是一个将被转换为图像的视图。您可以使用BezierPaths来实现向下箭头形状的视图。此外,如果您不想要我在标记顶部所做的操作,只需删除“mapView.selectedMarker = marker”这一行,它就会变成一个简单的标记。 - Rajan Maheshwari
9个回答

39

这是我所做的

let marker = GMSMarker()

// I have taken a pin image which is a custom image
let markerImage = UIImage(named: "mapMarker")!.withRenderingMode(.alwaysTemplate)

//creating a marker view
let markerView = UIImageView(image: markerImage)

//changing the tint color of the image
markerView.tintColor = UIColor.red

marker.position = CLLocationCoordinate2D(latitude: 28.7041, longitude: 77.1025)

marker.iconView = markerView
marker.title = "New Delhi"
marker.snippet = "India"
marker.map = mapView

//comment this line if you don't wish to put a callout bubble
mapView.selectedMarker = marker

输出是

enter image description here

我的标记图片是

enter image description here

你可以根据需要更改颜色。如果想要一个矩形的话,你可以创建一个简单的小矩形图像并像上面那样使用它,并更改所需的颜色。
或者,如果你想要一个带有文本的矩形,你只需创建一个带有一些标签的小的UIView,然后将该UIView转换为UIImage并进行相同的操作。
//function to convert the given UIView into a UIImage
func imageWithView(view:UIView) -> UIImage {
    UIGraphicsBeginImageContextWithOptions(view.bounds.size, false, 0.0)
    view.layer.render(in: UIGraphicsGetCurrentContext()!)
    let image = UIGraphicsGetImageFromCurrentImageContext()
    UIGraphicsEndImageContext()
    return image!
}

希望能有所帮助!


我尝试使用带有约束代码的“imageWithView”(https://dev59.com/kVkR5IYBdhLWcg3w9Ryt#40567858):`let label = UILabel()label.widthAnchor.constraintEqualToConstant(50.0).active = true` 但由于“imageWithView”中的“UIGraphicsGetCurrentContext()”为空,因此我遇到了崩溃。 - lf215
如何设置中心标题和摘要? - Puji Wahono

6
以下是我为解决您面临的同样问题所做的工作。
我已将下面的图像添加到我的图像资源中: enter image description here 现在,我在我的代码中添加了以下方法:
-(UIImage*)drawText:(NSString*)text inImage:(UIImage*)image
{
    UIFont *font = [UIFont boldSystemFontOfSize:11];
    CGSize size = image.size;
    UIGraphicsBeginImageContextWithOptions(size, NO, 0.0f);
    [image drawInRect:CGRectMake(0, 0, size.width, size.height)];
    CGRect rect = CGRectMake(0, 0, image.size.width, image.size.height);

    NSMutableParagraphStyle *paragraphStyle = [[NSParagraphStyle defaultParagraphStyle] mutableCopy];
    paragraphStyle.alignment = NSTextAlignmentCenter;
    NSDictionary *attributes = @{
                                 NSFontAttributeName : font,
                                 NSParagraphStyleAttributeName : paragraphStyle,
                                 NSForegroundColorAttributeName : [UIColor redColor]
                                 };
    CGSize textSize = [text sizeWithAttributes:attributes];
    CGRect textRect = CGRectMake((rect.size.width-textSize.width)/2, (rect.size.height-textSize.height)/2 - 2, textSize.width, textSize.height);
    [text drawInRect:CGRectIntegral(textRect) withAttributes:attributes];

    UIImage *newImage = UIGraphicsGetImageFromCurrentImageContext();
    UIGraphicsEndImageContext();

    return newImage;
}

现在,我调用了这个方法,并将图标分配给 GMSMarker,如下所示:
marker.icon = [self drawText:@"$33.6" inImage:[UIImage imageNamed:@"icon-marker"]];

它将生成如下图像图标:

enter image description here

在这里,我保持了背景图像的大小不变,因为我需要。您仍然可以自定义它以根据文本大小和多行进行调整。

更新

Swift中的更新代码:

func drawText(text:NSString, inImage:UIImage) -> UIImage? {

        let font = UIFont.systemFont(ofSize: 11)
        let size = inImage.size

        //UIGraphicsBeginImageContext(size)
        let scale = UIScreen.main.scale
        UIGraphicsBeginImageContextWithOptions(inImage.size, false, scale)
        inImage.draw(in: CGRect(x: 0, y: 0, width: size.width, height: size.height))
        let style : NSMutableParagraphStyle = NSMutableParagraphStyle.default.mutableCopy() as! NSMutableParagraphStyle
        style.alignment = .center
        let attributes:NSDictionary = [ NSAttributedString.Key.font : font, NSAttributedString.Key.paragraphStyle : style, NSAttributedString.Key.foregroundColor : UIColor.black ]

        let textSize = text.size(withAttributes: attributes as? [NSAttributedString.Key : Any])
        let rect = CGRect(x: 0, y: 0, width: inImage.size.width, height: inImage.size.height)
        let textRect = CGRect(x: (rect.size.width - textSize.width)/2, y: (rect.size.height - textSize.height)/2 - 2, width: textSize.width, height: textSize.height)
        text.draw(in: textRect.integral, withAttributes: attributes as? [NSAttributedString.Key : Any])
        let resultImage = UIGraphicsGetImageFromCurrentImageContext()

        UIGraphicsEndImageContext()

        return resultImage
}

1
你能否请将这段代码改成Swift语言?如果这段代码使用Swift语言,并且包含了调整图像大小以容纳最多70个字符和最少3个字符的代码,那么我会选择它。 - lf215
你能提供最后一段的链接吗? - kelalaka
@kelalaka:我已经完成了自己的编程..我该如何提供代码链接?如果您需要其他帮助,请告诉我。 - Mehul Thakkar
请问您能否将您的代码更新为Swift 4或4.2? - steveSarsawa
@BhaveshM.Sarsawa:现在检查一下。 - Mehul Thakkar

5
您可以在谷歌地图中添加自定义视图作为标记。
let marker = GMSMarker(position: coordinate)
marker.iconView = view // Your Custom view here

你可以使用imageView(用于包含那个橙色的方框)和label(用于文本)放在上面。

这似乎是最快捷的方式。 - Iskeraet

5

我尝试重写了 Mehul Thakkar 的答案,使其适用于 Swift 3。希望它对你有用。但正如Dari所说,制作自定义视图真的更容易。

func drawText(text:NSString, inImage:UIImage) -> UIImage? {

        let font = UIFont.systemFont(ofSize: 11)
        let size = inImage.size

        UIGraphicsBeginImageContext(size)

        inImage.draw(in: CGRect(x: 0, y: 0, width: size.width, height: size.height))
        let style : NSMutableParagraphStyle = NSMutableParagraphStyle.default.mutableCopy() as! NSMutableParagraphStyle
        style.alignment = .center
        let attributes:NSDictionary = [ NSFontAttributeName : font, NSParagraphStyleAttributeName : style, NSForegroundColorAttributeName : UIColor.red ]

        let textSize = text.size(attributes: attributes as? [String : Any])
        let rect = CGRect(x: 0, y: 0, width: inImage.size.width, height: inImage.size.height)
        let textRect = CGRect(x: (rect.size.width - textSize.width)/2, y: (rect.size.height - textSize.height)/2 - 2, width: textSize.width, height: textSize.height)
        text.draw(in: textRect.integral, withAttributes: attributes as? [String : Any])
        let resultImage = UIGraphicsGetImageFromCurrentImageContext()

        UIGraphicsEndImageContext()

        return resultImage
    }

2

以下是Eridana将Mehul Thakkar的答案转换成Swift的版本,在此基础上,我为您提供了一份Swift 5版本。原始答案

func drawTextT(text:NSString, inImage:UIImage) -> UIImage? {

    let font = UIFont.systemFont(ofSize: 11)
    let size = inImage.size

    UIGraphicsBeginImageContext(size)

    inImage.draw(in: CGRect(x: 0, y: 0, width: size.width, height: size.height))
    let style : NSMutableParagraphStyle = NSMutableParagraphStyle.default.mutableCopy() as! NSMutableParagraphStyle
    style.alignment = .center
    let attributes:NSDictionary = [ NSAttributedString.Key.font : font, NSAttributedString.Key.paragraphStyle : style, NSAttributedString.Key.foregroundColor : UIColor.red ]

    //let textSize = text.size(attributes: attributes as? [String : Any])
    let textSize = text.size(withAttributes: attributes as? [NSAttributedString.Key : Any] )

    let rect = CGRect(x: 0, y: 0, width: inImage.size.width, height: inImage.size.height)
    let textRect = CGRect(x: (rect.size.width - textSize.width)/2, y: (rect.size.height - textSize.height)/2 - 2, width: textSize.width, height: textSize.height)
    text.draw(in: textRect.integral, withAttributes: attributes as? [NSAttributedString.Key : Any]  )

    let resultImage = UIGraphicsGetImageFromCurrentImageContext()

    UIGraphicsEndImageContext()

    return resultImage
}

0

更改图标的最简单和最方便的方法是,只需将这3个图标(默认marker.png)更换为您的图标(1x、2x、3x)。

在Google聚合中,存在一个关于标记(图标)更改的问题。

[1]: https://istack.dev59.com/pR3Rx.webp


0

如果你只有一张图片,最简单的方法是:

 marker.icon = #imageLiteral(resourceName: "fault_marker")

1) 在最新的XCode中,输入marker.icon = "imageLiteral"

2) 双击刚刚出现的虚拟图像图标。

3) 选择所需的图像。


0

这是我完全通过编程实现的方法:

//custom markers for the map
class CustomMarker: GMSMarker {

    var label: UILabel!

    init(labelText: String, imageName: String) {
        super.init()

        let iconView = UIImageView(frame: CGRect(origin: .zero, size: CGSize(width: 60, height: 60)))
        iconView.image = UIImage(named: imageName)//Assign image to ImageView
        
        
        if(labelText != "1"){
            label = UILabel(frame: CGRect(origin: .zero, size: CGSize(width: 25, height: 25)))
            label.frame.origin.x = 25;
            
            label.text = labelText
            label.layer.cornerRadius =  label.frame.width/2
            label.layer.masksToBounds = true
            label.backgroundColor = .white
            label.applyBorder(width: 0.5, color: .black)
            label.textAlignment = .center
            iconView.addSubview(label)
        }

        
        self.iconView = iconView
    }
}

函数调用:

let marker = CustomMarker(labelText: addressCount.description, imageName: mapItem.cMapType!.lowercased())

结果:

enter image description here


0
                    //func to get Image view 
                // Url String :-  Your image coming from server
//image :- Background image
                    func drawImageWithProfilePic(urlString:String, image: UIImage) -> UIImageView {

                        let imgView = UIImageView(image: image)
                        imgView.frame = CGRect(x: 0, y: 0, width: 90, height: 90)

                        let picImgView = UIImageView()
                        picImgView.sd_setImage(with:URL(string: urlString))
                        picImgView.frame = CGRect(x: 0, y: 0, width: 40, height: 40)
                        imgView.addSubview(picImgView)

                        picImgView.center.x = imgView.center.x
                        picImgView.center.y = imgView.center.y-10
                        picImgView.layer.cornerRadius = picImgView.frame.width/2
                        picImgView.clipsToBounds = true
                        imgView.setNeedsLayout()
                        picImgView.setNeedsLayout()

                //        let newImage = imageWithView(view: imgView)
                //        return newImage

                        return imgView
            }


    //SHOW ON MAP

         let marker = GMSMarker()
         marker.position = CLLocationCoordinate2D(latitude: Double(lat)!, longitude:  Double(long)!)
        marker.iconView = self.drawImageWithProfilePic(urlString:getProviderImage,image: UIImage.init(named: "red")!)

网页内容由stack overflow 提供, 点击上面的
可以查看英文原文,
原文链接