为什么我不能在这个二进制图像上进行斑点检测?

4

首先,我正在使用Python 2.7和OpenCV进行Blob检测。我想要做的是在颜色检测后完成Blob检测。我想要检测红色圆圈(标记),并避免其他Blob的干扰。因此,我想要先进行颜色检测,然后再进行Blob检测。
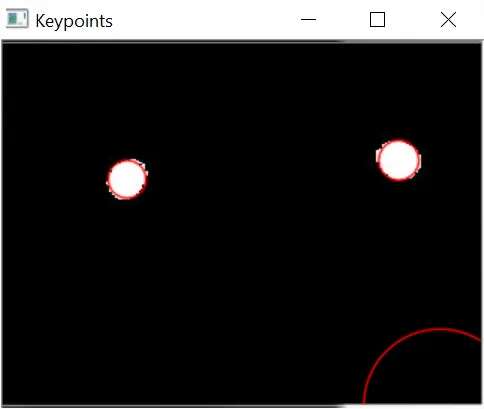
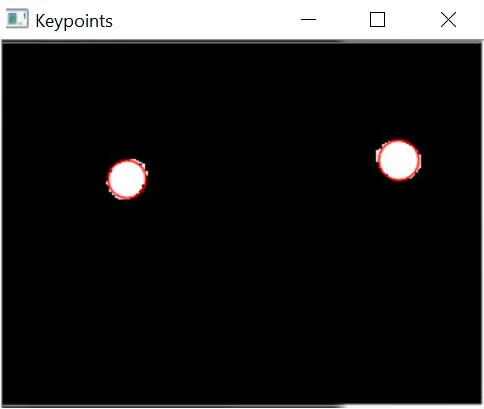
经过颜色检测后的图像为二值掩模

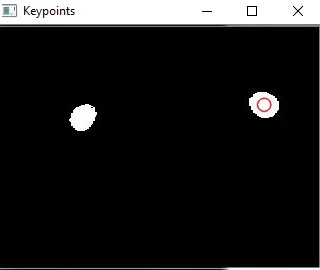
现在,我想在这个图像上进行Blob检测,但是它没有起作用。这是我的代码。

import cv2
import numpy as np;

# Read image
im = cv2.imread("myblob.jpg", cv2.IMREAD_GRAYSCALE)

# Set up the detector with default parameters.

params = cv2.SimpleBlobDetector_Params()
# Change thresholds
params.minThreshold = 10;    # the graylevel of images
params.maxThreshold = 200;

params.filterByColor = True
params.blobColor = 255

# Filter by Area
params.filterByArea = False
params.minArea = 10000

detector = cv2.SimpleBlobDetector(params)


# Detect blobs.
keypoints = detector.detect(im)

# Draw detected blobs as red circles.
# cv2.DRAW_MATCHES_FLAGS_DRAW_RICH_KEYPOINTS ensures the size of the circle corresponds to the size of blob
im_with_keypoints = cv2.drawKeypoints(im, keypoints, np.array([]), (0,0,255), cv2.DRAW_MATCHES_FLAGS_DRAW_RICH_KEYPOINTS)

# Show keypoints
cv2.imshow("Keypoints", im_with_keypoints)
cv2.waitKey(0)`

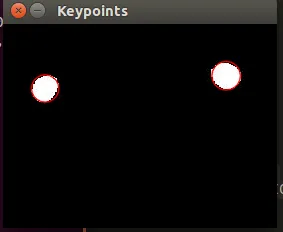
我对这段代码感到非常困惑,因为它可以在这张图片上运行:白点。我认为这张白点图片与二进制掩码非常相似,但为什么我不能在二进制图像上进行斑点检测呢?有人能告诉我其中的区别或正确的代码吗?
谢谢!!
敬礼, 南

1
我认为我需要一些额外的信息来帮助你。它可能无法正常工作的线索可能是blob的结构。在第一张图片中,白色像素并没有全部连接到一个大的blob上(这意味着有一些单个像素“漂浮”),而在第二张图片中,圆圈是完美的blob。 - meetaig
3个回答

7

看起来,Blob检测器默认启用了filterByInertiafilterByConvexity参数。 您可以在系统中检查此设置:

import cv2
params = cv2.SimpleBlobDetector_Params()
print params.filterByColor
print params.filterByArea
print params.filterByCircularity
print params.filterByInertia
print params.filterByConvexity

当你调用detector = cv2.SimpleBlobDetector(params)时,实际上使用默认的最小值和最大值进行惯性和凸度过滤。

如果你明确禁用这些过滤条件:

# Disable unwanted filter criteria params
params.filterByInertia = False
params.filterByConvexity = False

如果你调用detector = cv2.SimpleBlobDetector(params),你将得到以下图片:

blobing result

在该图片中,第三个blob是由于图像右下角的白框造成的。 如果框的位置总是相同的话,你可以裁剪图片,或者利用参数通过圆形过滤器过滤掉不需要的blob:

params.filterByCircularity = True
params.minCircularity = 0.1

而你最终会得到:

在此输入图像描述


3

这是一个与颜色过滤相关的OpenCV错误。您需要做的就是反转图像的颜色 -> 检测斑点 -> 再次反转以恢复原始颜色。

代码

import cv2
import numpy as np;

# Read image
im = cv2.imread("myblob.jpg", cv2.IMREAD_GRAYSCALE)

# Set up the detector with default parameters.
im=cv2.bitwise_not(im)

params = cv2.SimpleBlobDetector_Params()
detector = cv2.SimpleBlobDetector_create(params)


# Detect blobs.
keypoints = detector.detect(im)
im=cv2.bitwise_not(im)
# Draw detected blobs as red circles.
# cv2.DRAW_MATCHES_FLAGS_DRAW_RICH_KEYPOINTS ensures the size of the circle corresponds to the size of blob
im_with_keypoints = cv2.drawKeypoints(im, keypoints, np.array([]), (0,0,255), cv2.DRAW_MATCHES_FLAGS_DRAW_RICH_KEYPOINTS)

# Show keypoints
cv2.imshow("Keypoints", im_with_keypoints)
cv2.waitKey(0)

输出

在此输入图像描述


(注:本文中的“输出”指计算机程序或设备所产生的结果)

@ArjitMukherjee,我给你点赞了,你使用的查找blob的技术非常令人印象深刻。 - be_good_do_good

0

最简单的方法是@ArjitMukherjee所说的。

但我也赞同@meetaig最初评论中提到的两个图像中blob结构的差异

为什么它可能不起作用的线索可能是blob的结构。 在第一张图片中,白色像素并没有全部连接成一个大blob(意思是有一些单独的像素“漂浮”),而在第二张图片中,圆形是完美的blob

您需要微调算法,使其适应/对齐不同的blob结构

我进行了快速微调,部分满足您的要求:

import cv2
import numpy as np;

# Read image
im = cv2.imread("eRCe1.png", cv2.IMREAD_GRAYSCALE)
# Set up the detector with default parameters.

params = cv2.SimpleBlobDetector_Params()
# Change thresholds
params.minThreshold = 10;    # the graylevel of images
params.maxThreshold = 200;

params.filterByColor = True
params.blobColor = 255

# Filter by Area
params.filterByArea = True
params.minArea = 300

detector = cv2.SimpleBlobDetector(params)

# Detect blobs.
keypoints = detector.detect(im)

print keypoints
# Draw detected blobs as red circles.
# cv2.DRAW_MATCHES_FLAGS_DRAW_RICH_KEYPOINTS ensures the size of the circle corresponds to the size of blob
im_with_keypoints = cv2.drawKeypoints(im, keypoints, np.array([]), (0,0,255), cv2.DRAW_MATCHES_FLAGS_DRAW_RICH_KEYPOINTS)


cv2.imshow("Keypoints", im_with_keypoints)
cv2.waitKey(0)

在给定的两张图片上执行了上述代码,以下是输出结果

样例1:

sample #1

示例2:

sample #2


网页内容由stack overflow 提供, 点击上面的
可以查看英文原文,
原文链接