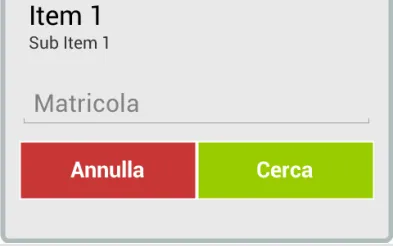
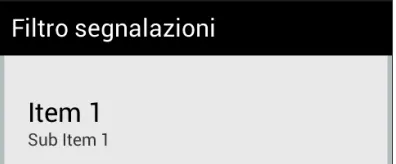
安卓 - 圆角线性布局被 fill_parent TextView 覆盖

3

图片描述

我需要在我的布局顶部添加这个

图片描述

实际上我拥有的是这个

目前有一个简单的选项,我没有计算。

圆角的Drawable

<?xml version="1.0" encoding="UTF-8"?>
<shape xmlns:android="http://schemas.android.com/apk/res/android">
    <solid android:color="#E9E9E9"/>
    <stroke android:width="4dip" android:color="#B1BCBE" />
    <corners android:radius="10dip"/>
    <padding android:left="0dip" android:top="0dip" android:right="0dip" android:bottom="0dip" />
</shape>

布局

<ScrollView xmlns:android="http://schemas.android.com/apk/res/android"
    android:id="@+id/home_root"
    android:layout_width="fill_parent"
    android:layout_height="fill_parent"
    android:background="@drawable/rounded_layout" >

    <LinearLayout
        android:layout_width="fill_parent"
        android:layout_height="wrap_content"
        android:orientation="vertical" >

        <TextView
            android:layout_width="fill_parent"
            android:layout_height="wrap_content"
            android:text="@string/filter_title"
            android:background="@android:color/black"
            android:textColor="@android:color/white"
            android:padding="10dp"
            android:textSize="20sp" />

        <LinearLayout
            android:layout_width="fill_parent"
            android:layout_height="wrap_content"
            android:orientation="vertical"
            android:padding="15dp" >

            <Spinner
                android:id="@+id/sp_intorno_a_me_proximity"
                android:layout_width="fill_parent"
                android:layout_height="wrap_content"
                android:layout_marginTop="10dp"
                android:spinnerMode="dialog" />
            .
            .
            .
            <EditText
                android:id="@+id/et_intorno_a_me_username"
                android:layout_width="fill_parent"
                android:layout_height="wrap_content"
                android:layout_marginTop="10dp"
                android:textSize="20sp"
                android:digits="abcdefghijklmnopqrstuvwxyzABCDEFGHIJKLMNOPQRSTUVWXYZ1234567890"
                android:hint="@string/agentNumber" />

            <LinearLayout
                android:layout_width="fill_parent"
                android:layout_height="wrap_content"
                android:orientation="horizontal"
                android:layout_marginTop="20dp"
                android:layout_marginBottom="10dp"
                android:weightSum="1" >

                <Button
                    android:id="@+id/btn_intorno_a_me_close_search"
                    android:layout_width="0dp"
                    android:layout_height="wrap_content"
                    android:layout_weight="0.5"
                    android:text="@string/annulla"
                    style="@style/HelianButtonRed"
                    android:textColor="@android:color/white" />

                <Button
                    android:id="@+id/btn_intorno_a_me_search"
                    android:layout_width="0dp"
                    android:layout_height="wrap_content"
                    android:layout_weight="0.5"
                    android:text="@string/find"
                    style="@style/HelianButtonGreen" />
            </LinearLayout>
        </LinearLayout>
    </LinearLayout>

</ScrollView>

我已经尝试将可绘制对象移动到第一个LinearLayout子元素中。

如何防止文本视图隐藏圆角?


为什么不在第二个LinearLayout内声明标题TextView?这样做的话,textView背景就不会重叠在你的圆角上了。 - Manishika
由于第二个线性布局的 **android:padding="15dp"**,结果将会被填充。我能否避免单个视图的填充? - Link 88
2个回答

3
通过Manishika的帮助(我投了赞成票,你也可以为我做同样的事情! :)),我发布了解决我的问题的方法!
使用以下父元素圆角样式:
<?xml version="1.0" encoding="UTF-8"?>
<shape xmlns:android="http://schemas.android.com/apk/res/android">
    <solid android:color="#E9E9E9"/>
    <stroke android:width="4dip" android:color="#B1BCBE" />
    <corners android:radius="10dip"/>
    <padding android:left="0dip" android:top="0dip" android:right="0dip" android:bottom="0dip" />
</shape>

我们需要将一个特定的drawable附加到TextView(或任何需要的视图)上。
以下是这个技巧所需的drawable:
我减去了2d。
    <corners 
        android:topLeftRadius="8dip"
        android:topRightRadius="8dip"
        android:bottomLeftRadius="0dip"
        android:bottomRightRadius="0dip" />
</shape>

请注意!!

图形化布局(预览)不会显示正确的四舍五入!您需要在设备上进行测试(如果您没有设备,则可以使用模拟器)。


2
在TextView的背景中尝试像这样的东西。 为TextView创建一个新的drawable.xml,并使用以下数据:
<?xml version="1.0" encoding="UTF-8"?>
<shape xmlns:android="http://schemas.android.com/apk/res/android">
    <solid android:color="#000000"/>
    <stroke android:width="4dip" android:color="#B1BCBE" />
    <corners 
        android:topLeftRadius="10dip"
        android:topRightRadius="10dip"
        android:bottomLeftRadius="0dip"
        android:bottomRightRadius="0dip"

        />
    <padding android:left="0dip" android:top="0dip" android:right="0dip"                  
      android:bottom="0dip" />

</shape>

我还没有尝试过,虽然我相信这个解决方法会起作用,但我想要一个更优雅的解决方案,不需要我复制半径和颜色两次(一次用于布局绘制,一次用于按钮绘制)。我想要将其泛化...无论如何,感谢你给我的时间! - Link 88
实际上,如果您已经给父布局设置了填充,则无法将填充从一个视图中移除。但是,您可以将TextView放置在一个没有填充的LinearLayout中,并将textView的LinearLayout和LinearLayout2都放置在一个LinearLayout中,并为此LinearLayout设置背景。这样,您的TextView将不会有填充。 - Manishika
我知道这是一种不好的做法。但你应该尝试一下。 - Manishika
没问题,我会试一下!你很快就会收到我的反馈。 - Link 88
几乎完美!当我设置 android:topLeftRadius="5dip" 时,所有的角都被圆化了,而不仅仅是左上角。 - Link 88

网页内容由stack overflow 提供, 点击上面的
可以查看英文原文,
原文链接