我想像这样扭曲一张图片,那么我需要为 context.setTransform 设置哪些参数呢?
我想像这样扭曲一张图片,那么我需要为 context.setTransform 设置哪些参数呢?
单纯的二维变换无法实现此效果。
使用二维变换可以通过将倾斜角度的正切值传递给setTransform()的第二个参数来使图像向上或向下倾斜,但是您希望以对称的方式执行这两种变形(导致“靠近”和/或“远离”变形)。您需要使用三维变换才能实现。
但是,您可以通过将图像切成若干水平的“条带”,并在渲染每个条带时应用不同的变换来模拟相同的结果。越靠近图像中心的条带将会应用更强的倾斜角度。例如:
var width = image.width,
    height = image.height,
    context = $("canvas")[0].getContext("2d");
for (var i = 0; i <= height / 2; ++i) {
    context.setTransform(1, -0.4 * i / height, 0, 1, 0, 60);
    context.drawImage(image,
        0, height / 2 - i, width, 2,
        0, height / 2 - i, width, 2);
    context.setTransform(1, 0.4 * i / height, 0, 1, 0, 60);
    context.drawImage(image,
        0, height / 2 + i, width, 2,
        0, height / 2 + i, width, 2);
}
function drawImageInPerspective(
        srcImg,
        targetCanvas,
        //Define where on the canvas the image should be drawn:
        //coordinates of the 4 corners of the quadrilateral that the original rectangular image will be transformed onto:
        topLeftX, topLeftY,
        bottomLeftX, bottomLeftY,
        topRightX, topRightY,
        bottomRightX, bottomRightY,
        //optionally flip the original image horizontally or vertically *before* transforming the original rectangular image to the custom quadrilateral:
        flipHorizontally,
        flipVertically
    ) {

    var srcWidth=srcImg.naturalWidth;
    var srcHeight=srcImg.naturalHeight;

    var targetMarginX=Math.min(topLeftX, bottomLeftX, topRightX, bottomRightX);
    var targetMarginY=Math.min(topLeftY, bottomLeftY, topRightY, bottomRightY);

    var targetTopWidth=(topRightX-topLeftX);
    var targetTopOffset=topLeftX-targetMarginX;
    var targetBottomWidth=(bottomRightX-bottomLeftX);
    var targetBottomOffset=bottomLeftX-targetMarginX;

    var targetLeftHeight=(bottomLeftY-topLeftY);
    var targetLeftOffset=topLeftY-targetMarginY;
    var targetRightHeight=(bottomRightY-topRightY);
    var targetRightOffset=topRightY-targetMarginY;

    var tmpWidth=Math.max(targetTopWidth+targetTopOffset, targetBottomWidth+targetBottomOffset);
    var tmpHeight=Math.max(targetLeftHeight+targetLeftOffset, targetRightHeight+targetRightOffset);

    var tmpCanvas=document.createElement('canvas');
    tmpCanvas.width=tmpWidth;
    tmpCanvas.height=tmpHeight;
    var tmpContext = tmpCanvas.getContext('2d');

    tmpContext.translate(
        flipHorizontally ? tmpWidth : 0,
        flipVertically ? tmpHeight : 0
    );
     tmpContext.scale(
        (flipHorizontally ? -1 : 1)*(tmpWidth/srcWidth),
        (flipVertically? -1 : 1)*(tmpHeight/srcHeight)
    );

    tmpContext.drawImage(srcImg, 0, 0);

    var tmpMap=tmpContext.getImageData(0,0,tmpWidth,tmpHeight);
    var tmpImgData=tmpMap.data;

    var targetContext=targetCanvas.getContext('2d');
    var targetMap = targetContext.getImageData(targetMarginX,targetMarginY,tmpWidth,tmpHeight);
    var targetImgData = targetMap.data;

    var tmpX,tmpY,
        targetX,targetY,
        tmpPoint, targetPoint;

    for(var tmpY = 0; tmpY < tmpHeight; tmpY++) {
        for(var tmpX = 0;  tmpX < tmpWidth; tmpX++) {

            //Index in the context.getImageData(...).data array.
            //This array is a one-dimensional array which reserves 4 values for each pixel [red,green,blue,alpha) stores all points in a single dimension, pixel after pixel, row after row:
            tmpPoint=(tmpY*tmpWidth+tmpX)*4;

            //calculate the coordinates of the point on the skewed image.
            //
            //Take the X coordinate of the original point and translate it onto target (skewed) coordinate:
            //Calculate how big a % of srcWidth (unskewed x) tmpX is, then get the average this % of (skewed) targetTopWidth and targetBottomWidth, weighting the two using the point's Y coordinate, and taking the skewed offset into consideration (how far topLeft and bottomLeft of the transformation trapezium are from 0).
            targetX=(
                       targetTopOffset
                       +targetTopWidth * tmpX/tmpWidth
                   )
                   * (1- tmpY/tmpHeight)
                   + (
                       targetBottomOffset
                       +targetBottomWidth * tmpX/tmpWidth
                   )
                   * (tmpY/tmpHeight)
            ;
            targetX=Math.round(targetX);

            //Take the Y coordinate of the original point and translate it onto target (skewed) coordinate:
            targetY=(
                       targetLeftOffset
                       +targetLeftHeight * tmpY/tmpHeight
                   )
                   * (1-tmpX/tmpWidth)
                   + (
                       targetRightOffset
                       +targetRightHeight * tmpY/tmpHeight
                   )
                   * (tmpX/tmpWidth)
            ;
            targetY=Math.round(targetY);

            targetPoint=(targetY*tmpWidth+targetX)*4;

            targetImgData[targetPoint]=tmpImgData[tmpPoint];  //red
            targetImgData[targetPoint+1]=tmpImgData[tmpPoint+1]; //green
            targetImgData[targetPoint+2]=tmpImgData[tmpPoint+2]; //blue
            targetImgData[targetPoint+3]=tmpImgData[tmpPoint+3]; //alpha
        }
    }

    targetContext.putImageData(targetMap,targetMarginX,targetMarginY);
}
以下是如何调用它:
function onLoad() {
    var canvas = document.createElement("canvas");
    canvas.id = 'canvas';
    canvas.width=800;
    canvas.height=800;
    document.body.appendChild(canvas);

    var img = new Image();
    img.onload = function(){
        //draw the original rectangular image as a 300x300 quadrilateral with its bottom-left and top-right corners skewed a bit:
        drawImageInPerspective(
         img, canvas,
         //coordinates of the 4 corners of the quadrilateral that the original rectangular image will be transformed onto:
         0, 0, //top left corner: x, y
         50, 300, //bottom left corner: x, y - position it 50px more to the right than the top right corner
         300, 50, //top right corner: x, y - position it 50px below the top left corner
         300, 300, //bottom right corner: x,y
         false, //don't flip the original image horizontally
         false //don't flip the original image vertically
        );
    }
    img.src="img/rectangle.png";
}
尽管进行了每个像素的计算,但实际上效率相当高,并且可以完成工作:
...但也可能有更优雅的方法来完成它。
skew()角度的余弦值,因为我们已经知道角度和斜边长度。
var canvas = document.getElementById('canvas');
var ctx = canvas.getContext('2d');

var alpha = 0;
var angle;
var opening = false;

window.addEventListener('mousedown', openDoor);

function openDoor() {
  opening = true;
}

var image = new Image();
var image2 = new Image();
image2.src = "https://i.ibb.co/7b19d5m/road-jpeg.png";

image.onload = function () {
  var width = image.width;
  var height = image.height;

  function animate() {
    if (opening && alpha < 60) alpha += 1;
    ctx.clearRect(0, 0, 400, 400);
    ctx.fillStyle = "black";
    ctx.fillRect(0,0,400,400);

    ctx.drawImage(image2,20, 60);
    angle = (alpha * Math.PI) / 180;

    ctx.save();
    for (var i = 0; i <= height / 2; ++i) {
      ctx.setTransform(1, (angle * i) / height, 0, 1, 20, 60);
      ctx.drawImage(
        image,
        0,
        height / 2 - i,
        width,
        2,
        0,
        height / 2 - i,
        width * Math.cos(angle),
        2
      );
      ctx.setTransform(1, (-angle * i) / height, 0, 1, 20, 60);
      ctx.drawImage(
        image,
        0,
        height / 2 + i,
        width,
        2,
        0,
        height / 2 + i,
        width * Math.cos(angle),
        2
      );
    }

    ctx.restore();

    requestAnimationFrame(animate);
  }

  animate();
};
image.src = 'https://i.ibb.co/thZfnYh/door-jpg.png';<canvas id="canvas" width="200" height="300"> </canvas>
<h3>Click on the door to open it</h3>这只是未来的事情,但它非常酷,我忍不住要添加它。
Chrome团队正在努力将非仿射变换添加到2D API。
这将向2D API添加一些方法,例如perspective()、rotate3d()、rotateAxis(),并扩展其他方法以添加z轴,同时改进setTransform()和transform()以最终接受3D DOMMatrix。
这仍然是非常实验性的,可能仍会发生变化,但您已经可以在启用chrome://flags/#enable-experimental-web-platform-features的Chrome Canary中尝试它。
if( CanvasRenderingContext2D.prototype.rotate3d ) {
  onload = (evt) => {
    const img = document.getElementById("img");
    const canvas = document.getElementById("canvas");
    const ctx = canvas.getContext("2d");
    ctx.translate(0, canvas.height/2);
    ctx.perspective(705); // yeah, magic numbers...
    ctx.rotate3d(0, (Math.PI/180) * 321, 0); // and more
    ctx.translate(0, -canvas.height/2);
    const ratio = img.naturalHeight / canvas.height;
    ctx.drawImage(img, 0, canvas.height/2 - img.naturalHeight/2);
  };
}else {
  console.error( "Your browser doesn't support affine transforms yet" );
}
body { margin: 0 }
canvas, img {
max-height: 100vh;
}<canvas id="canvas" width="330" height="426"></canvas>
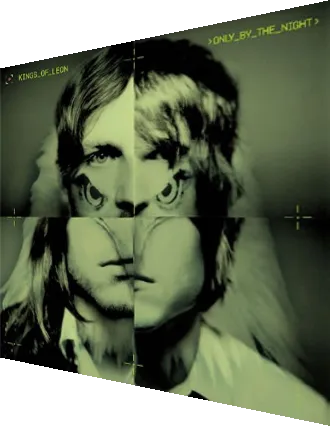
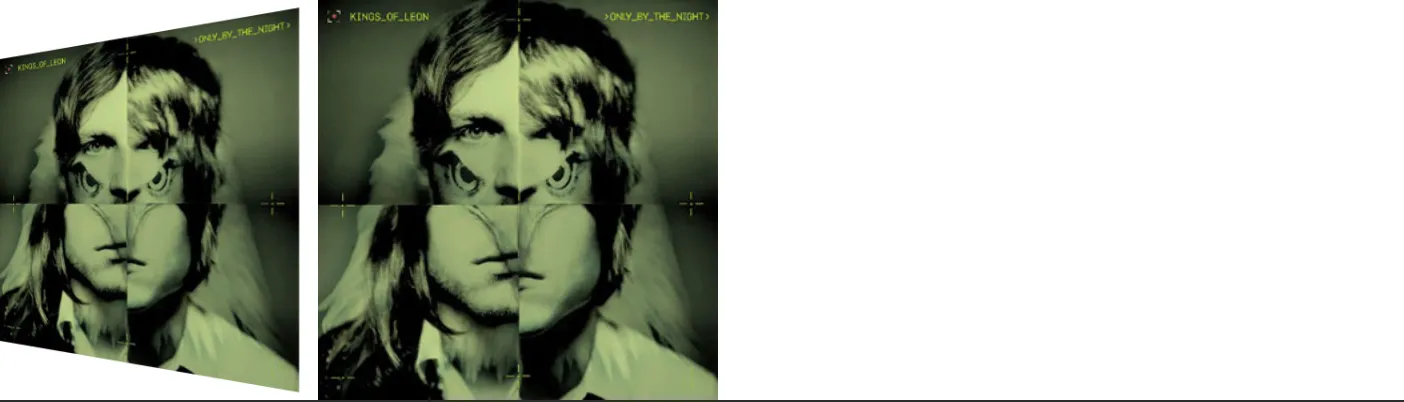
<img id="img" src="https://upload.wikimedia.org/wikipedia/en/f/f8/Only_By_the_Night_%28Kings_of_Leon_album_-_cover_art%29.jpg">在当前的Chrome Canary中呈现为
有一种方法可以将矩形转换为梯形,参见这个Stack Overflow答案。但是你需要对每个像素使用此方法。
你还可以将图像切成垂直条带,每个条带宽度为1像素,然后从中心拉伸每个条带。
假设这导致w个条带,并且您希望梯形的左边缘占右边缘的80%,则
对于条带n,拉伸应为1 + n /(4w)