更新:方法已经简化并且更易于理解,示例应用程序已经更新。
我认为我理解了你想要做的事情。你希望图形与您定义的StickyCaptureLayout保持关联。我喜欢使用Path和Matrix变换的方法。
在确定设备旋转后,创建一个Matrix来进行适当的旋转,并围绕图形中心旋转。
mMatrix.postRotate(rotationDegrees, oldBounds.centerX(), oldBounds.centerY());
这里的oldBounds是移动前图形的边界。我们将使用它来确定旋转图形的边距。继续进行旋转。
mPath.transform(mMatrix)
图形已经旋转,但位置不正确。它在旧位置上但是被旋转了。创建一个翻译Matrix将Path移动到适当的位置。实际计算取决于旋转。对于90度旋转,计算如下:
transY = -newBounds.bottom; // move bottom of graphic to top of View
transY += getHeight(); // move to bottom of rotated view
transY -= (getHeight() - oldBounds.right); // finally move up by old right margin
transX = -newBounds.left; // Pull graphic to left of container
transX += getWidth() - oldBounds.bottom; // and pull right for margin
其中transY是Y轴平移,transX是X轴平移。 oldBounds是旋转前的边界,newBounds是旋转后的边界。需要注意的是,getWidth()将给出“旧”View的高度,而getHeight()将给出旧View的宽度。
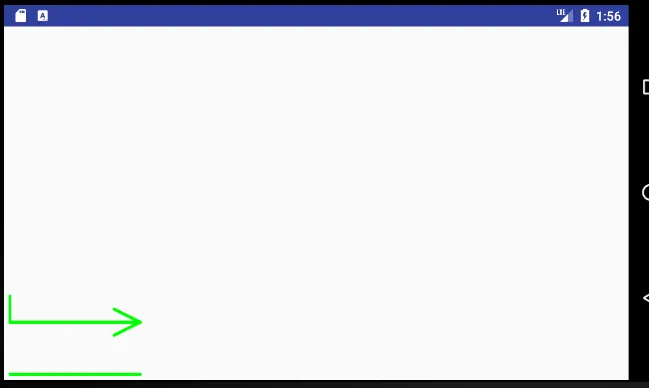
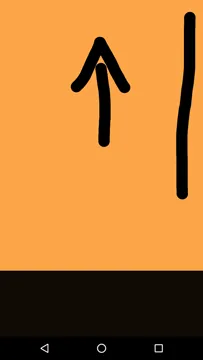
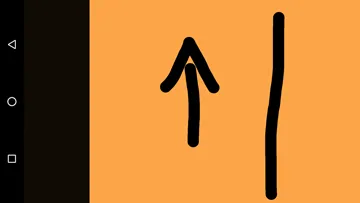
以下是一个示例程序,可以实现上述描述。下面有几个图形展示了使用此示例应用程序进行90度旋转。
演示应用程序
package com.example.rotatetranslatedemo;
import android.app.Activity;
import android.content.Context;
import android.graphics.Bitmap;
import android.graphics.Canvas;
import android.graphics.Color;
import android.graphics.Matrix;
import android.graphics.Paint;
import android.graphics.Path;
import android.graphics.RectF;
import android.os.Bundle;
import android.view.Display;
import android.view.Surface;
import android.view.View;
import android.view.WindowManager;
public class MainActivity extends Activity {
private DrawingView dv;
private Paint mPaint;
@Override
protected void onCreate(Bundle savedInstanceState) {
super.onCreate(savedInstanceState);
dv = new DrawingView(this);
setContentView(dv);
mPaint = new Paint();
mPaint.setAntiAlias(true);
mPaint.setDither(true);
mPaint.setColor(Color.GREEN);
mPaint.setStyle(Paint.Style.STROKE);
mPaint.setStrokeJoin(Paint.Join.ROUND);
mPaint.setStrokeCap(Paint.Cap.ROUND);
mPaint.setStrokeWidth(12);
}
public class DrawingView extends View {
private Bitmap mBitmap;
private Path mPath;
private Paint mBitmapPaint;
Context context;
private Paint paint;
Matrix mMatrix = new Matrix();
RectF oldBounds = new RectF();
RectF newBounds = new RectF();
public DrawingView(Context c) {
super(c);
context = c;
mBitmapPaint = new Paint(Paint.DITHER_FLAG);
paint = new Paint();
paint.setAntiAlias(true);
paint.setColor(Color.BLUE);
paint.setStyle(Paint.Style.STROKE);
paint.setStrokeJoin(Paint.Join.MITER);
paint.setStrokeWidth(4f);
}
@Override
protected void onSizeChanged(int w, int h, int oldw, int oldh) {
super.onSizeChanged(w, h, oldw, oldh);
mBitmap = Bitmap.createBitmap(w, h, Bitmap.Config.ARGB_8888);
}
@Override
protected void onDraw(Canvas canvas) {
Display display = ((WindowManager) context.getSystemService(Context.WINDOW_SERVICE))
.getDefaultDisplay();
int rotationDegrees = 0;
float transX = 0;
float transY = 0;
super.onDraw(canvas);
canvas.drawBitmap(mBitmap, 0, 0, mBitmapPaint);
switch (display.getRotation()) {
case Surface.ROTATION_0:
break;
case Surface.ROTATION_90:
rotationDegrees = 270;
break;
case Surface.ROTATION_180:
rotationDegrees = 180;
break;
case Surface.ROTATION_270:
rotationDegrees = 90;
break;
default:
rotationDegrees = 0;
break;
}
if (mPath == null) {
mPath = setupGraphic();
}
if (rotationDegrees != 0) {
mMatrix.reset();
mPath.computeBounds(oldBounds, true);
mMatrix.postRotate(rotationDegrees, oldBounds.centerX(), oldBounds.centerY());
mPath.transform(mMatrix);
mPath.computeBounds(newBounds, true);
mMatrix.reset();
if (rotationDegrees == 90) {
transY = -newBounds.bottom;
transY += getHeight();
transY -= (getHeight() - oldBounds.right);
transX = -newBounds.left;
transX += getWidth() - oldBounds.bottom;
} else if (rotationDegrees == 270) {
transY = -newBounds.top;
transY += getHeight() - oldBounds.right;
transX = getWidth() - newBounds.right;
transX -= getHeight() - oldBounds.right;
}
mMatrix.postTranslate(transX, transY);
mPath.transform(mMatrix);
}
canvas.drawPath(mPath, mPaint);
}
private Path setupGraphic() {
int startX;
int startY;
final int border = 20;
Path path;
if (getHeight() > getWidth()) {
startX = getWidth() - border - 1;
startY = getHeight() - border - 1;
} else {
startX = getHeight() - border - 1;
startY = getWidth() - border - 1;
}
startX = startX - 200;
Pt[] myLines = {
new Pt(startX, startY),
new Pt(startX, startY - 500),
new Pt(startX, startY),
new Pt(startX - 100, startY),
new Pt(startX, startY - 500),
new Pt(startX - 50, startY - 400),
new Pt(startX, startY - 500),
new Pt(startX + 50, startY - 400),
new Pt(startX + 200, startY),
new Pt(startX + 200, startY - 500)
};
path = new Path();
for (int i = 0; i < myLines.length; i = i + 2) {
path.moveTo(myLines[i].x, myLines[i].y);
path.lineTo(myLines[i + 1].x, myLines[i + 1].y);
}
return path;
}
private static final String TAG = "DrawingView";
}
private class Pt {
float x, y;
Pt(float _x, float _y) {
x = _x;
y = _y;
}
}
}
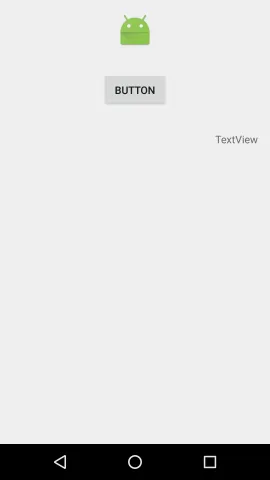
肖像模式
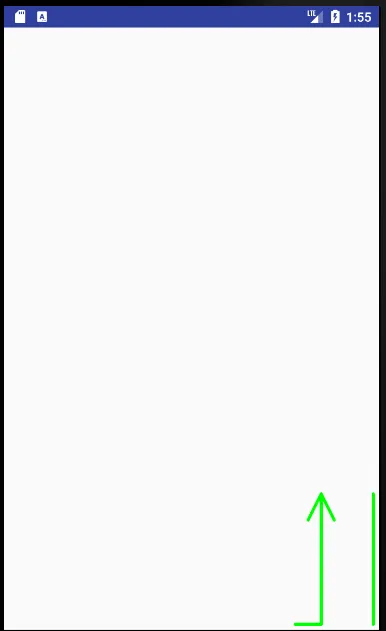
横向模式