如何自动从一张图片中检测出特定的特征,并将其映射到另一张遮罩图片上?然后如何仅平滑图像的角落?

3

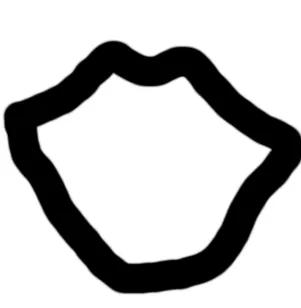
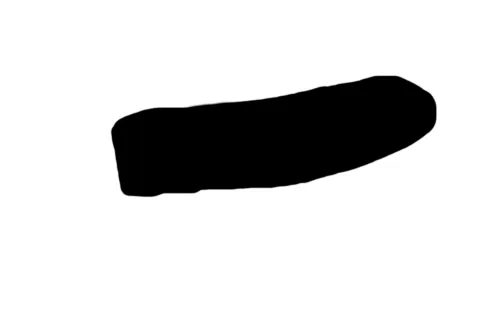
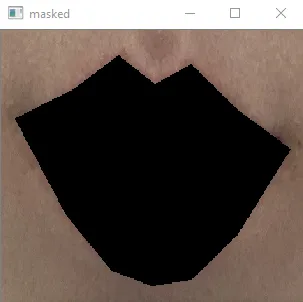
我使用 dlib 库成功地对一张图片进行了嘴部特征的遮盖(masked)。

masked

enter image description here

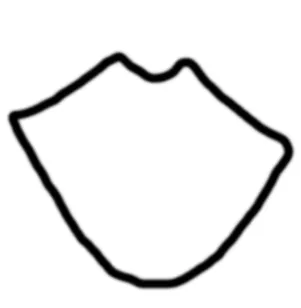
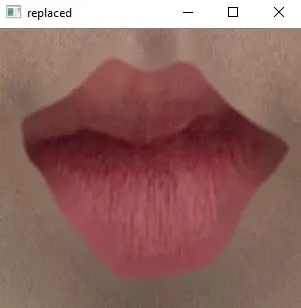
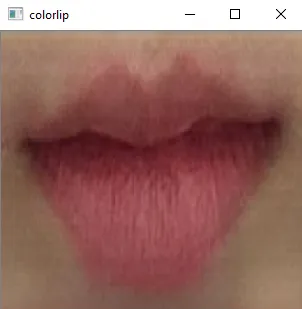
类似地,我有另一张未经过遮盖的嘴唇裁剪图像(colorlip)。

colorlip

enter image description here

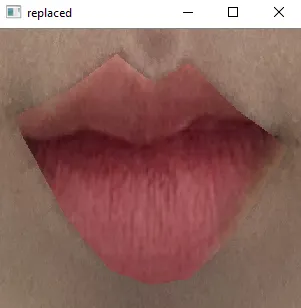
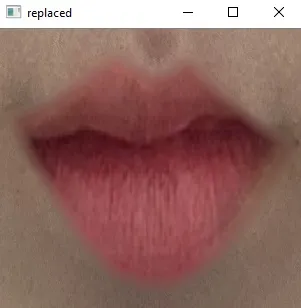
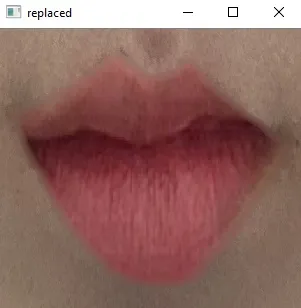
我已经按比例缩放并替换了这些图像 (replaced),并使用如下代码中的 np.where 函数。

replaced

enter image description here

#Get the values of the lip and the target mask
lip = pred_toblackscreen[bbox_lip[0]:bbox_lip[1], bbox_lip[2]:bbox_lip[3],:]
target = roi[bbox_mask[0]:bbox_mask[1], bbox_mask[2]:bbox_mask[3],:]
cv2.namedWindow('masked', cv2.WINDOW_NORMAL)
cv2.imshow('masked', target)


#Resize the lip to be the same scale/shape as the mask
lip_h, lip_w, _ = lip.shape
target_h, target_w, _ = target.shape
fy = target_h / lip_h
fx = target_w / lip_w
scaled_lip = cv2.resize(lip,(0,0),fx=fx,fy=fy)

cv2.namedWindow('colorlip', cv2.WINDOW_NORMAL)
cv2.imshow('colorlip', scaled_lip)


update = np.where(target==[0,0,0],scaled_lip,target)
cv2.namedWindow('replaced', cv2.WINDOW_NORMAL)
cv2.imshow('replaced', update)

但是'colorlip'中的特征形状(唇)与'masked'图像不匹配,因此存在错位,使得掩模的边缘看起来锐利,就好像图像被叠加了一样。如何解决这个问题?并且如何使最终替换的图像看起来更加细腻和正常?

1个回答

1

**更新 #2: OpenCV图像修复以平滑锯齿边缘。

OpenCV python inpainting 可以帮助处理粗糙的边缘。使用口部标记模型、来自DL模型的口腔分割掩模或任何用于找到边缘位置的内容。从此,在新图像中围绕嘴唇轮廓画出一条小宽度的边框,并将其用作修复的掩模。我提供的掩模需要反转才能正常工作。

在输入掩模中,一个掩模更宽,一个有阴影,最后一个较窄。对三个掩模的半径值为520生成六个输出图像。

代码

import numpy as np
# import cv2 as cv2
# import cv2
import cv2.cv2 as cv2

img = cv2.imread('images/lip_img.png')
#mask = cv2.imread('images/lip_img_border_mask.png',0)
mask = cv2.imread('images/lip_img_border_mask2.png',0)
#mask = cv2.imread('images/lip_img_border_mask3.png',0)
mask = np.invert(mask)
# Choose appropriate method and radius.
radius = 20
dst = cv2.inpaint(img, mask, radius, cv2.INPAINT_TELEA)
# dst = cv2.inpaint(img, mask, radius, cv2.INPAINT_NS)
cv2.imwrite('images/inpainted_lip.jpg', dst)
cv2.imshow('dst',dst)
cv2.waitKey(0)
cv2.destroyAllWindows()

输入图像和掩模

enter image description here enter image description here enter image description here enter image description here

输出图像

enter image description hereenter image description here enter image description hereenter image description here enter image description hereenter image description here

**更新 #1:添加了基于深度学习的图像融合方法。

尝试使用OpenCV无缝克隆进行微妙的替换和去除锐利边缘。另外,对于锐利的角落,可以尝试基于深度学习的图像修复,或将其与无缝克隆相结合,以获得更好的效果。

基于深度学习的图像融合是另一种将两个图像混合在一起的方法,使裁剪部分与背景图像的风格匹配。即使在这种情况下,像素强度也会改变以匹配背景,但混合会更加平滑。链接已添加到帖子底部。

示例

这个代码示例基于learnopencv的无缝克隆示例。
# import cv2
from cv2 import cv2
import numpy as np

src = cv2.imread("images/src_img.jpg")
dst = cv2.imread("images/dest_img.jpg")

src_mask = cv2.imread("images/src_img_rough_mask.jpg")
src_mask = np.invert(src_mask)

cv2.namedWindow('src_mask', cv2.WINDOW_NORMAL)
cv2.imshow('src_mask', src_mask)
cv2.waitKey(0)

# Where to place image.
center = (500,500)

# Clone seamlessly.
output = cv2.seamlessClone(src, dst, src_mask, center, cv2.NORMAL_CLONE)

# Write result
cv2.imwrite("images/opencv-seamless-cloning-example.jpg", output)

cv2.namedWindow('output', cv2.WINDOW_NORMAL)
cv2.imshow('output', output)
cv2.waitKey(0)

源图像

enter image description here

粗略遮罩图像

enter image description here

目标图像

enter image description here

最终图像

enter image description here

参考文献

深度图像融合技术


谢谢您的建议。但是,按照上述方法,唇色完全改变,看起来像没有涂颜色的普通嘴唇。但我想保留“替换”图像中显示的新唇色,并仅使边缘平滑,以便自然融合。此外,您能否展示如何在您的示例中找到确切的中心点,即(500,500)? - r_k_y
我已经添加了另一种方法,可以帮助混合。至于“中心点”,我随机选择了它。它是背景图像中裁剪/遮罩要粘贴的坐标。 - B200011011
我尝试了无缝克隆技术,但替换部分的颜色发生了变化。正如您所提到的,基于深度学习的另一种技术也会改变背景以适应“替换部分”。但我只想在新替换的唇边缘应用混合,使得修补部分不会被注意到。对于我的情况,颜色变化是不可取的。谢谢! - r_k_y
1
尝试使用alpha混合技术,https://learnopencv.com/alpha-blending-using-opencv-cpp-python/。在灰度alpha掩膜上尝试平滑边缘过渡。除此之外,我现在想不出其他的东西了。 - B200011011
1
我还添加了基于OpenCV的图像修复功能。 - B200011011

网页内容由stack overflow 提供, 点击上面的
可以查看英文原文,
原文链接