我想要做的是在屏幕上移动手指(touchesMoved)并在touchesMoved生成的点上均匀绘制图像(可能是CGImageRefs)。我可以画出线条,但我想要生成的是类似于这样的东西(对于这个例子,我使用了一个箭头的图像,但它可以是任何图像,比如我的狗的照片 :) )。最重要的是,在iPhone或iPad上用手指绘制时均匀地得到图像。
2个回答
8
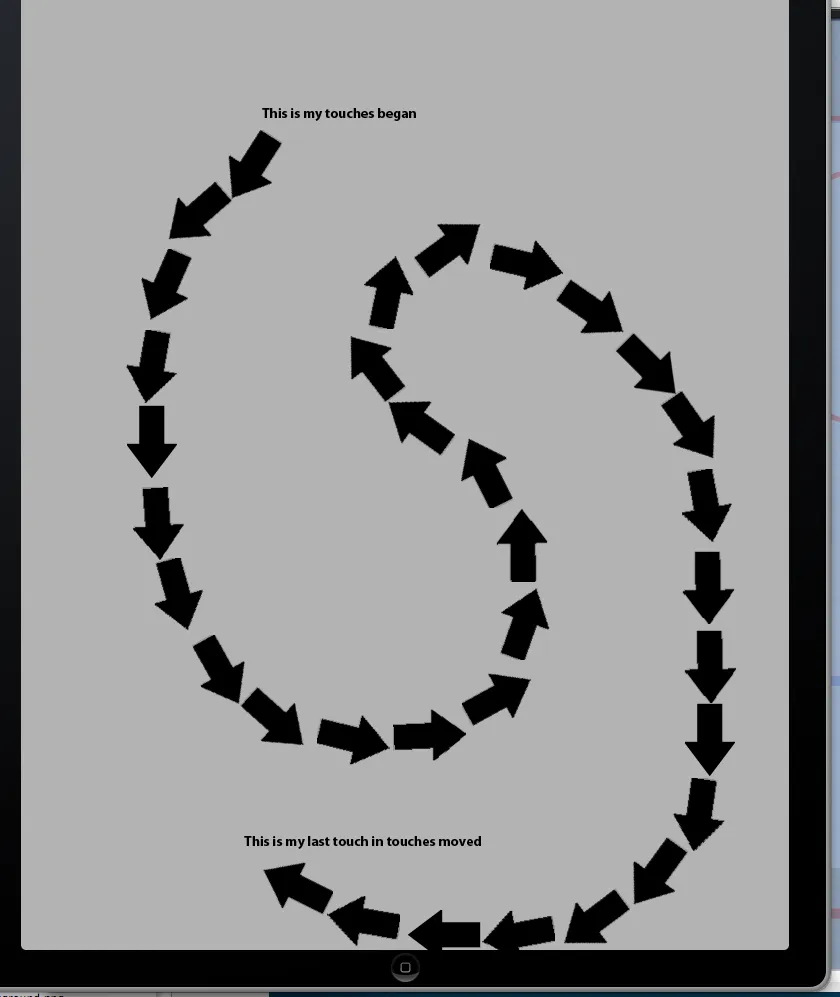
首先,非常感谢 Kendall 提供的答案。基于他的回答,以下是代码,可以将 UIImage 沿着路径(不是真实的 pathRef,而是由点创建的逻辑路径)绘制在屏幕上,基于触摸点之间的距离进行旋转,并根据当前和前一个点的向量正确地旋转图像。希望你喜欢:
首先,您需要加载要作为 CGImage 反复使用的图像:
NSString *imagePath = [[NSBundle mainBundle] pathForResource:@"arrow.png" ofType:nil];
  UIImage *img = [UIImage imageWithContentsOfFile:imagePath];
  image = CGImageRetain(img.CGImage);
在dealloc方法中确保调用
CGImageRelease(image);
在touchesBegan方法中,只需将起始点存储在一个变量中,该变量作用域超出该方法(在您的头文件中声明它),在这种情况下,我正在绘制到一个UIView中。
@interface myView : UIView {
    CGPoint lastPoint;
    }
@end
然后在触摸中开始:
-(void)touchesBegan:(NSSet *)touches withEvent:(UIEvent *)event
{
UITouch *touch = [touches anyObject];
lastPoint = [touch locationInView:self];
最后在touchesMoved中,将位图绘制到屏幕上,当你移动的距离足够时(在我的情况下是73,因为我的图片是73像素x 73像素),将该图像绘制到屏幕上,保存新图像并将lastPoint设置为currentPoint。
     -(void)touchesMoved:(NSSet *)touches withEvent:(UIEvent *)event
    {

        UITouch *touch = [touches anyObject];
        currentPoint = [touch locationInView:self];

        double deltaX = lastPoint.x - currentPoint.x;
        double deltaY = lastPoint.y - currentPoint.y;

        double powX = pow(deltaX,2);
        double powY = pow(deltaY,2);

        double distance = sqrt(powX + powY);
        if (distance >= 73){

            lastPoint = currentPoint;

             UIGraphicsBeginImageContext(self.frame.size);
            [drawImage.image drawInRect:CGRectMake(0, 0, self.frame.size.width, self.frame.size.height)];
            CGContextSaveGState(UIGraphicsGetCurrentContext());

            float angle = atan2(deltaX, deltaY);
            angle *= (M_PI / 180);


            CGContextDrawImage(UIGraphicsGetCurrentContext(), CGRectMake(currentPoint.x, currentPoint.y, 73, 73),[self CGImageRotatedByAngle:image angle:angle * -1]);
            CGContextRestoreGState(UIGraphicsGetCurrentContext());
             drawImage.image = UIGraphicsGetImageFromCurrentImageContext();
            UIGraphicsEndImageContext();
            distance = 0;

        }

    }


    - (CGImageRef)CGImageRotatedByAngle:(CGImageRef)imgRef angle:(CGFloat)angle
{
    CGFloat angleInRadians = angle * (M_PI / 180);
    CGFloat width = CGImageGetWidth(imgRef);
    CGFloat height = CGImageGetHeight(imgRef);

    CGRect imgRect = CGRectMake(0, 0, width, height);
    CGAffineTransform transform = CGAffineTransformMakeRotation(angleInRadians);
    CGRect rotatedRect = CGRectApplyAffineTransform(imgRect, transform);

    CGColorSpaceRef colorSpace = CGColorSpaceCreateDeviceRGB();
    CGContextRef bmContext = CGBitmapContextCreate(NULL,
                                                   rotatedRect.size.width,
                                                   rotatedRect.size.height,
                                                   8,
                                                   0,
                                                   colorSpace,
                                                   kCGImageAlphaPremultipliedFirst);
    CGContextSetAllowsAntialiasing(bmContext, FALSE);
    CGContextSetInterpolationQuality(bmContext, kCGInterpolationNone);
    CGColorSpaceRelease(colorSpace);
    CGContextTranslateCTM(bmContext,
                          +(rotatedRect.size.width/2),
                          +(rotatedRect.size.height/2));
    CGContextRotateCTM(bmContext, angleInRadians);
    CGContextTranslateCTM(bmContext,
                          -(rotatedRect.size.width/2),
                          -(rotatedRect.size.height/2));
    CGContextDrawImage(bmContext, CGRectMake(0, 0,
                                             rotatedRect.size.width,
                                             rotatedRect.size.height),
                       imgRef);

    CGImageRef rotatedImage = CGBitmapContextCreateImage(bmContext);
    CFRelease(bmContext);
    [(id)rotatedImage autorelease];

    return rotatedImage;
}
这将创建一张类似于这样的图片:
CGPoint point1 = CGPointMake(100, 200);

CGPoint point2 = CGPointMake(300, 100);


double deltaX = point2.x - point1.x;
double deltaY = point2.y - point1.y;

double powX = pow(deltaX,2);
double powY = pow(deltaY,2);

double distance = sqrt(powX + powY);

distance = 0;


for (int j = 1; j * 73 < distance; j++ )
{
    double x =  (point1.x + ((deltaX / distance) * 73 * j));
    double y =  (point1.y + ((deltaY / distance) * 73 * j));


    NSLog(@"My new point is x: %f y :%f", x, y);
}
- cdasher
3
将要添加以下内容(对上面的代码进行一些更改,以尝试填补快速移动时touchesMoved缺少某些点的空白部分: - cdasher
谢谢您的帮助,我该如何绘制X和Y点,请给我建议。 - dineshprasanna
在for循环之前,为什么要将distance = 0设置为最低代码框?最底部的代码框如何帮助快速运动? - retrovius
2
假设您已经有了跟踪用户触摸屏幕的代码,听起来您想要检测他们移动的距离是否等于您的图像长度,此时您想在他们的触摸下绘制另一张图像的副本。为了实现这一点,我认为您需要:
- 计算您的图像的长度(宽度)
- 实现将您的图像的副本绘制到视图上,并旋转到任何角度的代码
- 每次用户的触摸移动(例如,在touchesMoved中):
- 计算每次移动时触摸的增量并生成该增量的“长度”(例如sqrt(dx^2 + dy^2)之类的东西)
- 累积自上次绘制图像以来的距离
- 如果距离已达到您的图像的长度,请在触摸的当前位置下绘制一个图像的副本,并适当地旋转(可能根据从上一个图像位置到当前位置的向量)
- Kendall Lister
6
让我试一试。我从来没有想过要根据距离来放置图像。我一直在考虑是否需要在路径上添加或调整点。 - cdasher
正是我所需要的,等我整理好代码后会发布工作代码。(你不知道如何计算一个正确的向量吗 :) ) - cdasher
做得好,实现并发布你的代码。看起来你需要稍微调整一下绘图位置,使箭头尖指向下一个箭头的底部。尝试计算另一个向量,这次是图像方向旋转90度,长度等于图像宽度的一半,然后将该向量添加到当前点的.x和.y,并查看效果如何。 - Kendall Lister
我几乎就像《阿甘正传》中的阿甘一样通过向量处理。那么图像方向是当前角度吗?还是我要创建一个距离我的图像宽度一半,且在右侧90度的任意点?嗯...你看到了吧,我的向量理解只有45分钟的历史 :) - cdasher
是的!我所说的“向量”只是指一个(x,y)位置,正如你已经发现的那样,所以现在你需要做的就是找到正确的偏移量使你的一系列箭头看起来平滑。我还没有测试过这个,但我觉得将每个箭头“左移”或“右移”半个宽度应该可以很好地对齐它们,这也是90度旋转的原因: “左”/“右”移位必须相对于箭头的方向。 - Kendall Lister
好的,让我考虑一下...我弄清楚后会更新。谢谢! - cdasher
网页内容由stack overflow 提供, 点击上面的可以查看英文原文,
原文链接
原文链接