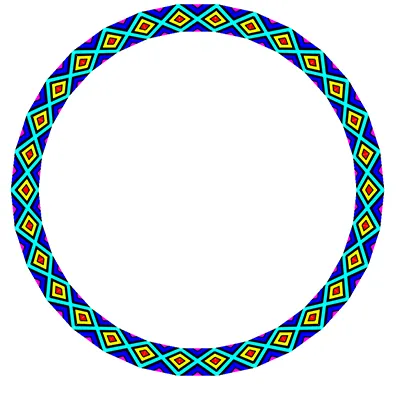
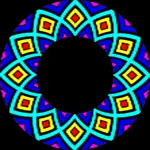
我的目标是采取这样的模式

并沿着圆形路径重复绘制,以产生类似于此图像的内容:
我考虑了一种方法,手动变形/旋转图像,并围绕中心点多次绘制它以实现我想要的效果,但我相信CoreGraphics可以更有效地完成,并且代码更少。
任何有关如何实现我想要的结果的建议将不胜感激。
以下是ChalkCircle项目中相关的代码:
const float kPatternWidth = 8;
const float kPatternHeight = 8;

void DrawPatternCellCallback(void *info, CGContextRef cgContext)
{
UIImage *patternImage = [UIImage imageNamed:@"chalk_brush.png"];
CGContextDrawImage(cgContext, CGRectMake(0, 0, kPatternWidth, kPatternHeight), patternImage.CGImage);
}

- (void)drawRect:(CGRect)rect {
float startDeg = 0; // where to start drawing
float endDeg = 360; // where to stop drawing
int x = self.center.x;
int y = self.center.y;
int radius = (self.bounds.size.width > self.bounds.size.height ? self.bounds.size.height : self.bounds.size.width) / 2 * 0.8;
CGContextRef ctx = UIGraphicsGetCurrentContext();


const CGRect patternBounds = CGRectMake(0, 0, kPatternWidth, kPatternHeight);
const CGPatternCallbacks kPatternCallbacks = {0, DrawPatternCellCallback, NULL};


CGAffineTransform patternTransform = CGAffineTransformIdentity;
CGPatternRef strokePattern = CGPatternCreate(
NULL,
patternBounds,
patternTransform,
kPatternWidth, // horizontal spacing
kPatternHeight,// vertical spacing
kCGPatternTilingNoDistortion,
true,
&kPatternCallbacks);
CGFloat color1[] = {1.0, 1.0, 1.0, 1.0};


CGColorSpaceRef patternSpace = CGColorSpaceCreatePattern(NULL);
CGContextSetStrokeColorSpace(ctx, patternSpace);


CGContextSetStrokePattern(ctx, strokePattern, color1);


CGContextSetLineWidth(ctx, 4.0);


CGContextMoveToPoint(ctx, x, y - radius);
CGContextAddArc(ctx, x, y, radius, (startDeg-90)*M_PI/180.0, (endDeg-90)*M_PI/180.0, 0);
CGContextClosePath(ctx);
CGContextDrawPath(ctx, kCGPathStroke);


CGPatternRelease(strokePattern);
strokePattern = NULL;
CGColorSpaceRelease(patternSpace);
patternSpace = NULL;

}
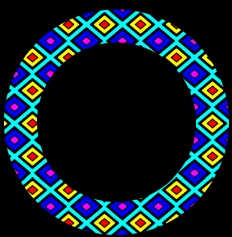
SAM的解决方案
我修改了Sam的解决方案,使其能够处理非正方形图案,将结果居中,并通过对传入图像进行计算来删除硬编码数字:
#define MAX_CIRCLE_DIAMETER   290.0f
#define OVERLAP 1.5f

-(void) drawInCircle:(UIImage *)patternImage
{
    int numberOfImages = 12;
    float diameter =  (MAX_CIRCLE_DIAMETER * numberOfImages * patternImage.size.width) / ( (2.0 * M_PI * patternImage.size.height) + (numberOfImages * patternImage.size.width));

    //get the radius, circumference and image size
    CGRect replicatorFrame = CGRectMake((320-diameter)/2.0f, 60.0f, diameter, diameter);
    float radius = diameter/2;
    float circumference = M_PI * diameter;
    float imageWidth = circumference/numberOfImages;
    float imageHeight = imageWidth *  patternImage.size.height / patternImage.size.width;

    //create a replicator layer and add it to our view
    CAReplicatorLayer *replicator = [CAReplicatorLayer layer];

    replicator.frame = replicatorFrame;
    [self.view.layer addSublayer:replicator];

    //configure the replicator
    replicator.instanceCount = numberOfImages;

    //apply a rotation transform for each instance
    CATransform3D transform = CATransform3DIdentity;
    transform = CATransform3DRotate(transform, M_PI / (numberOfImages/2), 0, 0, 1);
    replicator.instanceTransform = transform;

    //create a sublayer and place it inside the replicator
    CALayer *layer = [CALayer layer];
    //the frame places the layer in the middle of the replicator layer and on the outside of
    //the replicator layer so that the the size is accurate relative to the circumference
    layer.frame = CGRectMake(radius - (imageWidth/2.0) - (OVERLAP/2.0), -imageHeight/2.0, imageWidth+OVERLAP, imageHeight);

    layer.anchorPoint = CGPointMake(0.5, 1);
    [replicator addSublayer:layer];

    //apply a perspective transform to the layer
    CATransform3D perspectiveTransform = CATransform3DIdentity;
    perspectiveTransform.m34 = 1.0f / -radius;
    perspectiveTransform = CATransform3DRotate(perspectiveTransform, (M_PI_4), -1, 0, 0);
    layer.transform = perspectiveTransform;

    //set the image as the layer's contents
    layer.contents = (__bridge id)patternImage.CGImage;
}