在Python中使用给定的字体正确渲染文本并准确检测其边界。

8
这可能看起来很简单,我也以为会很简单,但实际上并不是。我花了一个星期尝试让它工作,但我却无法做到。 我需要什么 我需要使用任何手写样式的字体在Python中渲染给定字符串(仅包含标准字符)。必须从TTF文件中加载字体。我还需要能够准确地检测其边界(垂直和水平地获取文本的确切开始和结束位置),最好是在绘制之前。最后,如果输出是一个数组而不是写入磁盘的图像文件,那将使我的生活更加轻松。 我尝试过什么 Imagemagick绑定(即Wand):无法弄清如何在设置图像大小并在其上呈现文本之前获取文本度量。
通过Pycairo绑定的Pango:文档几乎不存在,无法弄清如何从文件中加载TrueType字体。
PIL(Pillow):最有希望的选项。我已经成功地计算出了任何文本的高度(令人惊讶的是,这不仅仅是getsize返回的高度),但是对于一些字体,宽度似乎有问题。即使让图像足够大,它们也会被裁剪。
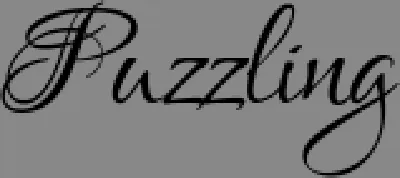
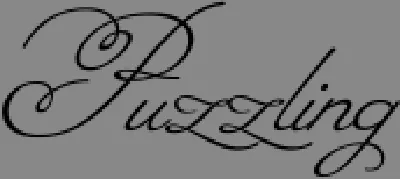
这里有一些示例,文本为“Puzzling”:
字体:Lovers Quarrel 结果: Lovers Quarrel Render 字体:Miss Fajardose 结果: Miss Fajardose Render 这是我用来生成图像的代码:
from PIL import Image, ImageDraw, ImageFont
import cv2
import numpy as np
import glob
import os

font_size = 75
font_paths = sorted(glob.glob('./fonts/*.ttf'))
text = "Puzzling"
background_color = 180
text_color = 50
color_variance = 60
cv2.namedWindow('display', 0)

for font_path in font_paths:

    font = ImageFont.truetype(font_path, font_size)
    text_width, text_height = font.getsize(text)

    ascent, descent = font.getmetrics()
    (width, baseline), (offset_x, offset_y) = font.font.getsize(text)

    # +100 added to see that text gets cut off
    PIL_image = Image.new('RGB', (text_width-offset_x+100, text_height-offset_y), color=0x888888)
    draw = ImageDraw.Draw(PIL_image)
    draw.text((-offset_x, -offset_y), text, font=font, fill=0)

    cv2.imshow('display', np.array(PIL_image))
    k = cv2.waitKey()
    if chr(k & 255) == 'q':
        break

一些问题

是否字体是问题所在?我的一些同事告诉我可能是这个原因,但我不这样认为,因为通过命令行Imagemagick可以正确渲染它们。

我的代码是否有问题?我是否做错了什么导致文本被截断?

最后,这是PIL的一个错误吗?如果是这种情况,您推荐我使用哪个库来解决我的问题?我应该再试试Pango和Wand吗?


在命令行 ImageMagick 中,创建文本时可以使用“-debug annotate”获取字体指标。请参阅 https://www.imagemagick.org/Usage/text/#font_info。我不知道这个功能在 Wand 中是否可用。但是你可以使用 Python 子进程调用来实现。 - fmw42
如果您知道文本需要适合的框,那么https://stackoverflow.com/a/39557083/740553可能更符合您的需求。 - Mike 'Pomax' Kamermans
@fmw42 谢谢,我可能可以利用这个做些事情,尽管在进行了一些测试之后,似乎度量标准也不是很准确,在大多数情况下,PIL 在计算高度方面做得更好。 - kikones34
@Mike'Pomax'Kamermans 我需要一个恒定的字体大小,并且我需要知道它将占用多少空间,而不是相反。 - kikones34
@AdriàRicoBlanes 请将此内容添加到您的帖子的“我需要什么”部分。这不应该是评论中的一个事后想法 =) - Mike 'Pomax' Kamermans
1
注意:当我在最新版本的PIL中使用链接字体的最新版本时,这种情况已不再存在。现在PIL可以正确地呈现它了。 - John
3个回答

5

pyvips 看起来可以正确地完成这个任务。我尝试了以下操作:

$ python3
Python 3.7.3 (default, Apr  3 2019, 05:39:12) 
[GCC 8.3.0] on linux
Type "help", "copyright", "credits" or "license" for more information.
>>> import pyvips
>>> x = pyvips.Image.text("Puzzling", dpi=300, font="Miss Fajardose", fontfile="/home/john/pics/MissFajardose-Regular.ttf")
>>> x.write_to_file("x.png")

制作:

enter image description here

pyvips文档对选项有一个快速介绍:

https://libvips.github.io/pyvips/vimage.html#pyvips.Image.text

或者C库文档有更多的细节:

http://libvips.github.io/libvips/API/current/libvips-create.html#vips-text

它可以生成一个反锯齿文本的单波段8位图像,您可以用于进一步处理、传递给NumPy或PIL等。在介绍中有一个章节讲解如何将libvips图像转换为数组:

https://libvips.github.io/pyvips/intro.html#numpy-and-pil


2
使用Ananda Hastakchyar字体时,带有libvips 8.6.3的pyvips无法在顶部和底部留出足够的空间。这是因为这种手写风格的字体故意在墨水区域之外涂鸦--例如,如果您尝试在文字处理器中选择该字体,您会发现一行上的下降线会重叠在下面的行上的上升线上。我已经在HEAD 8.6中修复了这个问题,并且改进将在8.6.4中实现,感谢您指出这个问题。https://github.com/jcupitt/libvips/commit/878c77a035ef0a32db7c249ccb31118932e790d3 - jcupitt
根据 pyvips 文档中的 text[1],它可以返回一个 Image 或 "list[Image, Dict[str, mixed]]",但它没有解释何时返回第二种类型,并且我不清楚第二种类型的确切含义是什么 List[Union[Image, Dict[str, Any]]]?libvips 的 text 文档没有指出这样的情况。[1]: https://libvips.github.io/pyvips/vimage.html#pyvips.Image.text - John
你好,你可以读取自适应选择的 DPI。请参阅主要的 C 文档:https://libvips.github.io/libvips/API/current/libvips-create.html#vips-text .. 例如 pyvips.Image.text("hello", width=100, height=100, autofit_dpi=True) - jcupitt
在我的测试中,pyvips 在 Squarrel 字体上失败了,原因我不知道(可能是无法加载字体),并使用一些标准字体生成了图像。 - Claudio
@claudio 如果你贴出那个无法使用的字体链接,我可以试着修复它。 - jcupitt
显示剩余5条评论

0

这是我创建的一些代码,适用于PIL。我发现使用getsize_multiline效果不错(并且还使用了ImageDraw.Draw multiline_text函数绘制文本)。

from PIL import Image, ImageFont, ImageDraw, ImageColor

def text_to_image(
text: str,
font_filepath: str,
font_size: int,
color: (int, int, int), #color is in RGB
font_align="center"):

   font = ImageFont.truetype(font_filepath, size=font_size)
   box = font.getsize_multiline(text)
   img = Image.new("RGBA", (box[0], box[1]))
   draw = ImageDraw.Draw(img)
   draw_point = (0, 0)
   draw.multiline_text(draw_point, text, font=font, fill=color, align=font_align)
   return img

0

截至2023年5月26日,PIL对我来说运行良好:

from PIL import Image, ImageDraw, ImageFont
import cv2
import numpy as np
import glob
import os

font_size = 75
font_paths = sorted(glob.glob('./fonts/*.ttf'))
text = "Puzzling"
background_color = 180
text_color = 50
color_variance = 60
cv2.namedWindow('display', 0)

for font_path in font_paths:

    font = ImageFont.truetype(font_path, font_size)
    # text_width, text_height = font.getsize(text)
    #          DeprecationWarning: getsize is deprecated and will be 
    # removed in Pillow 10 (2023-07-01). Use getbbox or getlength 
    # instead: 
    x,y,w,h = font.getbbox(text) # int values
    text_width, text_height = w, h    
    # font.getlength(text) # a float value 
    ascent, descent = font.getmetrics()
    (width, baseline), (offset_x, offset_y) = font.font.getsize(text)

    # +100 added to see that text gets cut off
    #PIL_image = Image.new('RGB', (text_width-offset_x+100, text_height-offset_y), color=0x888888)
    PIL_image = Image.new('RGB', (text_width-offset_x, text_height-offset_y), color=0x888888)
    draw = ImageDraw.Draw(PIL_image)
    draw.text((-offset_x, -offset_y), text, font=font, fill=0)

    cv2.imshow('display', np.array(PIL_image))
    k = cv2.waitKey()
    if chr(k & 255) == 'q':
        break

使用OpenCV GUI保存的图像,展示它们:

enter image description here

enter image description here


网页内容由stack overflow 提供, 点击上面的
可以查看英文原文,
原文链接