OCR:图像转文本?

14

在将问题标记为复制或重复之前,请先阅读整个问题。

目前我能做到的如下:

  1. 获取图像并裁剪所需的部分进行OCR。
  2. 使用tesseractleptonica处理图像。
  3. 当应用文档被裁剪成块,即每个图像1个字符时,提供96%的准确度。
  4. 如果我不这样做,并且文档背景是白色,文本是黑色,它会给出几乎相同的准确度。

例如,如果输入为此照片:

开始照片

enter image description here

结束照片

我想要的是能够获得相同的准确度,而无需生成块,就像这张照片一样
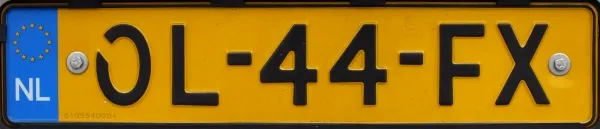
enter image description here

我用于初始化tesseract并从图像中提取文本的代码如下:

tesseract的init:

在 .h 文件中

tesseract::TessBaseAPI *tesseract;
uint32_t *pixels;

在 .m 文件中

tesseract = new tesseract::TessBaseAPI();
tesseract->Init([dataPath cStringUsingEncoding:NSUTF8StringEncoding], "eng");
tesseract->SetPageSegMode(tesseract::PSM_SINGLE_LINE);
tesseract->SetVariable("tessedit_char_whitelist", "0123456789ABCDEFGHIJKLMNOPQRSTUVWXYZ");
tesseract->SetVariable("language_model_penalty_non_freq_dict_word", "1");
tesseract->SetVariable("language_model_penalty_non_dict_word ", "1");
tesseract->SetVariable("tessedit_flip_0O", "1");
tesseract->SetVariable("tessedit_single_match", "0");
tesseract->SetVariable("textord_noise_normratio", "5");
tesseract->SetVariable("matcher_avg_noise_size", "22");
tesseract->SetVariable("image_default_resolution", "450");
tesseract->SetVariable("editor_image_text_color", "40");
tesseract->SetVariable("textord_projection_scale", "0.25");
tesseract->SetVariable("tessedit_minimal_rejection", "1");
tesseract->SetVariable("tessedit_zero_kelvin_rejection", "1");
从图像中获取文本
- (void)processOcrAt:(UIImage *)image
{
    [self setTesseractImage:image];

    tesseract->Recognize(NULL);
    char* utf8Text = tesseract->GetUTF8Text();
    int conf = tesseract->MeanTextConf();

    NSArray *arr = [[NSArray alloc]initWithObjects:[NSString stringWithUTF8String:utf8Text],[NSString stringWithFormat:@"%d%@",conf,@"%"], nil];

    [self performSelectorOnMainThread:@selector(ocrProcessingFinished:)
                           withObject:arr
                        waitUntilDone:YES];
    free(utf8Text);
}

- (void)ocrProcessingFinished0:(NSArray *)result
{
    UIAlertView *alt = [[UIAlertView alloc]initWithTitle:@"Data" message:[result objectAtIndex:0] delegate:self cancelButtonTitle:nil otherButtonTitles:@"OK", nil];
   [alt show];
}

但是我无法得到车牌图像的正确输出,它要么为空,要么为图像提供了一些垃圾数据。

如果我使用的是第一个图像,即白色背景和黑色文本,则输出结果的准确率为89%至95%。

请帮帮我。

任何建议都将不胜感激。

更新

感谢@jcesar提供链接,以及@konstantin pribluda提供宝贵信息和指导。

我能够将图像转换成适当的黑白形式(几乎),所以所有图像的识别效果更好了 :)


需要帮助处理图像的二值化。 有任何想法都将不胜感激。


也许在尝试识别文本之前,您可以尝试操纵图像,例如将每个非黑色(或接近黑色)像素的颜色更改为白色。目前我没有进行此操作的Objective-C代码,但我相信这是可行的。 - jcesarmobile
我有想法,但是同样的问题在这里我无法实现它。 - The iOSDev
阅读被接受的答案上的链接:http://stackoverflow.com/questions/9977905/change-a-color-in-a-uiimage - jcesarmobile
谢谢您的回复。现在我有一些方法来做它了。谢谢 :) - The iOSDev
@jcesar 谢谢您的建议。我从您发布的链接中获取了代码,目前正在努力使我的代码正常工作 :) - The iOSDev
@Claric PWI你用的是哪个OCR库?我也要开始做类似的项目了。感谢你的帮助。 - Rahul Vyas
3个回答

6

大家好,感谢你们的回复。从这些回复中,我得出以下结论:

  1. 我需要获取只包含车牌号码的裁剪图像块。
  2. 从车牌中需要使用提供这里方法获得的数据找出数字部分。
  3. 然后使用上面方法找到的RGB数据将图像数据转换为几乎黑白数据。
  4. 然后使用这里提供的方法将数据转换为图像。

以上4个步骤被合并为一个方法,如下所示:

-(void)getRGBAsFromImage:(UIImage*)image
{
    NSInteger count = (image.size.width * image.size.height);
    // First get the image into your data buffer
    CGImageRef imageRef = [image CGImage];
    NSUInteger width = CGImageGetWidth(imageRef);
    NSUInteger height = CGImageGetHeight(imageRef);
    CGColorSpaceRef colorSpace = CGColorSpaceCreateDeviceRGB();
    unsigned char *rawData = (unsigned char*) calloc(height * width * 4, sizeof(unsigned char));
    NSUInteger bytesPerPixel = 4;
    NSUInteger bytesPerRow = bytesPerPixel * width;
    NSUInteger bitsPerComponent = 8;
    CGContextRef context = CGBitmapContextCreate(rawData, width, height,
                                                 bitsPerComponent, bytesPerRow, colorSpace,
                                                 kCGImageAlphaPremultipliedLast | kCGBitmapByteOrder32Big);
    CGColorSpaceRelease(colorSpace);

    CGContextDrawImage(context, CGRectMake(0, 0, width, height), imageRef);
    CGContextRelease(context);

    // Now your rawData contains the image data in the RGBA8888 pixel format.
    int byteIndex = 0;
    for (int ii = 0 ; ii < count ; ++ii)
    {
        CGFloat red   = (rawData[byteIndex]     * 1.0) ;
        CGFloat green = (rawData[byteIndex + 1] * 1.0) ;
        CGFloat blue  = (rawData[byteIndex + 2] * 1.0) ;
        CGFloat alpha = (rawData[byteIndex + 3] * 1.0) ;

        NSLog(@"red %f \t green %f \t blue %f \t alpha %f rawData [%d] %d",red,green,blue,alpha,ii,rawData[ii]);
        if(red > Required_Value_of_red || green > Required_Value_of_green || blue > Required_Value_of_blue)//all values are between 0 to 255
        {
            red = 255.0;
            green = 255.0;
            blue = 255.0;
            alpha = 255.0;
            // all value set to 255 to get white background.
        }
        rawData[byteIndex] = red;
        rawData[byteIndex + 1] = green;
        rawData[byteIndex + 2] = blue;
        rawData[byteIndex + 3] = alpha;

        byteIndex += 4;
    }

    colorSpace = CGColorSpaceCreateDeviceRGB();
    CGContextRef bitmapContext = CGBitmapContextCreate(
                                                       rawData,
                                                       width,
                                                       height,
                                                       8, // bitsPerComponent
                                                       4*width, // bytesPerRow
                                                       colorSpace,
                                                       kCGImageAlphaNoneSkipLast);

    CFRelease(colorSpace);

    CGImageRef cgImage = CGBitmapContextCreateImage(bitmapContext);

    UIImage *img = [UIImage imageWithCGImage:cgImage];

    //use the img for further use of ocr

    free(rawData);
}

注意:

这种方法唯一的缺点是需要消耗时间来将RGB值转换为白色和其他颜色转换为黑色。

更新:

    CGImageRef imageRef = [plate CGImage];
    CIContext *context = [CIContext contextWithOptions:nil]; // 1
    CIImage *ciImage = [CIImage imageWithCGImage:imageRef]; // 2
    CIFilter *filter = [CIFilter filterWithName:@"CIColorMonochrome" keysAndValues:@"inputImage", ciImage, @"inputColor", [CIColor colorWithRed:1.f green:1.f blue:1.f alpha:1.0f], @"inputIntensity", [NSNumber numberWithFloat:1.f], nil]; // 3
    CIImage *ciResult = [filter valueForKey:kCIOutputImageKey]; // 4
    CGImageRef cgImage = [context createCGImage:ciResult fromRect:[ciResult extent]];
    UIImage *img = [UIImage imageWithCGImage:cgImage]; 

只需将上述方法(getRGBAsFromImage:)的代码替换为下面的代码,结果仍然相同,但时间仅需要0.1到0.3秒。


这需要非常长的时间,但似乎正在做我想要的事情。有没有办法在GPUImage或类似的东西中使用这样的东西? - mwright
是的,对于一个250 X 55像素的图像,需要大约1.5分钟(几乎)来达到99%的准确率。你知道或者有什么建议可以缩短所需时间吗? :) - The iOSDev
我对使用这种方法降低错误率没有任何建议,我正在使用图像预处理和Tess的组合来获得100%准确的结果。我会尝试使用你的图片,看看是否能够获得类似的好结果,如果成功了我会在这里发布答案。 - mwright
当然,我在等待它,我会尽快测试它,如果它对我有效,我会接受这个答案。 - The iOSDev
通过使用这段代码,可以将图片转换为黑白,但是您是如何从图像中获取文本的? - kalyani puvvada

4
我能够使用提供的演示照片快速获得结果,并生成正确的字母。
我使用 GPUImage 对图像进行了预处理。
// Pre-processing for OCR
GPUImageLuminanceThresholdFilter * adaptiveThreshold = [[GPUImageLuminanceThresholdFilter alloc] init];
[adaptiveThreshold setThreshold:0.3f];
[self setProcessedImage:[adaptiveThreshold imageByFilteringImage:_image]];

然后将处理后的图像发送到TESS。
- (NSArray *)processOcrAt:(UIImage *)image {
    [self setTesseractImage:image];

    _tesseract->Recognize(NULL);
    char* utf8Text = _tesseract->GetUTF8Text();

    return [self ocrProcessingFinished:[NSString stringWithUTF8String:utf8Text]];
}

- (NSArray *)ocrProcessingFinished:(NSString *)result {
    // Strip extra characters, whitespace/newlines
    NSString * results_noNewLine = [result stringByReplacingOccurrencesOfString:@"\n" withString:@""];
    NSArray * results_noWhitespace = [results_noNewLine componentsSeparatedByCharactersInSet:[NSCharacterSet whitespaceCharacterSet]];
    NSString * results_final = [results_noWhitespace componentsJoinedByString:@""];
    results_final = [results_final lowercaseString];

    // Separate out individual letters
    NSMutableArray * letters = [[NSMutableArray alloc] initWithCapacity:results_final.length];
    for (int i = 0; i < [results_final length]; i++) {
        NSString * newTile = [results_final substringWithRange:NSMakeRange(i, 1)];
        [letters addObject:newTile];
    }

    return [NSArray arrayWithArray:letters];
}

- (void)setTesseractImage:(UIImage *)image {
    free(_pixels);

    CGSize size = [image size];
    int width = size.width;
    int height = size.height;

    if (width <= 0 || height <= 0)
        return;

    // the pixels will be painted to this array
    _pixels = (uint32_t *) malloc(width * height * sizeof(uint32_t));
    // clear the pixels so any transparency is preserved
    memset(_pixels, 0, width * height * sizeof(uint32_t));

    CGColorSpaceRef colorSpace = CGColorSpaceCreateDeviceRGB();

    // create a context with RGBA pixels
    CGContextRef context = CGBitmapContextCreate(_pixels, width, height, 8, width * sizeof(uint32_t), colorSpace,
                                                 kCGBitmapByteOrder32Little | kCGImageAlphaPremultipliedLast);

    // paint the bitmap to our context which will fill in the pixels array
    CGContextDrawImage(context, CGRectMake(0, 0, width, height), [image CGImage]);

    _tesseract->SetImage((const unsigned char *) _pixels, width, height, sizeof(uint32_t), width * sizeof(uint32_t));
}

这里的左单引号 ' 是为了表示 -,但也很容易去掉。根据你所拥有的图像集,你可能需要微调一下,但它应该能帮助你朝着正确的方向前进。
如果使用时遇到问题,请告诉我。这是我正在使用的一个项目中的代码,我不想把所有东西都剥离或从头开始创建一个项目。

谢谢您的回复。我一定会尝试这个方法。但是目前我已经使用了苹果默认的图像处理框架CoreImage.framework,并使用其默认滤镜轻松地将我的图像转换成纯黑白色,只需要0.1到0.3秒的时间。对于我尝试的几乎所有类型的图像都提供了完美的结果。 - The iOSDev
你应该更新你的答案,包括你正在使用的新方法,这样其他人也可以从中受益。 - mwright
看看我的回答更新,我已经放上了代码。我知道这是一个双向网站。 - The iOSDev

1
我敢说,对于您的目的来说,tesseract可能过于复杂了。您不需要使用字典匹配来提高识别质量(您没有这个字典,但也许可以计算许可证号码的校验和),而且您已经针对OCR进行了字体优化。最重要的是,您有标记(附近的橙色和蓝色区域很好),可以在图像中找到区域。
在我的OCR应用程序中,我使用人工辅助的感兴趣区域检索(只需在相机预览上方放置帮助叠加层)。通常使用haar级联之类的东西来定位有趣的特征,比如面孔。您还可以通过遍历整个图像并存储适当颜色的最左/最右/最上/最下像素来计算橙色区域的质心或边界框。
至于识别本身,我建议使用不变矩(不确定是否在tesseract中实现,但您可以轻松地从我们的java项目中移植:http://sourceforge.net/projects/javaocr/)。
我在监视器图像上尝试了我的演示应用程序,并成功识别出数字(未经过字符训练)。

关于二值化(将黑色与白色分离),我建议使用Sauvola方法,因为它对亮度变化具有最好的容忍度(我们的OCR项目中也实现了该方法)。


是的,没错,但我不知道如何得到完美的区域,也不知道如何在不进行一些块生成的情况下获取文本,即需要将图像裁剪成每个字符一个图像块,然后进行OCR处理才能生成良好的结果,否则它只会产生垃圾值。 - The iOSDev
嗨@Konstantin,我已更新我的答案。我刚找到了一些方法来解决问题,平均时间只需0.3至0.5秒。再次感谢您的建议,因为它帮助我得到了派生解决方案。 - The iOSDev

网页内容由stack overflow 提供, 点击上面的
可以查看英文原文,
原文链接