在自定义警告对话框的边缘添加Android图标

3
我想在我的自定义警告对话框中添加一个图标。
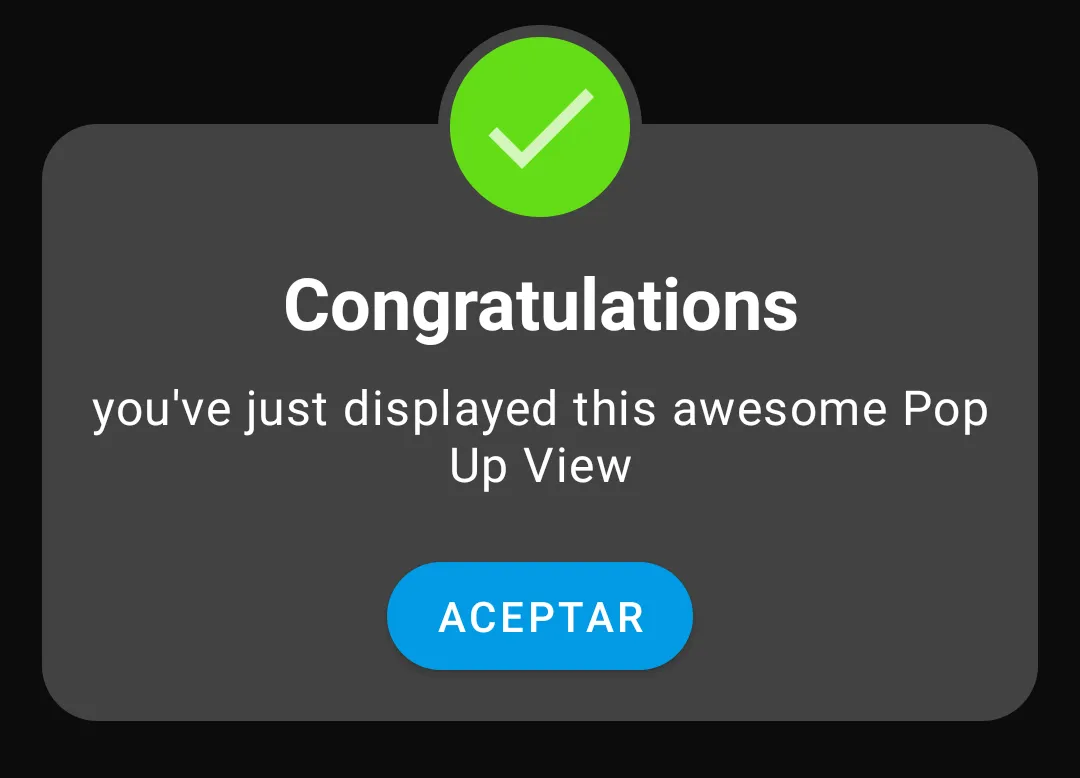
我希望它与下面的图片一样添加在对话框的边缘。
那么我该如何实现呢?

Alert dialog

<LinearLayout 
android:orientation="vertical" 
android:layout_width="match_parent"
android:background="@drawable/custom_alert_dialog"
android:layout_height="match_parent">

<TextView
    android:background="@color/Blue"
    android:layout_width="match_parent"
    android:layout_height="wrap_content"

    android:text="Warning"/>

<LinearLayout
    android:layout_width="match_parent"
    android:layout_height="wrap_content"
    android:gravity="center_horizontal">


    <Button
        android:id="@+id/btn_confirm"
        android:layout_width="100dp"
        android:layout_height="30dp"
        />


    <Button
        android:id="@+id/btn_quit"
        android:layout_width="100dp"
        android:layout_height="30dp"
       />


</LinearLayout>
2个回答

2

我的解决方案 在此输入图片描述

Kotlin 代码

class CustomOneDialog : DialogFragment() {


    override fun onCreateDialog(savedInstanceState: Bundle?): Dialog {

        val binding = DialogCustomOneBinding.inflate(layoutInflater)

        binding.btnDone.setOnClickListener {
            dialog?.dismiss()
        }

        val dialog = MaterialAlertDialogBuilder(
            requireActivity(),
            R.style.MaterialAlertDialog_CustomBorders
        ).apply {
            setView(binding.root)

            setOnKeyListener { _, keyCode, keyEvent ->
                if (keyCode == KeyEvent.KEYCODE_BACK && keyEvent.action == KeyEvent.ACTION_UP) {
                    dismiss()
                    true
                } else false
            }

        }.create()

        dialog.getWindow()?.setBackgroundDrawable(ColorDrawable(Color.TRANSPARENT))

        return dialog
    }

}

布局

<?xml version="1.0" encoding="utf-8"?>
<androidx.constraintlayout.widget.ConstraintLayout xmlns:android="http://schemas.android.com/apk/res/android"
    xmlns:app="http://schemas.android.com/apk/res-auto"
    android:layout_width="match_parent"
    android:layout_height="match_parent">

    <LinearLayout
        android:id="@+id/linearLayout"
        android:layout_width="match_parent"
        android:layout_height="wrap_content"
        android:layout_marginTop="32dp"
        android:background="@drawable/dialog_custom_borders"
        android:orientation="vertical"
        android:paddingStart="16dp"
        android:paddingTop="48dp"
        android:paddingEnd="16dp"
        android:paddingBottom="16dp"
        app:layout_constraintBottom_toBottomOf="parent"
        app:layout_constraintEnd_toEndOf="parent"
        app:layout_constraintHorizontal_bias="0.5"
        app:layout_constraintStart_toStartOf="parent"
        app:layout_constraintTop_toTopOf="parent">

        <TextView
            android:layout_width="match_parent"
            android:layout_height="wrap_content"
            android:gravity="center"
            android:text="@string/dialog_congratulations_title"
            android:textAppearance="@style/TextAppearance.MaterialComponents.Headline5"
            android:textStyle="bold" />

        <TextView
            android:layout_width="match_parent"
            android:layout_height="wrap_content"
            android:layout_marginTop="8dp"
            android:gravity="center"
            android:text="@string/dialog_congratulations_summary"
            android:textAppearance="@style/TextAppearance.MaterialComponents.Body1" />

        <com.google.android.material.button.MaterialButton
            android:id="@+id/btn_done"
            android:layout_width="wrap_content"
            android:layout_height="wrap_content"
            android:layout_gravity="center"
            android:layout_marginTop="16dp"
            android:text="@android:string/ok"
            android:textColor="@color/md_white_1000"
            app:shapeAppearance="@style/ShapeAppearance.Capsule" />

    </LinearLayout>


    <androidx.appcompat.widget.AppCompatImageView
        android:id="@+id/appCompatImageView"
        android:layout_width="68dp"
        android:layout_height="68dp"
        android:layout_marginTop="-28dp"
        app:layout_constraintEnd_toEndOf="parent"
        app:layout_constraintHorizontal_bias="0.5"
        app:layout_constraintStart_toStartOf="parent"
        app:layout_constraintTop_toTopOf="@+id/linearLayout"
        app:srcCompat="@drawable/circle_rounded_filled" />


</androidx.constraintlayout.widget.ConstraintLayout>

带有图标的资源圆圈已完成

<?xml version="1.0" encoding="utf-8"?>
<layer-list xmlns:android="http://schemas.android.com/apk/res/android"
    xmlns:tools="http://schemas.android.com/tools"
    tools:ignore="UnusedResources">
    <item>
        <shape android:shape="oval">
            <size
                android:width="34dp"
                android:height="34dp" />
            <solid android:color="@color/md_light_green_A700" />
            <stroke
                android:width="2dp"
                android:color="?android:colorBackgroundFloating" />
        </shape>
    </item>
    <item
        android:drawable="@drawable/ic_baseline_done_24"
        android:gravity="center" />
</layer-list>
<style name="ShapeAppearance.Capsule" parent="ShapeAppearance.MaterialComponents.SmallComponent">
    <item name="cornerFamily">rounded</item>
    <item name="cornerSize">50%</item>
</style>

在暗模式下显示这个 输入图像描述

0
你应该使用圆角图片视图
1. 实现//圆角图片
implementation "com.makeramen:roundedimageview:2.3.0"
2. 添加以下代码
<?xml version="1.0" encoding="utf-8"?>
<androidx.constraintlayout.widget.ConstraintLayout
    xmlns:android="http://schemas.android.com/apk/res/android" android:layout_width="match_parent"
    android:layout_height="match_parent">
    <RelativeLayout
        android:layout_width="match_parent"
        android:layout_height="match_parent">
        <com.makeramen.roundedimageview.RoundedImageView
            android:layout_width="100dp"
            android:layout_height="100dp"
            android:elevation="2dp"
            android:background="@drawable/dark_blue_circle"
            android:layout_centerHorizontal="true"/>

    <com.makeramen.roundedimageview.RoundedImageView
        android:layout_width="80dp"
        android:layout_height="80dp"
        android:layout_marginTop="10dp"
        android:elevation="2dp"
        android:background="@drawable/grey_circle"
        android:layout_centerHorizontal="true"/>
    <LinearLayout
        android:orientation="vertical"
        android:layout_width="match_parent"
        android:background="@drawable/rounded_white_rectangle"
        android:layout_height="match_parent"
        android:layout_alignParentTop="true"
        android:layout_marginTop="80dp">
        <TextView
            android:layout_marginTop="30dp"
            android:textColor="@color/blue_dark"
            android:layout_width="match_parent"
            android:layout_height="wrap_content"
            android:text="Warning"
            android:textStyle="bold"
            android:textAlignment="center"
            android:textSize="40dp"/>

        <TextView
            android:layout_marginTop="30dp"
            android:textColor="@color/blue_dark"
            android:layout_width="match_parent"
            android:layout_height="wrap_content"
            android:text="You just display this"
            android:textAlignment="center"
            android:textSize="40dp"/>
        
        <Button
            android:layout_width="match_parent"
            android:layout_height="60dp"
            android:text="Done"
            android:layout_marginStart="30dp"
            android:layout_marginEnd="30dp"
            android:textSize="40dp"
            android:textColor="white"/>

    </LinearLayout>

</RelativeLayout>

</androidx.constraintlayout.widget.ConstraintLayout>

第三步:对于drawable文件夹中的圆形图案,使用folded_dark_blue_circle.xml。
    <?xml version="1.0" encoding="utf-8"?> 
<shape xmlns:android="schemas.android.com/apk/res/android" android:innerRadius="0dp" 
android:shape="ring" 
android:thicknessRatio="2" 
android:useLevel="false" > 
<solid android:color="@color/colorToolbar" /> 
</shape>

  1. 对于drawable文件夹中的圆形图案,使用folded_dark_blue_circle.xml。
//////////////////////////////////////<?xml version="1.0" encoding="utf-8"?> <shape xmlns:android="http://schemas.android.com/apk/res/android" android:innerRadius="0dp" android:shape="ring" android:thicknessRatio="2" android:useLevel="false" > <solid android:color="@color/colorToolbar" /> </shape>///////////////////////// 这是你应该根据需要更改颜色和尺寸的全部内容。
- undefined

网页内容由stack overflow 提供, 点击上面的
可以查看英文原文,
原文链接