NVIDIA-SMI因无法与NVIDIA驱动程序通信而失败。

56

我正在运行一个带有Ubuntu 14.04 LTS的AWS EC2 g2.2xlarge实例。 在训练TensorFlow模型时,我想观察GPU利用率。 尝试运行“nvidia-smi”时出现错误。

ubuntu@ip-10-0-1-213:/etc/alternatives$ cd /usr/lib/nvidia-375/bin
ubuntu@ip-10-0-1-213:/usr/lib/nvidia-375/bin$ ls
nvidia-bug-report.sh     nvidia-debugdump     nvidia-xconfig
nvidia-cuda-mps-control  nvidia-persistenced
nvidia-cuda-mps-server   nvidia-smi
ubuntu@ip-10-0-1-213:/usr/lib/nvidia-375/bin$ ./nvidia-smi
NVIDIA-SMI has failed because it couldn't communicate with the NVIDIA driver. Make sure that the latest NVIDIA driver is installed and running.


ubuntu@ip-10-0-1-213:/usr/lib/nvidia-375/bin$ dpkg -l | grep nvidia 
ii  nvidia-346                                            352.63-0ubuntu0.14.04.1                             amd64        Transitional package for nvidia-346
ii  nvidia-346-dev                                        346.46-0ubuntu1                                     amd64        NVIDIA binary Xorg driver development files
ii  nvidia-346-uvm                                        346.96-0ubuntu0.0.1                                 amd64        Transitional package for nvidia-346
ii  nvidia-352                                            375.26-0ubuntu1                                     amd64        Transitional package for nvidia-375
ii  nvidia-375                                            375.39-0ubuntu0.14.04.1                             amd64        NVIDIA binary driver - version 375.39
ii  nvidia-375-dev                                        375.39-0ubuntu0.14.04.1                             amd64        NVIDIA binary Xorg driver development files
ii  nvidia-modprobe                                       375.26-0ubuntu1                                     amd64        Load the NVIDIA kernel driver and create device files
ii  nvidia-opencl-icd-346                                 352.63-0ubuntu0.14.04.1                             amd64        Transitional package for nvidia-opencl-icd-352
ii  nvidia-opencl-icd-352                                 375.26-0ubuntu1                                     amd64        Transitional package for nvidia-opencl-icd-375
ii  nvidia-opencl-icd-375                                 375.39-0ubuntu0.14.04.1                             amd64        NVIDIA OpenCL ICD
ii  nvidia-prime                                          0.6.2.1                                             amd64        Tools to enable NVIDIA's Prime
ii  nvidia-settings                                       375.26-0ubuntu1                                     amd64        Tool for configuring the NVIDIA graphics driver
ubuntu@ip-10-0-1-213:/usr/lib/nvidia-375/bin$ lspci | grep -i nvidia
00:03.0 VGA compatible controller: NVIDIA Corporation GK104GL [GRID K520] (rev a1)
ubuntu@ip-10-0-1-213:/usr/lib/nvidia-375/bin$ 

$ inxi -G
Graphics:  Card-1: Cirrus Logic GD 5446 
           Card-2: NVIDIA GK104GL [GRID K520] 
           X.org: 1.15.1 driver: N/A tty size: 80x24 Advanced Data: N/A out of X

$  lspci -k | grep -A 2 -E "(VGA|3D)"
00:02.0 VGA compatible controller: Cirrus Logic GD 5446
    Subsystem: XenSource, Inc. Device 0001
    Kernel driver in use: cirrus
00:03.0 VGA compatible controller: NVIDIA Corporation GK104GL [GRID K520] (rev a1)
    Subsystem: NVIDIA Corporation Device 1014
00:1f.0 Unassigned class [ff80]: XenSource, Inc. Xen Platform Device (rev 01)

我按照以下步骤安装了CUDA 7和cuDNN:

$sudo apt-get -q2 update
$sudo apt-get upgrade
$sudo reboot

=======================================================================

重启后,运行“$sudo update-initramfs -u”命令更新initramfs。

现在,请编辑/etc/modprobe.d/blacklist.conf文件以屏蔽nouveau驱动。在编辑器中打开该文件,并在文件末尾插入以下行:

blacklist nouveau blacklist lbm-nouveau options nouveau modeset=0 alias nouveau off alias lbm-nouveau off

保存并退出文件。

现在安装构建基本工具,然后按以下步骤更新initramfs并再次重启:

$sudo apt-get install linux-{headers,image,image-extra}-$(uname -r) build-essential
$sudo update-initramfs -u
$sudo reboot

重新启动后,运行以下命令安装Nvidia。

$sudo wget http://developer.download.nvidia.com/compute/cuda/7_0/Prod/local_installers/cuda_7.0.28_linux.run
$sudo chmod 700 ./cuda_7.0.28_linux.run
$sudo ./cuda_7.0.28_linux.run
$sudo update-initramfs -u
$sudo reboot

现在系统已经启动,通过运行以下命令来验证安装。
$sudo modprobe nvidia
$sudo nvidia-smi -q | head`enter code here`

你应该看到输出类似于“nvidia.png”。
现在运行以下命令。 $
cd ~/NVIDIA_CUDA-7.0_Samples/1_Utilities/deviceQuery
$make
$./deviceQuery

然而,在Tensorflow训练模型时,“nvidia-smi”仍然不显示GPU活动:
ubuntu@ip-10-0-1-48:~$ ipython
Python 2.7.11 |Anaconda custom (64-bit)| (default, Dec  6 2015, 18:08:32) 
Type "copyright", "credits" or "license" for more information.

IPython 4.1.2 -- An enhanced Interactive Python.
?         -> Introduction and overview of IPython's features.
%quickref -> Quick reference.
help      -> Python's own help system.
object?   -> Details about 'object', use 'object??' for extra details.

In [1]: import tensorflow as tf 
I tensorflow/stream_executor/dso_loader.cc:135] successfully opened CUDA library libcublas.so.7.5 locally
I tensorflow/stream_executor/dso_loader.cc:135] successfully opened CUDA library libcudnn.so.5 locally
I tensorflow/stream_executor/dso_loader.cc:135] successfully opened CUDA library libcufft.so.7.5 locally
I tensorflow/stream_executor/dso_loader.cc:135] successfully opened CUDA library libcuda.so.1 locally
I tensorflow/stream_executor/dso_loader.cc:135] successfully opened CUDA library libcurand.so.7.5 locally


ubuntu@ip-10-0-1-48:~$ nvidia-smi
Thu Mar 30 05:45:26 2017       
+------------------------------------------------------+                       
| NVIDIA-SMI 346.46     Driver Version: 346.46         |                       
|-------------------------------+----------------------+----------------------+
| GPU  Name        Persistence-M| Bus-Id        Disp.A | Volatile Uncorr. ECC |
| Fan  Temp  Perf  Pwr:Usage/Cap|         Memory-Usage | GPU-Util  Compute M. |
|===============================+======================+======================|
|   0  GRID K520           Off  | 0000:00:03.0     Off |                  N/A |
| N/A   35C    P0    38W / 125W |     10MiB /  4095MiB |      0%      Default |
+-------------------------------+----------------------+----------------------+

+-----------------------------------------------------------------------------+
| Processes:                                                       GPU Memory |
|  GPU       PID  Type  Process name                               Usage      |
|=============================================================================|
|  No running processes found                                                 |
+-----------------------------------------------------------------------------+

1
对我有效的方法是运行:nvidia-settings,然后选择NVIDIA GPU(根据您的喜好选择Performance/On-Demand)。它之前被设置为Intel。 - Akhil
27个回答

0

在 Linux 内核更新后,可能会出现此错误。您可以使用以下命令重新构建 nvidia 驱动程序以进行修复:

  1. 首先,您需要安装 dkms,它可以在内核版本更改后自动重新生成新模块。
    sudo apt-get install dkms
  2. 其次,重新构建您的 nvidia 驱动程序。这里我的 nvidia 驱动程序版本是 440.82,如果您之前已经安装了,可以在 /usr/src 中检查已安装的版本。
    sudo dkms build -m nvidia -v 440.82
  3. 最后,重新安装 nvidia 驱动程序。然后重新启动计算机。
    sudo dkms install -m nvidia -v 440.82

现在,您可以通过 sudo nvidia-smi 检查是否可以使用。


当你说“重新安装驱动程序”时,你的意思是什么?运行原始安装程序吗? - algal

0
  • chmod 700表示您可以对文件或目录进行任何操作,其他用户无法访问它
  1. 首先运行以下命令:

    chmod 700 ./Nvidia.xyz.run

  2. 启动Nvidia驱动程序

    sudo ./Nvidia.xyx.run


感谢您对Stack Overflow社区做出贡献的兴趣。这个问题已经有很多答案了,其中一个答案已经得到社区的广泛验证。您确定您的方法之前没有被提到过吗?如果是这样的话,能否解释一下您的方法与众不同的地方,在什么情况下您的方法可能更好,并且为什么您认为之前的答案不够满意。您能否编辑您的答案并提供一些解释呢? - undefined

0

Ubuntu 22.04

sudo apt remove --purge nvidia* && sudo ubuntu-drivers autoinstall && sudo reboot

0
我需要在g2.2xlarge Ubuntu 14.04LTS实例上安装NVIDIA 367.57驱动程序和CUDA 7.5与Tensorflow相关联。 例如:nvidia-graphics-drivers-367_367.57.orig.tar 现在,当我训练TensorFlow模型时,GRID K520 GPU正在工作。
ubuntu@ip-10-0-1-70:~$ nvidia-smi
Sat Apr  1 18:03:32 2017       
+-----------------------------------------------------------------------------+
| NVIDIA-SMI 367.57                 Driver Version: 367.57                    |
|-------------------------------+----------------------+----------------------+
| GPU  Name        Persistence-M| Bus-Id        Disp.A | Volatile Uncorr. ECC |
| Fan  Temp  Perf  Pwr:Usage/Cap|         Memory-Usage | GPU-Util  Compute M. |
|===============================+======================+======================|
|   0  GRID K520           Off  | 0000:00:03.0     Off |                  N/A |
| N/A   39C    P8    43W / 125W |   3800MiB /  4036MiB |      0%      Default |
+-------------------------------+----------------------+----------------------+

+-----------------------------------------------------------------------------+
| Processes:                                                       GPU Memory |
|  GPU       PID  Type  Process name                               Usage      |
|=============================================================================|
|    0      2254    C   python                                        3798MiB |
+-----------------------------------------------------------------------------+

ubuntu@ip-10-0-1-70:~/NVIDIA_CUDA-7.0_Samples/1_Utilities/deviceQuery$ ./deviceQuery 
./deviceQuery Starting...

 CUDA Device Query (Runtime API) version (CUDART static linking)

Detected 1 CUDA Capable device(s)

Device 0: "GRID K520"
  CUDA Driver Version / Runtime Version          8.0 / 7.0
  CUDA Capability Major/Minor version number:    3.0
  Total amount of global memory:                 4036 MBytes (4232052736 bytes)
  ( 8) Multiprocessors, (192) CUDA Cores/MP:     1536 CUDA Cores
  GPU Max Clock rate:                            797 MHz (0.80 GHz)
  Memory Clock rate:                             2500 Mhz
  Memory Bus Width:                              256-bit
  L2 Cache Size:                                 524288 bytes
  Maximum Texture Dimension Size (x,y,z)         1D=(65536), 2D=(65536, 65536), 3D=(4096, 4096, 4096)
  Maximum Layered 1D Texture Size, (num) layers  1D=(16384), 2048 layers
  Maximum Layered 2D Texture Size, (num) layers  2D=(16384, 16384), 2048 layers
  Total amount of constant memory:               65536 bytes
  Total amount of shared memory per block:       49152 bytes
  Total number of registers available per block: 65536
  Warp size:                                     32
  Maximum number of threads per multiprocessor:  2048
  Maximum number of threads per block:           1024
  Max dimension size of a thread block (x,y,z): (1024, 1024, 64)
  Max dimension size of a grid size    (x,y,z): (2147483647, 65535, 65535)
  Maximum memory pitch:                          2147483647 bytes
  Texture alignment:                             512 bytes
  Concurrent copy and kernel execution:          Yes with 2 copy engine(s)
  Run time limit on kernels:                     No
  Integrated GPU sharing Host Memory:            No
  Support host page-locked memory mapping:       Yes
  Alignment requirement for Surfaces:            Yes
  Device has ECC support:                        Disabled
  Device supports Unified Addressing (UVA):      Yes
  Device PCI Domain ID / Bus ID / location ID:   0 / 0 / 3
  Compute Mode:
     < Default (multiple host threads can use ::cudaSetDevice() with device simultaneously) >

deviceQuery, CUDA Driver = CUDART, CUDA Driver Version = 8.0, CUDA Runtime Version = 7.0, NumDevs = 1, Device0 = GRID K520
Result = PASS

0

对我都没有帮助。

我正在使用在Google Cloud上的KubernetesTesla K-80 GPU

按照此指南确保您已正确安装:

https://cloud.google.com/kubernetes-engine/docs/how-to/gpus

我错过了一些重要的事情:

  1. 在您的NODES上安装NVIDIA GPU设备驱动程序。使用以下命令:

COS节点:

kubectl apply -f https://raw.githubusercontent.com/GoogleCloudPlatform/container-engine-accelerators/master/nvidia-driver-installer/cos/daemonset-preloaded.yaml

UBUNTU节点:

kubectl apply -f https://raw.githubusercontent.com/GoogleCloudPlatform/container-engine-accelerators/master/nvidia-driver-installer/ubuntu/daemonset-preloaded.yaml

确保更新已应用到您的节点。如果关闭了升级,请重新启动它们。

  1. 我在我的Docker中使用这个镜像nvidia/cuda:10.1-base-ubuntu16.04

  2. 你必须设置GPU限制!这是节点驱动程序与Pod通信的唯一方式。在您的yaml配置下,添加以下内容到您的容器中:

    resources:
      limits:
        nvidia.com/gpu: 1
    

0
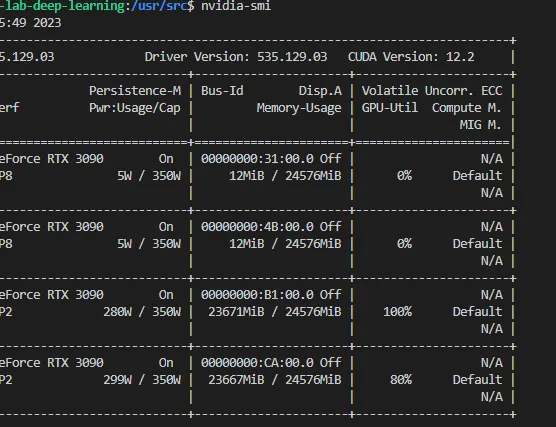
在/usr/src目录下:
ls

enter image description here

找到你的NVIDIA驱动程序版本(例如nvidia-535.129.03),然后:
sudo apt-get install dkms
sudo dkms install -m nvidia -v 535.129.03

如果版本中有 srv(例如,nvidia-srv-535.129.03),则在版本系列之前添加 srvsudo dkms install -m nvidia -v srv-535.129.03。 问题已解决:

enter image description here


请阅读为什么不应该上传代码/数据/错误的图片? 您可以[编辑]您的问题,并用[code block]替换图片。最简单的方法是将代码直接粘贴为文本到您的问题中,然后选择它并点击代码块按钮。 - undefined
@Chris 嗨,Chris。我已经在答案中输入了代码的文本版本。这些图片与代码/数据/错误无关,只是结果。即使没有看到这些图片,问题仍然可以通过按照我输入的代码来解决。 - undefined
为什么这只适用于代码呢?如果结果是你答案的重要部分,它们也应该以文本形式提供。 - undefined

-16

尝试拔出NVIDIA显卡并重新插入。


6
这有什么可能帮助呢? - giusti
13
在AWS实例上如何完成这个操作? - Caustic
这不是SNES游戏卡带。 - Eduardo Reis

网页内容由stack overflow 提供, 点击上面的
可以查看英文原文,
原文链接