如何使用storyboard添加浮动按钮,类似Facebook的App Rooms?
我只知道在tableview上拖动UIView,但现在无法这样做。

如何使用storyboard添加浮动按钮,类似Facebook的App Rooms?
我只知道在tableview上拖动UIView,但现在无法这样做。
以下是按钮代码:
Swift 4.2:完成视图控制器实现
import Foundation

public class FloatingButtonViewController: UIViewController {
    private var floatingButton: UIButton?
    // TODO: Replace image name with your own image:
    private let floatingButtonImageName = "NAME OF YOUR IMAGE"
    private static let buttonHeight: CGFloat = 75.0
    private static let buttonWidth: CGFloat = 75.0
    private let roundValue = FloatingButtonViewController.buttonHeight/2
    private let trailingValue: CGFloat = 15.0
    private let leadingValue: CGFloat = 15.0
    private let shadowRadius: CGFloat = 2.0
    private let shadowOpacity: Float = 0.5
    private let shadowOffset = CGSize(width: 0.0, height: 5.0)
    private let scaleKeyPath = "scale"
    private let animationKeyPath = "transform.scale"
    private let animationDuration: CFTimeInterval = 0.4
    private let animateFromValue: CGFloat = 1.00
    private let animateToValue: CGFloat = 1.05

    public override func viewWillAppear(_ animated: Bool) {
        super.viewWillAppear(animated)
        createFloatingButton()
    }

    public override func viewWillDisappear(_ animated: Bool) {
        guard floatingButton?.superview != nil else {  return }
        DispatchQueue.main.async {
            self.floatingButton?.removeFromSuperview()
            self.floatingButton = nil
        }
        super.viewWillDisappear(animated)
    }

    private func createFloatingButton() {
        floatingButton = UIButton(type: .custom)
        floatingButton?.translatesAutoresizingMaskIntoConstraints = false
        floatingButton?.backgroundColor = .white
        floatingButton?.setImage(UIImage(named: floatingButtonImageName), for: .normal)
        floatingButton?.addTarget(self, action: #selector(doThisWhenButtonIsTapped(_:)), for: .touchUpInside)
        constrainFloatingButtonToWindow()
        makeFloatingButtonRound()
        addShadowToFloatingButton()
        addScaleAnimationToFloatingButton()
    }

    // TODO: Add some logic for when the button is tapped.
    @IBAction private func doThisWhenButtonIsTapped(_ sender: Any) {
        print("Button Tapped")
    }

    private func constrainFloatingButtonToWindow() {
        DispatchQueue.main.async {
            guard let keyWindow = UIApplication.shared.keyWindow,
                let floatingButton = self.floatingButton else { return }
            keyWindow.addSubview(floatingButton)
            keyWindow.trailingAnchor.constraint(equalTo: floatingButton.trailingAnchor,
                                                constant: self.trailingValue).isActive = true
            keyWindow.bottomAnchor.constraint(equalTo: floatingButton.bottomAnchor,
                                              constant: self.leadingValue).isActive = true
            floatingButton.widthAnchor.constraint(equalToConstant:
                FloatingButtonViewController.buttonWidth).isActive = true
            floatingButton.heightAnchor.constraint(equalToConstant:
                FloatingButtonViewController.buttonHeight).isActive = true
        }
    }

    private func makeFloatingButtonRound() {
        floatingButton?.layer.cornerRadius = roundValue
    }

    private func addShadowToFloatingButton() {
        floatingButton?.layer.shadowColor = UIColor.black.cgColor
        floatingButton?.layer.shadowOffset = shadowOffset
        floatingButton?.layer.masksToBounds = false
        floatingButton?.layer.shadowRadius = shadowRadius
        floatingButton?.layer.shadowOpacity = shadowOpacity
    }

    private func addScaleAnimationToFloatingButton() {
        // Add a pulsing animation to draw attention to button:
        DispatchQueue.main.async {
            let scaleAnimation: CABasicAnimation = CABasicAnimation(keyPath: self.animationKeyPath)
            scaleAnimation.duration = self.animationDuration
            scaleAnimation.repeatCount = .greatestFiniteMagnitude
            scaleAnimation.autoreverses = true
            scaleAnimation.fromValue = self.animateFromValue
            scaleAnimation.toValue = self.animateToValue
            self.floatingButton?.layer.add(scaleAnimation, forKey: self.scaleKeyPath)
        }
    }
}
viewWillDisappear(_:) 中,您想使用的是 super.viewWillDisappear(animated) 而不是 super.viewWillAppear(animated)?此外,对于脉动动画,我需要将代码放在 DispatchQueue.main.async { ... } 中,以便脉动对我起作用。再次感谢! - bvh有点晚了,但希望能帮到某些人。您可以通过编程轻松地完成此操作。只需创建按钮的实例,设置所需的属性即可。最好使用约束而不是框架,因为它会在每个屏幕大小上以相同的位置呈现按钮。我将发布使按钮变圆的代码。尝试使用约束值来更改按钮的位置和大小。
Swift 3
var roundButton = UIButton()
override func viewDidLoad() {
    super.viewDidLoad()
    self.roundButton = UIButton(type: .custom)
    self.roundButton.setTitleColor(UIColor.orange, for: .normal)
    self.roundButton.addTarget(self, action: #selector(ButtonClick(_:)), for: UIControlEvents.touchUpInside)
    self.view.addSubview(roundButton)
}

override func viewWillLayoutSubviews() {

    roundButton.layer.cornerRadius = roundButton.layer.frame.size.width/2
    roundButton.backgroundColor = UIColor.lightGray
    roundButton.clipsToBounds = true
    roundButton.setImage(UIImage(named:"your-image"), for: .normal)
    roundButton.translatesAutoresizingMaskIntoConstraints = false
    NSLayoutConstraint.activate([
        roundButton.trailingAnchor.constraint(equalTo: self.view.trailingAnchor, constant: -3),
    roundButton.bottomAnchor.constraint
    (equalTo: self.view.bottomAnchor, constant: -53),
    roundButton.widthAnchor.constraint(equalToConstant: 50),
    roundButton.heightAnchor.constraint(equalToConstant: 50)])
}

/** Action Handler for button **/

@IBAction func ButtonClick(_ sender: UIButton){

 /** Do whatever you wanna do on button click**/

}
以下是@Kunal Kumar的回答,它适用于UIScrollView和UIView,但不适用于UITableView。我发现只需要添加一行代码就可以让它在UITableView上工作。非常感谢@Kunal Kumar。
在viewDidLoad中,将self.view.addSubview(roundButton)更改为self.navigationController?.view.addSubview(roundButton)即可。
顺便说一下,在viewWillLayoutSubviews()方法中,我认为我们需要添加super.viewWillLayoutSubviews()。
以下是所有代码:
Swift 3
// MARK: Floating Button

var roundButton = UIButton()
func createFloatingButton() {
    self.roundButton = UIButton(type: .custom)
    self.roundButton.setTitleColor(UIColor.orange, for: .normal)
    self.roundButton.addTarget(self, action: #selector(ButtonClick(_:)), for: UIControlEvents.touchUpInside)
    //change view to navigationController?.view, if you have a navigationController in this tableview
    self.navigationController?.view.addSubview(roundButton)
}

override func viewWillLayoutSubviews() {
    super.viewWillLayoutSubviews()

    roundButton.layer.cornerRadius = roundButton.layer.frame.size.width/2
    roundButton.backgroundColor = UIColor.lightGray
    roundButton.clipsToBounds = true
    roundButton.setImage(UIImage(named:"ic_wb_sunny_48pt"), for: .normal)
    roundButton.translatesAutoresizingMaskIntoConstraints = false
    NSLayoutConstraint.activate([
        roundButton.trailingAnchor.constraint(equalTo: self.view.trailingAnchor, constant: -3),
        roundButton.bottomAnchor.constraint(equalTo: self.view.bottomAnchor, constant: -53),
        roundButton.widthAnchor.constraint(equalToConstant: 50),
        roundButton.heightAnchor.constraint(equalToConstant: 50)])
}
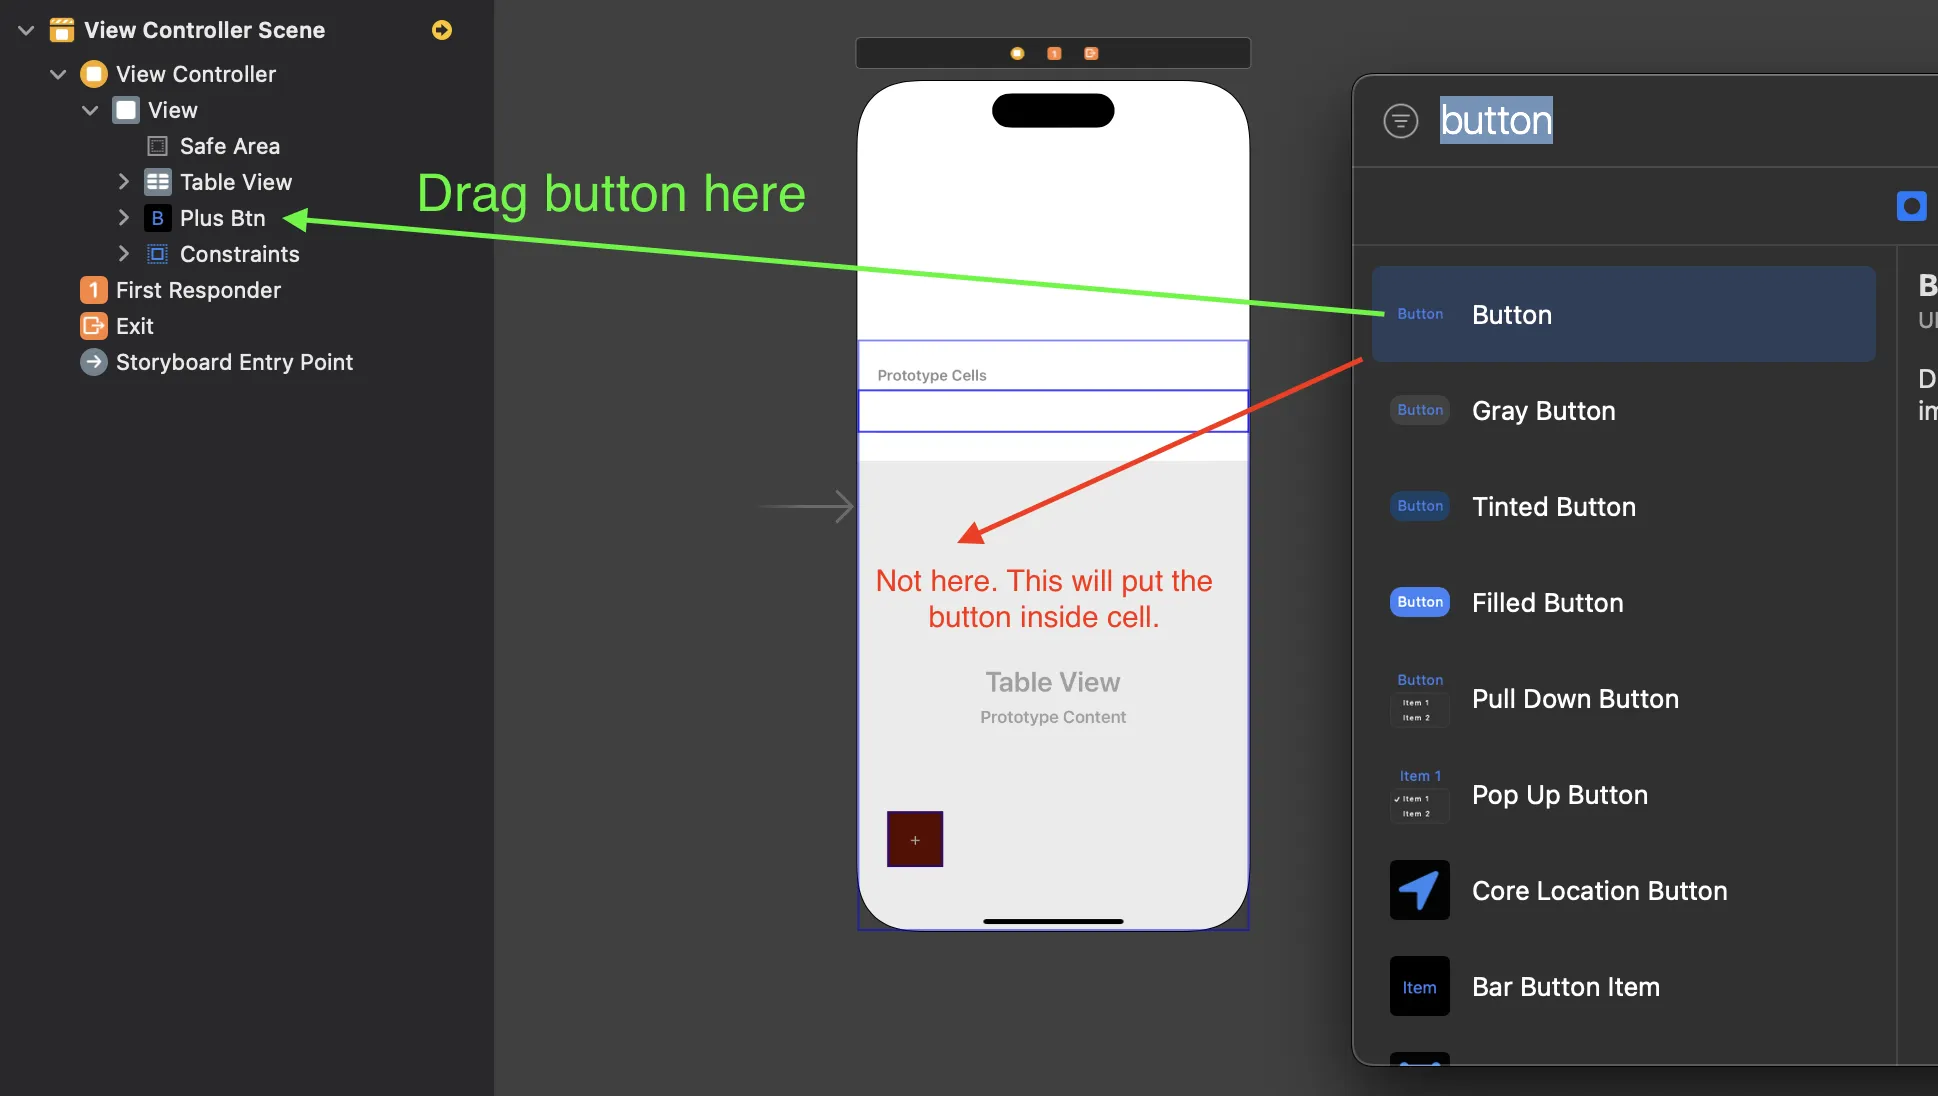
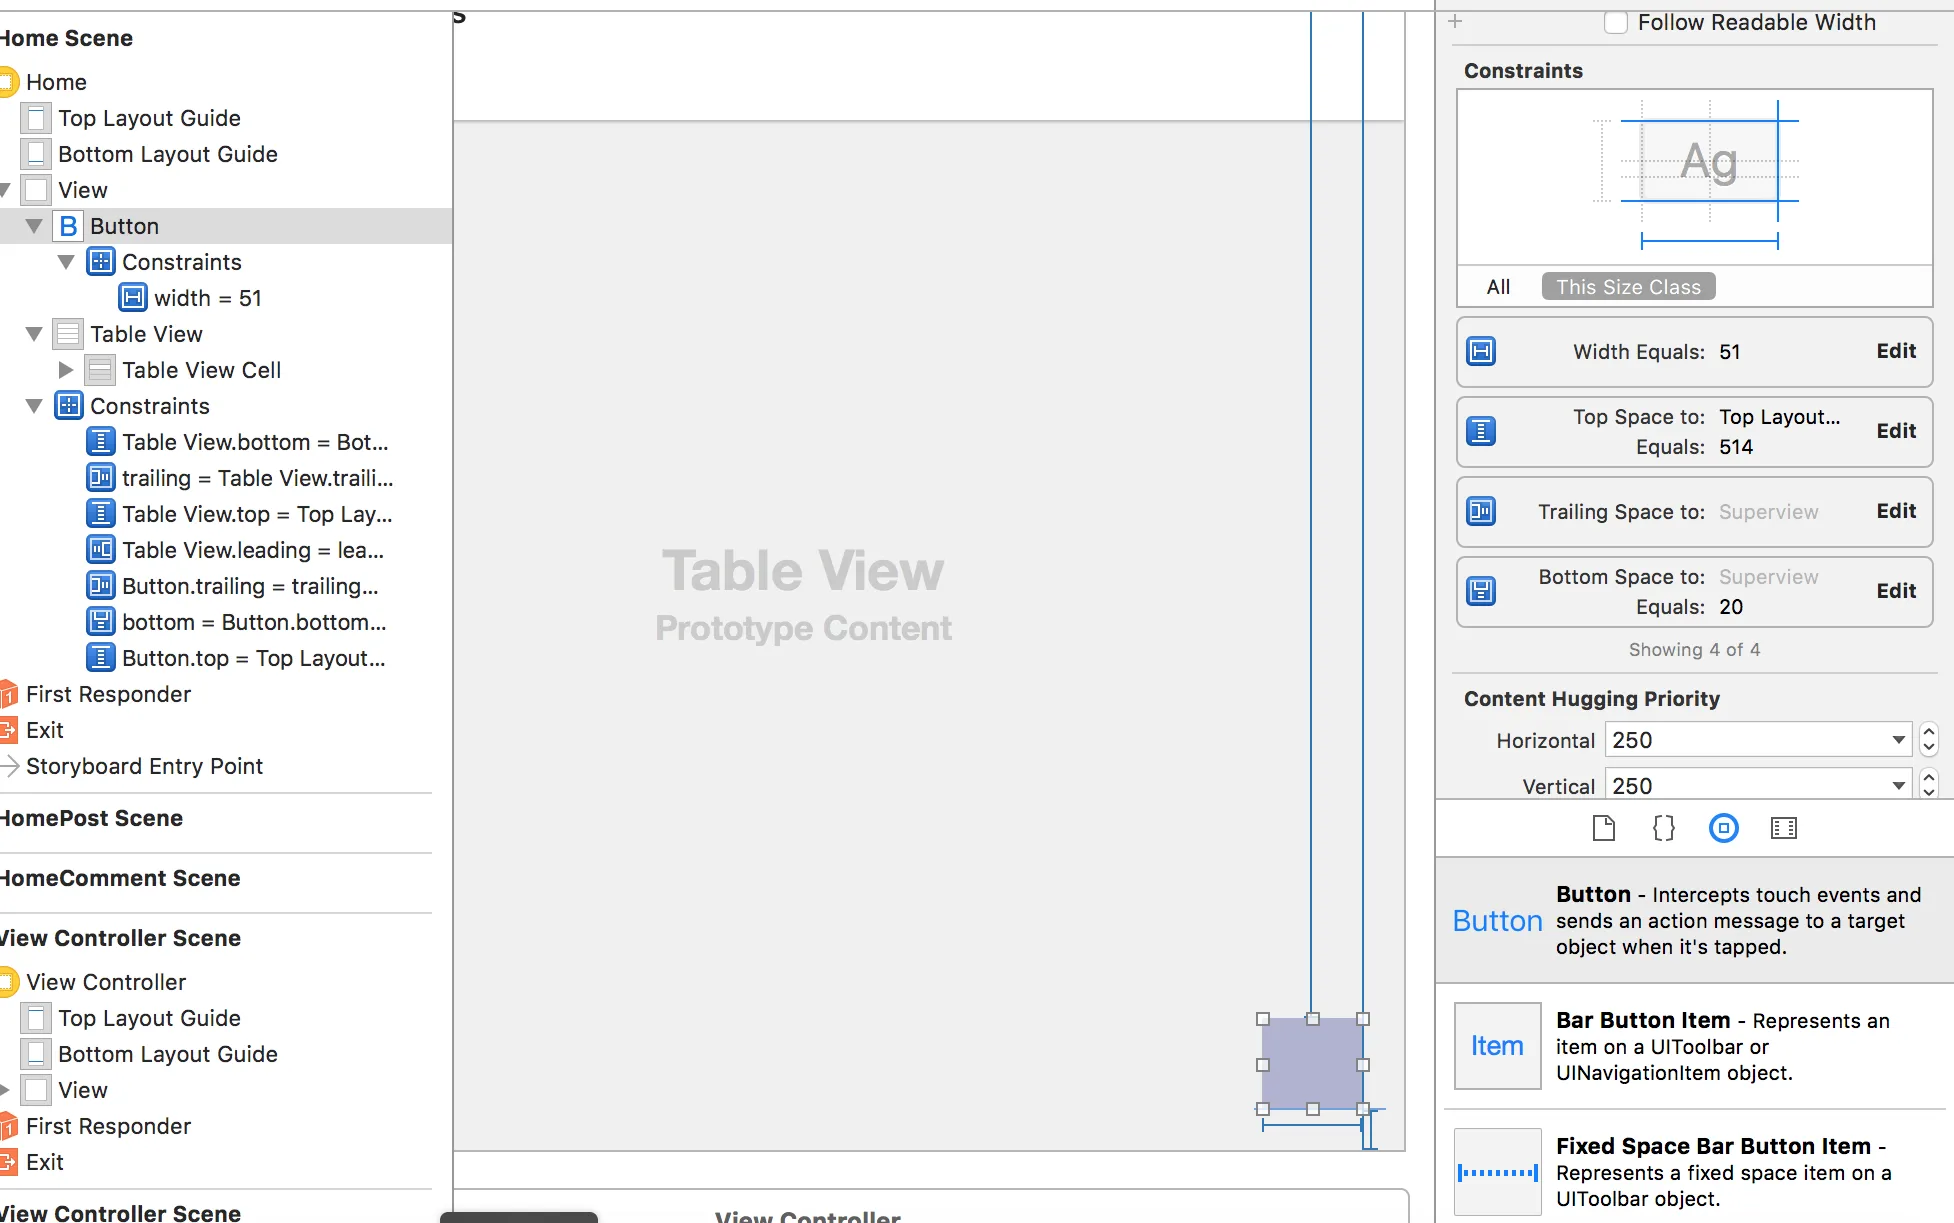
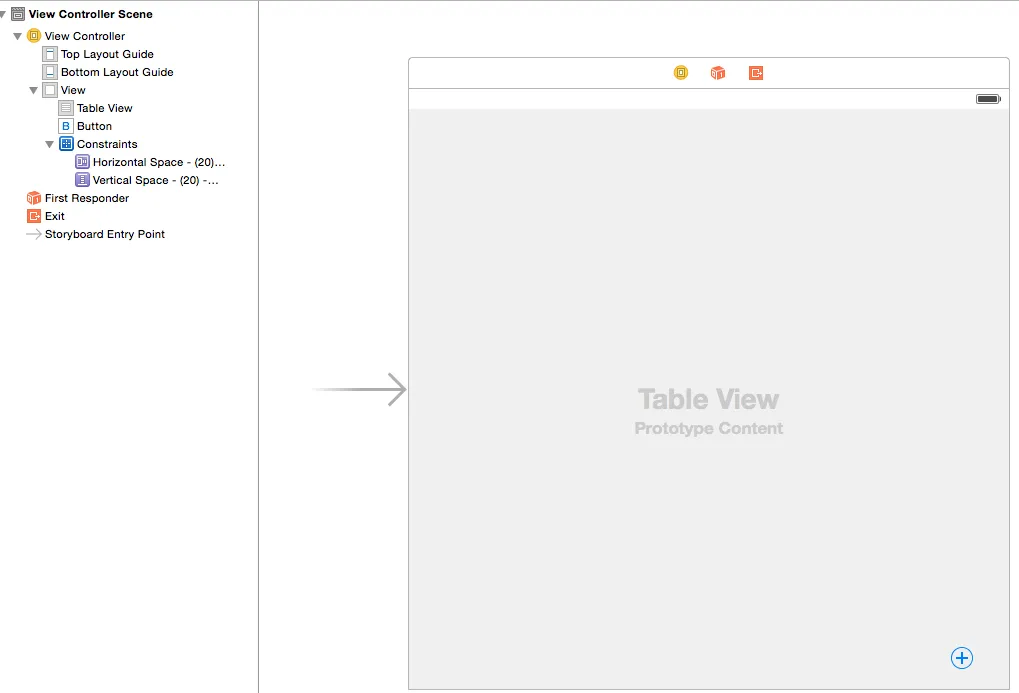
这是因为您的UIButton位于UITableView下方,将其移动到故事板树中,使其显示如下:
最初的回答:
只是因为您的UIButton位于UITableView下方,请将其移动到故事板树中,以便它显示在UITableView上方。
| View
|-- Table View
|-- Button