使用OpenCV将PNG图片的透明背景改为白色背景

12

我有一张OpenCV图像,类似于:

opencvImage = cv2.cvtColor(numpy_image, cv2.COLOR_RGBA2BGRA)

然后,使用以下代码片段,我想去除透明度并设置为白色背景。

source_img = cv2.cvtColor(opencvImage[:, :, :3], cv2.COLOR_BGRA2GRAY)
source_mask = opencvImage[:,:,3]  * (1 / 255.0)

background_mask = 1.0 - source_mask

bg_part = (background_color * (1 / 255.0)) * (background_mask)
source_part = (source_img * (1 / 255.0)) * (source_mask)

result_image = np.uint8(cv2.addWeighted(bg_part, 255.0, source_part, 255.0, 0.0))

实际上,我可以将背景设置为白色,但实际图像的颜色也会改变。 我相信COLOR_BGRA2GRAY方法导致了这个问题。因此,我尝试使用IMREAD_UNCHANGED方法,但我遇到了这个错误:'cvtColor'函数中不支持的颜色转换代码

顺便说一下,我对任何解决方案都持开放态度,只是分享我的代码 - 可能需要一些小修补。

5个回答

36

这是一个基本脚本,它将替换所有完全透明的像素为白色,并移除 alpha 通道。

import cv2
#load image with alpha channel.  use IMREAD_UNCHANGED to ensure loading of alpha channel
image = cv2.imread('your image', cv2.IMREAD_UNCHANGED)    

#make mask of where the transparent bits are
trans_mask = image[:,:,3] == 0

#replace areas of transparency with white and not transparent
image[trans_mask] = [255, 255, 255, 255]

#new image without alpha channel...
new_img = cv2.cvtColor(image, cv2.COLOR_BGRA2BGR)

完成这个操作并将新图像进行序列化后,我无法打开它,每个程序都说该文件(图片)已损坏。大小也增加了20倍。 - PlsWork
@AnnaVopureta,你可能想使用imwrite函数来保存你的图像,而不是将其封存。 - user1269942
如何在Java中实现这个功能 - zephor

3

所有之前的答案都使用二值化,但是掩码可以是非二进制的。在这种情况下,您可以使用alpha blending和白色背景。

def alpha_blend_with_mask(foreground, background, mask): # modified func from link
    # Convert uint8 to float
    foreground = foreground.astype(float)
    background = background.astype(float)

    # Normalize the mask mask to keep intensity between 0 and 1
    mask = cv2.cvtColor(mask, cv2.COLOR_GRAY2BGR)
    mask = mask.astype(float) / 255

    # Multiply the foreground with the mask matte
    foreground = cv2.multiply(mask, foreground)

    # Multiply the background with ( 1 - mask )
    background = cv2.multiply(1.0 - mask, background)

    # Add the masked foreground and background.
    return cv2.add(foreground, background).astype(np.uint8)

img_with_white_background = alpha_blend_with_mask(img[..., :3], np.ones_like(clip_img) * 255, img[..., 3])

3

我不确定那个错误是什么,但是我刚刚为你测试了一个可能的解决方案。虽然这是用C++写的,但我认为你可以很容易地将它转换成Python。

 /* Setting data info */
std::string test_image_path = "Galicia.png";

/* General variables */
cv::namedWindow("Input image", cv::WINDOW_NORMAL);
cv::namedWindow("Input image R", cv::WINDOW_NORMAL);
cv::namedWindow("Input image G", cv::WINDOW_NORMAL);
cv::namedWindow("Input image B", cv::WINDOW_NORMAL);
cv::namedWindow("Input image A", cv::WINDOW_NORMAL);
cv::namedWindow("Output image", cv::WINDOW_NORMAL);

/* Process */
cv::Mat test_image = cv::imread(test_image_path, cv::IMREAD_UNCHANGED);
std::cout << "Image type: " << test_image.type() << std::endl;

// Split channels of the png files
std::vector<cv::Mat> pngChannels(4);
cv::split(test_image, pngChannels);

cv::imshow("Input image", test_image);
cv::imshow("Input image R", pngChannels[0]);
cv::imshow("Input image G", pngChannels[1]);
cv::imshow("Input image B", pngChannels[2]);
cv::imshow("Input image A", pngChannels[3]);

// Set to 255(white) the RGB channels where the Alpha channel(mask) is 0(transparency)
pngChannels[0].setTo(cv::Scalar(255), pngChannels[3]==0);
pngChannels[1].setTo(cv::Scalar(255), pngChannels[3]==0);
pngChannels[2].setTo(cv::Scalar(255), pngChannels[3]==0);

// Merge again the channels
cv::Mat test_image_output;
cv::merge(pngChannels, test_image_output);

// Show the merged channels.
cv::imshow("Output image", test_image_output);

// For saving with changes, conversion is needed.
cv::cvtColor(test_image_output, test_image_output, cv::COLOR_RGBA2RGB);
cv::imwrite("Galicia_mod.png", test_image_output);

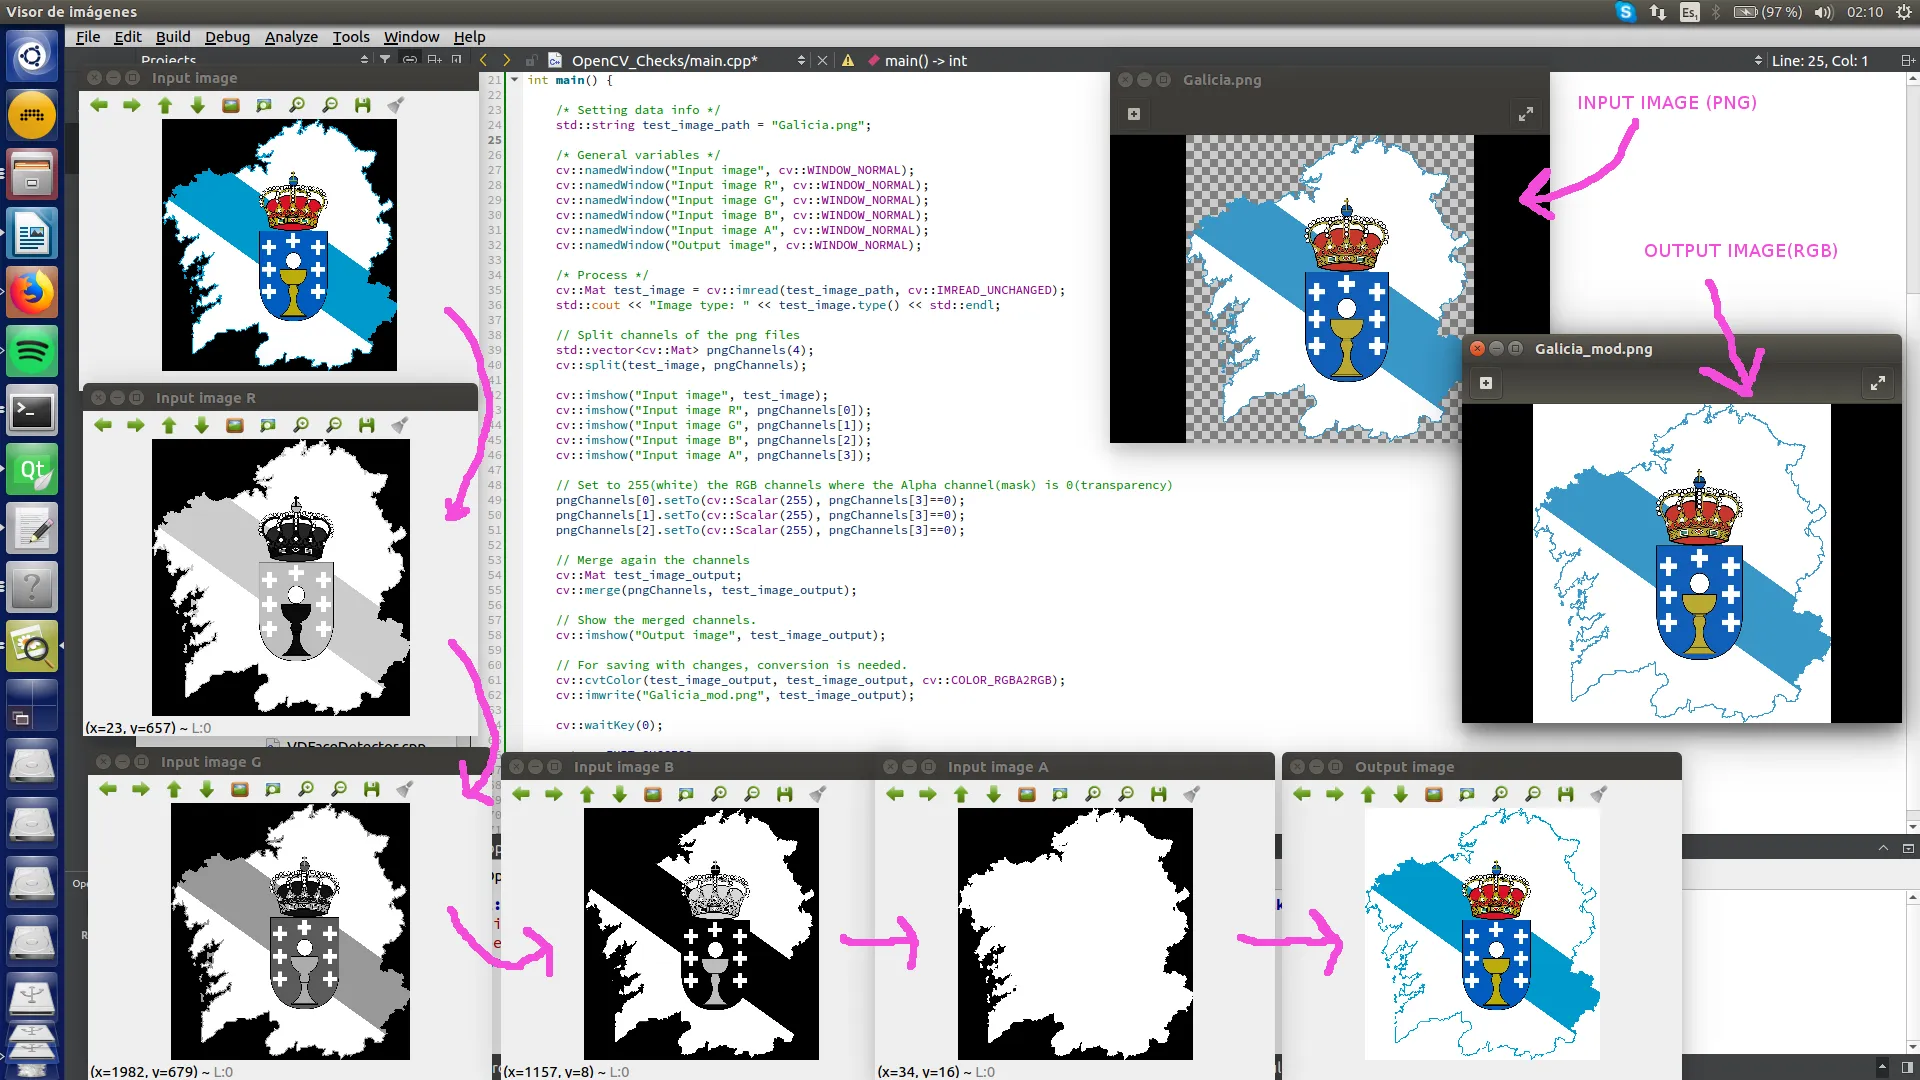
我通过这张截图来补充我的代码,它可能会帮助你更好地理解我的解决方案: enter image description here 祝一切顺利, Arritmic

1
谢谢分享。这也是我遵循的逻辑,并且你以清晰的方式描述了它。谢谢。 - eknbrk

1

用户@user1269942的答案在图像周围留下了黑边并产生了不必要的轮廓。我需要为这个图像填充背景。 这是我需要转换的图像

按照被接受的答案中的步骤所得到的图像 然而,如果我们根据阈值进行掩膜处理,我们可以根据我们选择的阈值来减少不必要的轮廓。 在我的情况下,我选择了75作为阈值。
因此,我们不再使用trans_mask = image[:,:,3] == 0,而是使用

img2gray = cv2.cvtColor(image,cv2.COLOR_BGR2GRAY)    
ret, trans_mask = cv2.threshold(img2gray, 75, 255, cv2.THRESH_BINARY)    
trans_mask = trans_mask == 0    

def fillColor(imageFile, color):    
  image = cv2.imread(imageFile, cv2.IMREAD_UNCHANGED)    
  #trans_mask = image[:,:,3] == 0
  img2gray = cv2.cvtColor(image,cv2.COLOR_BGR2GRAY)    
  ret, trans_mask = cv2.threshold(img2gray, 75, 255, cv2.THRESH_BINARY)
  trans_mask = trans_mask == 0
  image[trans_mask] = color    
  new_img = cv2.cvtColor(image, cv2.COLOR_BGRA2BGR)    
  return new_img

输出图像


0

这对我有用...

# import cv2
# #load image with alpha channel.  use IMREAD_UNCHANGED to ensure loading of alpha channel
image = cv2.imread('/content/test1.jpg')    

#make mask of where the transparent bits are
transp_mask = image[:,:,:3] == 0
transp_mask = image[:,:,:3] == 1 # swap 

#replace areas of transparency with white and not transparent
image[transp_mask] = [100]


#new image without alpha channel...
new_img = cv2.cvtColor(image, cv2.COLOR_BGRA2BGR)
cv2.imwrite('testingnew.jpg',new_img)  converted to binary img
print(new_img.shape)
plt.imshow(new_img)

透明图像

enter image description here

输出

enter image description here

输出2

enter image description here

真实图像

enter image description here


网页内容由stack overflow 提供, 点击上面的
可以查看英文原文,
原文链接