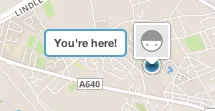
悬停自定义标记时显示工具提示

8
我有一个关于Google地图的测试:http://jsfiddle.net/gM6Z6/ 如您所见,它获取您的位置,并使用三个标记在地图上显示它。
我想要做的是,当用户悬停在任何一个标记上时,我想在标记头像旁边显示以下工具提示:
var tooltipOptions={
    marker:marker,
    content: "You're here!",
    cssClass:'tooltip'
};
var tooltip = new Tooltip(tooltipOptions);

我不确定如何最好地做到这一点,因为我需要它适用于所有三个标记,并且在悬停哪个标记时保持在同一位置。它应该始终出现在头像旁边,就像下面的foursquare截图中那样,但是应该根据屏幕上图标的位置向左或向右移动以使其适合。

enter image description here

有人能帮忙吗?因为对此的文档描述有些模糊... 我可以创建工具提示,但是我不确定如何最好地显示它以适用于所有三个标记,但在相同的位置并且视口感知。

为什么不用透明背景把你的标记做大呢?(谷歌知道你的标记大小,应该可以让它适配)如果你的头像是动态的,这可能行不通。 - turtlepick
1
请更新您的代码片段,将当前的Tooltip代码包含在其中。 Tooltip不是API的一部分,并且没有表明它的实现方式。 - Andrew Leach
2个回答

9

请看这里:

http://jsfiddle.net/nickaknudson/KVa2d/


此链接为JSFiddle上的一个代码示例。
tooltip = new Tooltip("text");
...
tooltip.open(map, marker);

可通过CSS进行自定义。

更新

有注释的代码: http://jsfiddle.net/nickaknudson/KVa2d/12/

更新2

删除了不必要的部分: http://jsfiddle.net/nickaknudson/KVa2d/14/

//========================
// Tooltip Class Definition
//   extends OverlayView:
//   https://developers.google.com/maps/documentation/javascript/reference#OverlayView
//========================
var Tooltip
Tooltip = function(tip) {
    this.tip = tip;
    this.buildDOM();
};

$.extend(Tooltip.prototype, google.maps.OverlayView.prototype, {

    // build the DOM
    buildDOM: function() {
        // Body DIV
        this.bdiv = $("<div></div>").addClass('WindowBody').html(this.tip);
        // Window DIV
        this.wdiv = $("<div></div>").addClass('Window').append(this.bdiv);
        // Shadow DIV
        this.sdiv = $("<div></div>").addClass('WindowShadow');
        // Start Closed
        this.close();
    },

    // API - onAdd
    onAdd: function() {
        $(this.getPanes().floatPane).append(this.wdiv);
        $(this.getPanes().floatShadow).append(this.sdiv);
    },

    // API - onRemove
    onRemove: function() {
        this.wdiv.detach();
        this.sdiv.detach();

    },

    // API - draw
    draw: function() {
        var pos, left, top;
        // projection is accessible?
        if (!this.getProjection()) return;
        // position is accessible?
        if (!this.get('position')) return;
        // convert projection
        pos = this.getProjection().fromLatLngToDivPixel(this.get('position'));
        // top offset
        top = pos.y - this.getAnchorHeight() / 2;
        // left offset
        if (this.getMap().getCenter().lng() > this.get('position').lng()) {
            left = pos.x + this.wdiv.width() * 0.5;
        } else {
            left = pos.x - this.wdiv.width() * 1.5;
        }
        // window position
        this.wdiv.css('top', top);
        this.wdiv.css('left', left);
        // shadow position
        this.sdiv.css('top', (top - this.getAnchorHeight() / 2));
        this.sdiv.css('left', left);
        // shadow size
        this.sdiv.width(this.wdiv.width());
        this.sdiv.height(this.wdiv.height());
    },

    // open Tooltip
    open: function(map, anchor) {
        // bind to map
        if (map) this.setMap(map);
        // bind to anchor
        if (anchor) {
            this.set('anchor', anchor);
            this.bindTo('anchorPoint', anchor);
            this.bindTo('position', anchor);
        }
        // need to force redraw otherwise it will decide to draw after we show the Tooltip                    
        this.draw();
        // show tooltip
        this.wdiv.show();
        this.sdiv.show();
        // set property
        this.isOpen = true;
    },

    // close Tooltip
    close: function() {
        // hide tooltip
        this.wdiv.hide();
        this.sdiv.hide();
        // set property
        this.isOpen = false;
    },

    // correctly get the anchorPoint height
    getAnchorHeight: function() {
        // See: https://developers.google.com/maps/documentation/javascript/reference#InfoWindow
        //   "The anchorPoint is the offset from the anchor's position to the tip of the InfoWindow."
        return -1 * this.get('anchorPoint').y;
    }
});

更新 3

使用outerWidth()和outerHeight()更好地定位,可以考虑边框等因素。已删除阴影div。

http://jsfiddle.net/nickaknudson/KVa2d/16/

//========================
// Tooltip Class Definition
//   extends OverlayView:
//   https://developers.google.com/maps/documentation/javascript/reference#OverlayView
//========================
var Tooltip
Tooltip = function(tip) {
    this.tip = tip;
    this.buildDOM();
};

$.extend(Tooltip.prototype, google.maps.OverlayView.prototype, {

    // build the DOM
    buildDOM: function() {
        // Window DIV
        this.wdiv = $("<div></div>").addClass('Window').append(this.tip);
        // Start Closed
        this.close();
    },

    // API - onAdd
    onAdd: function() {
        $(this.getPanes().floatPane).append(this.wdiv);
    },

    // API - onRemove
    onRemove: function() {
        this.wdiv.detach();
    },

    // API - draw
    draw: function() {
        var pos, left, top;
        // projection is accessible?
        if (!this.getProjection()) return;
        // position is accessible?
        if (!this.get('position')) return;
        // convert projection
        pos = this.getProjection().fromLatLngToDivPixel(this.get('position'));
        // top offset
        top = pos.y - this.getAnchorHeight() / 2 - this.wdiv.outerHeight()/2;
        // left offset
        if (this.getMap().getCenter().lng() > this.get('position').lng()) {
            left = pos.x + this.wdiv.outerWidth() * 0.3;
        } else {
            left = pos.x - this.wdiv.outerWidth() * 1.3;
        }
        // window position
        this.wdiv.css('top', top);
        this.wdiv.css('left', left);
    },

    // open Tooltip
    open: function(map, anchor) {
        // bind to map
        if (map) this.setMap(map);
        // bind to anchor
        if (anchor) {
            this.set('anchor', anchor);
            this.bindTo('anchorPoint', anchor);
            this.bindTo('position', anchor);
        }
        // need to force redraw otherwise it will decide to draw after we show the Tooltip                    
        this.draw();
        // show tooltip
        this.wdiv.show();
        // set property
        this.isOpen = true;
    },

    // close Tooltip
    close: function() {
        // hide tooltip
        this.wdiv.hide();
        // set property
        this.isOpen = false;
    },

    // correctly get the anchorPoint height
    getAnchorHeight: function() {
        // See: https://developers.google.com/maps/documentation/javascript/reference#InfoWindow
        //   "The anchorPoint is the offset from the anchor's position to the tip of the InfoWindow."
        return -1 * this.get('anchorPoint').y;
    }
});​

资源


代码有点多,对于这么简单的事情...你确定所有的都是必要的吗?不过还是谢谢你提供代码。我很想看看是否可以简化它。谢谢。 - Cameron
删除不必要的代码,例如由CoffeeScript生成的代码。如果您不需要阴影效果,甚至可以更简单? - nickaknudson
不是我给你点了踩,Nick。我个人非常感谢迄今为止的帮助。最后一个问题,能不能只做成一个窗口,没有单独的窗口和窗口主体,也没有阴影?这样它就只是一个需要在屏幕上定位的div工具提示。如果你能做到这一点,那就太完美了,对我使用它作为基础会有很大帮助。 - Cameron
1
也许你应该先自己尝试一下,然后再回来分享你的进展。这不是一个让别人替你完成所有工作的地方。 - Chris Herring
我已经完成了这里:http://dev.driz.co.uk/GoogleMap.html,但我不确定如何使其仅使用一个div(我目前只对一个div进行样式设置并删除了阴影),以及如何确保提示定位如原始截图所示,而不是像它现在显示的那样在下方。 - Cameron
我继续你的工作,移除了阴影。现在只使用一个 div。使定位更加稳健。http://jsfiddle.net/nickaknudson/KVa2d/16/ - nickaknudson

2
您可以使用mouseover事件来显示您的工具提示。 (有关事件文档,请单击此处)。您只需要为marker2显示它,因为它具有最高的zIndex值。
google.maps.event.addListener(marker2, 'mouseout', function() {
});

这里是一个使用InfoWindow显示浮动提示框的jsFiddle演示。您的示例中没有浮动提示框代码。能否更新您的示例,使用您创建的浮动提示框?

这很酷,但我不想使用InfoWindow,因为它对我想要的东西过于复杂。我只想创建一个简单的工具提示,然后使用CSS进行样式设置,使其看起来像我在截图中展示的那样。再次感谢您的帮助。 - Cameron
是的,这就是为什么我要求您更新示例并添加您说可以创建的工具提示,以便我们可以继续前进。 - Chris Herring
嗨,我从未创建过这样的东西。我只是写了那段代码,因为我认为那就是它的实现方式。无论如何,我该如何创建一个简单的提示框,可以使用CSS进行编辑,并且能够适应视口大小呢?谢谢。 - Cameron

网页内容由stack overflow 提供, 点击上面的
可以查看英文原文,
原文链接