如何在Sprite Kit中将纹理设置为平铺

7

我正在制作一个Sprite Kit游戏,显然使用具有平铺纹理的一个大的SKSpriteNode比使用多个带有平铺纹理的SKSpriteNode更有效。我的问题是,当我尝试使用

SKTexture* tex = [SKTexture textureWithRect:CGRectMake(0,0,5,5) inTexture:[SKTexture textureWithImageNamed:@"tile.png"]];
SKSpriteNode* node = [SKSpriteNode spriteNodeWithTexture:tex size:CGSizeMake(100,100)];

图像已经被适当地调整大小,但它被夹住了而不是平铺。在OpenGL术语中,我得到了一个GL_CLAMP_TO_EDGE,而我想要一个GL_REPEAT。有没有办法在单个SKSpriteNode中实现纹理的平铺效果,而不必创建非常大的图像。
这是我的问题图像: enter image description here
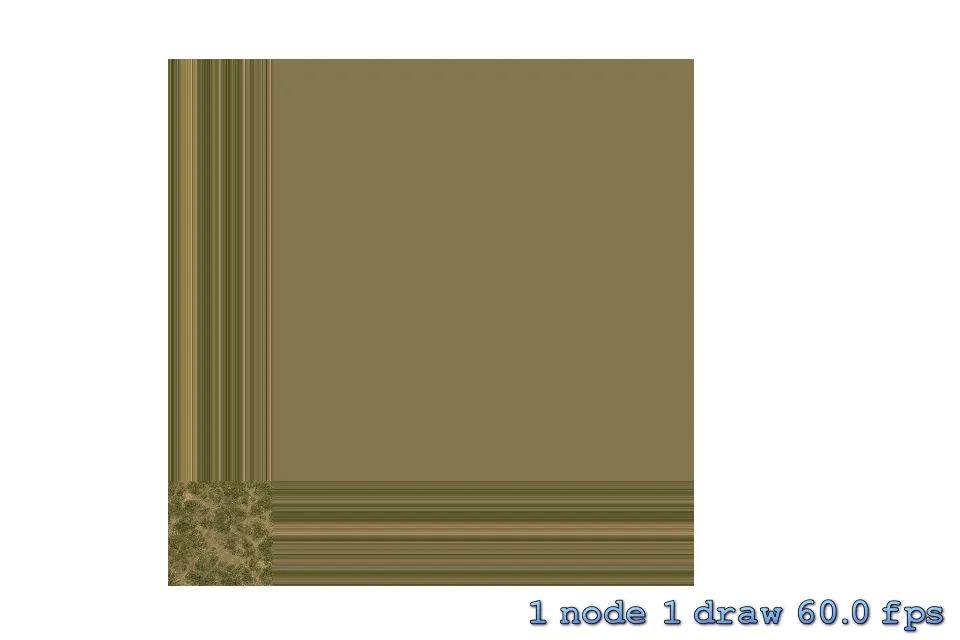
7个回答

10
据我所知,目前没有办法使用平铺纹理创建精灵。但是你可以在单个绘制通道中渲染许多精灵。
根据苹果公司的文档(Sprite Kit最佳实践->绘制您的内容):
如果节点的所有子节点都使用相同的混合模式和纹理图集,则Sprite Kit通常可以在单个绘制通道中绘制这些精灵。另一方面,如果子节点组织成每个新精灵更改绘制模式,则Sprite Kit可能会执行每个精灵的一个绘制通道,这非常低效。

1
基于着色器的实现,只使用了1个节点。https://dev59.com/EnjZa4cB1Zd3GeqPbDSx#37768928 - MoDJ

1

我发现这个问题没有得到完美的回答。我的解决方法如下。

你知道你可以在UIButton或UIImageView中使用resizableImageWithCapInsets来实现这一点,所以,这是我的解决方案:

-(SKTexture *)textureWithImage:(UIImage *)image tiledForSize:(CGSize)size withCapInsets:(UIEdgeInsets)capInsets{
//get resizable image
image =  [image resizableImageWithCapInsets:capInsets];
//redraw image to target size
UIGraphicsBeginImageContextWithOptions(size, NO, 0.0f);
[image drawInRect:CGRectMake(0, 0, size.width-1, size.height-1)];
[[UIColor clearColor] setFill];
//get target image
UIImage *ResultImage = UIGraphicsGetImageFromCurrentImageContext();
UIGraphicsEndImageContext();
// get texture
SKTexture * texture = [SKTexture textureWithImage:ResultImage];
return texture;
}

1
SKTexture* tex = [SKTexture textureWithRect:CGRectMake(0,0,5,5) inTexture:[SKTexture textureWithImageNamed:@"tile.png"]];
textureWithRect:inTexture:创建一个子纹理,矩形参数在“单位坐标空间”中,这意味着所有值都是0-1。 CGRectMake(0,0,5,5)的行为未定义,但似乎将纹理按比例拉伸了5倍。

编辑: 单位坐标空间

您可以将单位坐标视为总可能值的百分比。单位坐标空间中的每个坐标都有一个0.0到1.0的范围。例如,在x轴上,左边缘的坐标为0.0,右边缘的坐标为1.0。沿y轴,单位坐标值的方向取决于平台。

核心动画编程指南,图层使用两种坐标系统


这篇文章我有些晚才看到,谢谢你的分享。请问你能告诉我苹果文档中定义了什么是单位坐标空间吗? - rswayz
@rswayz,已在上面的回答中添加了描述和链接。 - bshirley

1
在创建纹理时应用ciaffinetile滤镜。

0
更好、更简单的方法当然是通过 SKShader。像这样简单的着色器可以做到:
// SpriteTiled.fsh

//uniform vec2 u_offset;
//uniform vec2 u_tiling;

void main() {
    vec2 uv = v_tex_coord.xy + u_offset;
    vec2 phase = fract(uv / u_tiling);
    vec4 current_color = texture2D(u_texture, phase);

    gl_FragColor = current_color;
}

然后使用以下代码设置您的SKSpriteNodeshader属性:

shader = SKShader(
    named: "SpriteTiled", 
    uniforms: [
        // e.g., 0 has no effect and 1 will offset the texture by its whole extent
        SKUniform(name: "u_offset", vectorFloat2: vector_float2(0, 0)),
        // e.g., 0.5 will repeat the texture twice, 1 produces no effect, and 1 < "zooms in" on the texture
        SKUniform(name: "u_tiling", vectorFloat2: vector_float2(0.5, 0.5))
    ]
)

如果您的源纹理不是正方形,则只需将传递给u_tiling的值的第一个分量乘以您纹理的宽高比即可。

0
为了帮助我转换坐标系,我使用以下函数 - 这样我就可以像您上面使用绝对坐标(5,5)一样使用它们:
//Pass the absolute sizes of your sub-texture (subRect) and main-texture (mainRect)
CGRect unitCoordinateGivenSubRectInRect (CGRect subRect, CGRect mainRect)
{
if (mainRect.size.height == 0 || mainRect.size.width == 0) {
    return CGRectZero;
}

float x = subRect.origin.x / mainRect.size.width;
float y = subRect.origin.y / mainRect.size.height;

float sizeX = subRect.size.width / mainRect.size.width;
float sizeY = subRect.size.height / mainRect.size.height;

return CGRectMake(x, y, sizeX, sizeY);
}

0

我使用了薛永伟的答案,并将其翻译成了Swift扩展:

extension SKTexture {

  static func x_repeatableTexture(named name: String, toSize size: CGSize) -> SKTexture {
    let image = UIImage(named: name)
    UIGraphicsBeginImageContextWithOptions(size, false, 0.0)
    image?.draw(in: CGRect(x: 0, y: 0, width: size.width, height: size.height))
    guard let resultImage = UIGraphicsGetImageFromCurrentImageContext() else {
      fatalError("Image could not be drawn.")
    }
    UIGraphicsEndImageContext()
    return SKTexture(image: resultImage)
  }

}

你可以通过以下方式使用它:

let texture = SKTexture.x_repeatableTexture(named: textureName, toSize: size)

这个解决方案允许使用在资产编辑器中完成的切片,这真的很好。


网页内容由stack overflow 提供, 点击上面的
可以查看英文原文,
原文链接