调整 R 的 lattice 包中的点图细节

4
我正在尝试为不同数据集和不同算法绘制一堆ROC区域。我有三个变量:“方案”指定使用的算法,“数据集”是正在测试算法的数据集,“ROC下面积”。我在R中使用lattice库,使用以下命令:dotplot(Scheme〜Area_under_ROC | Dataset,data = simulationSummary,layout = c(4,6))。我得到的结果是: Scheme vs.Area_under_ROC的点图,在Dataset上进行条件标记
我想知道的是:
如何使y轴上的标签可读?现在它们都挤在一起了。
如何重新排列面板,使带有“100”标记的数据集形成最后一列,但其他列保持不变?
非常感谢您的任何意见或指针。
2个回答

9
一些想法:
  1. Use a smaller font size for y-axis labels, e.g. 
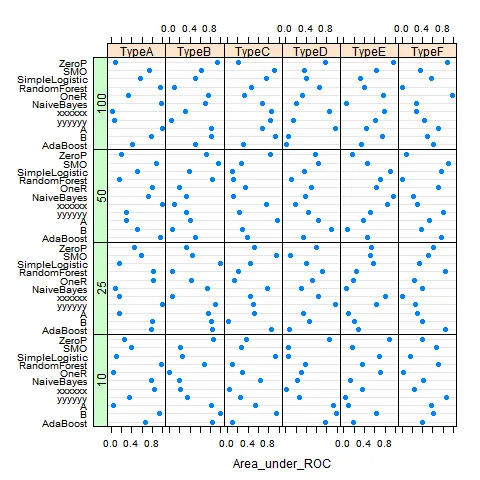
scale=list(y=list(cex=.6)). An alternative would be to preserve uniform font size, but separate your output on several pages (this can be controlled with layout=), or, probably better, to show all data from the same dataset (A to F, hence 4 points for each algorithm) or by sample size (10 to 100, hence 6 points for each algorithm) with a group= option. I would personally create two factors, sample.size and dataset.type for that.
  2. Relevel your factor Dataset, so that the dataset you are interested appear where layout will put them, or (better!) use index.cond to specify a particular arrangement for your 24 panels. E.g.,

    dfrm <- data.frame(algo=gl(11, 1, 11*24, labels=paste("algo", 1:11, sep="")), 
                       type=gl(24, 11, 11*24, labels=paste("type", 1:24, sep="")),
                       roc=runif(11*24))
    p <- dotplot(algo ~ roc | type, dfrm, layout=c(4,6), scale=list(y=list(cex=.4)))
    

    will arrange panels in sequential order, from bottom left to top right (type1 in bottom left panel, type24 in top right panel), while

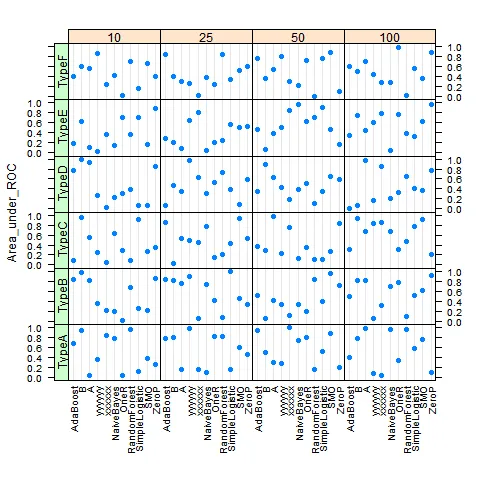
    update(p, index.cond=list(24:1))
    

    will arrange panels in the reverse order. Just specify a list with expected panel locations.


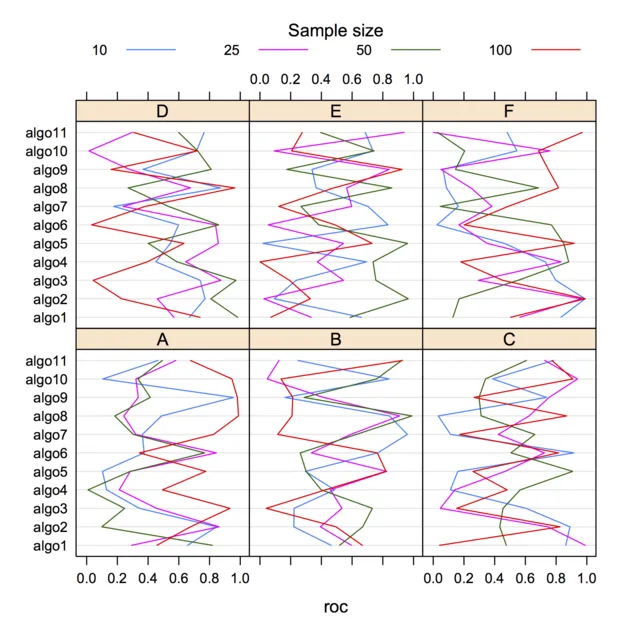
这里是我对第一点的想法所提供的一个例子,使用两个因素而不是一个。让我们生成另一个人工数据集:

dfrm <- data.frame(algo=gl(11, 1, 11*24, labels=paste("algo", 1:11, sep="")),
                   dataset=gl(6, 11, 11*24, labels=LETTERS[1:6]),
                   ssize=gl(4, 11*6, 11*24, labels=c(10,25,50,100)), 
                   roc=runif(11*24))
xtabs(~ dataset + ssize, dfrm)  # to check allocation of factor levels 
dotplot(algo ~ roc | dataset, data=dfrm, group=ssize, type="l", 
        auto.key=list(space="top", column=4, cex=.8, title="Sample size", 
                      cex.title=1, lines=TRUE, points=FALSE))

enter image description here


非常感谢您的帮助,chl! 我真的很感激。我还没有尝试过您编辑后的评论,但是您最初的建议非常有效。不过,y轴上的标签非常小。我必须想办法使它们更易读。我在最初的帖子中没有澄清的一件事是,数据集名称中字母后面的数字并不表示大小,而是数据中信号的数量。 A100表示全部信号,没有噪声,但A10中90%是噪声,10%是信号。 数据集的大小都相同。再次非常感谢。 - user765195

5
此外,在将Dataset类型拆分为类型和大小后,您可以使用latticeExtra包中的useOuterStrips函数,除了 chl answer
为了获得更多标签空间,您可以“转置”绘图。
# prepare data:
simulationSummary$Dataset_type <- substr(simulationSummary$Dataset, 1, 5)
simulationSummary$Dataset_size <- substr(simulationSummary$Dataset, 6, 10)

# to gets proper order force factor levels:
simulationSummary$Dataset_size <- factor(simulationSummary$Dataset_size,
    levels = c("10", "25", "50", "100"))

library(latticeExtra)
useOuterStrips(dotplot(
     Scheme ~ Area_under_ROC | Dataset_type*Dataset_size,
     data = simulationSummary,
     layout = c(4,6)
))

Dotplot

或使用垂直点图:

useOuterStrips(dotplot(
     Area_under_ROC ~ Scheme | Dataset_size*Dataset_type,
     data = simulationSummary, horizontal=FALSE,
     layout = c(4,6), scales=list(x=list(rot=90))
))

enter image description here


非常感谢你,Marek!我真的很感激你的评论。标签大小实际上是一个问题,这将有助于我解决它。 - user765195
我总是忘记外部条带! - chl

网页内容由stack overflow 提供, 点击上面的
可以查看英文原文,
原文链接