我有一张从网络摄像头捕获的.jpg图像。它是一张灰度图像。我需要将该图像转换为其像素的字符串,如下所示:
"255 232 45 678 56 23....345 76 44 767 433 345"
我该如何开始做这个?
另外,改变图像的尺寸会改变这些值吗?
我有一张从网络摄像头捕获的.jpg图像。它是一张灰度图像。我需要将该图像转换为其像素的字符串,如下所示:
"255 232 45 678 56 23....345 76 44 767 433 345"
我该如何开始做这个?
另外,改变图像的尺寸会改变这些值吗?
分步骤看起来像这样
# img is our input image represented by a numpy array
lin_img = img.flatten()
pixel_list = lin_img.tolist()
pixel_str_list = map(str, pixel_list)
img_str = ' '.join(pixel_str_list)
# img is our input image represented by a numpy array
img_str = ' '.join(map(str,img.flatten().tolist()))
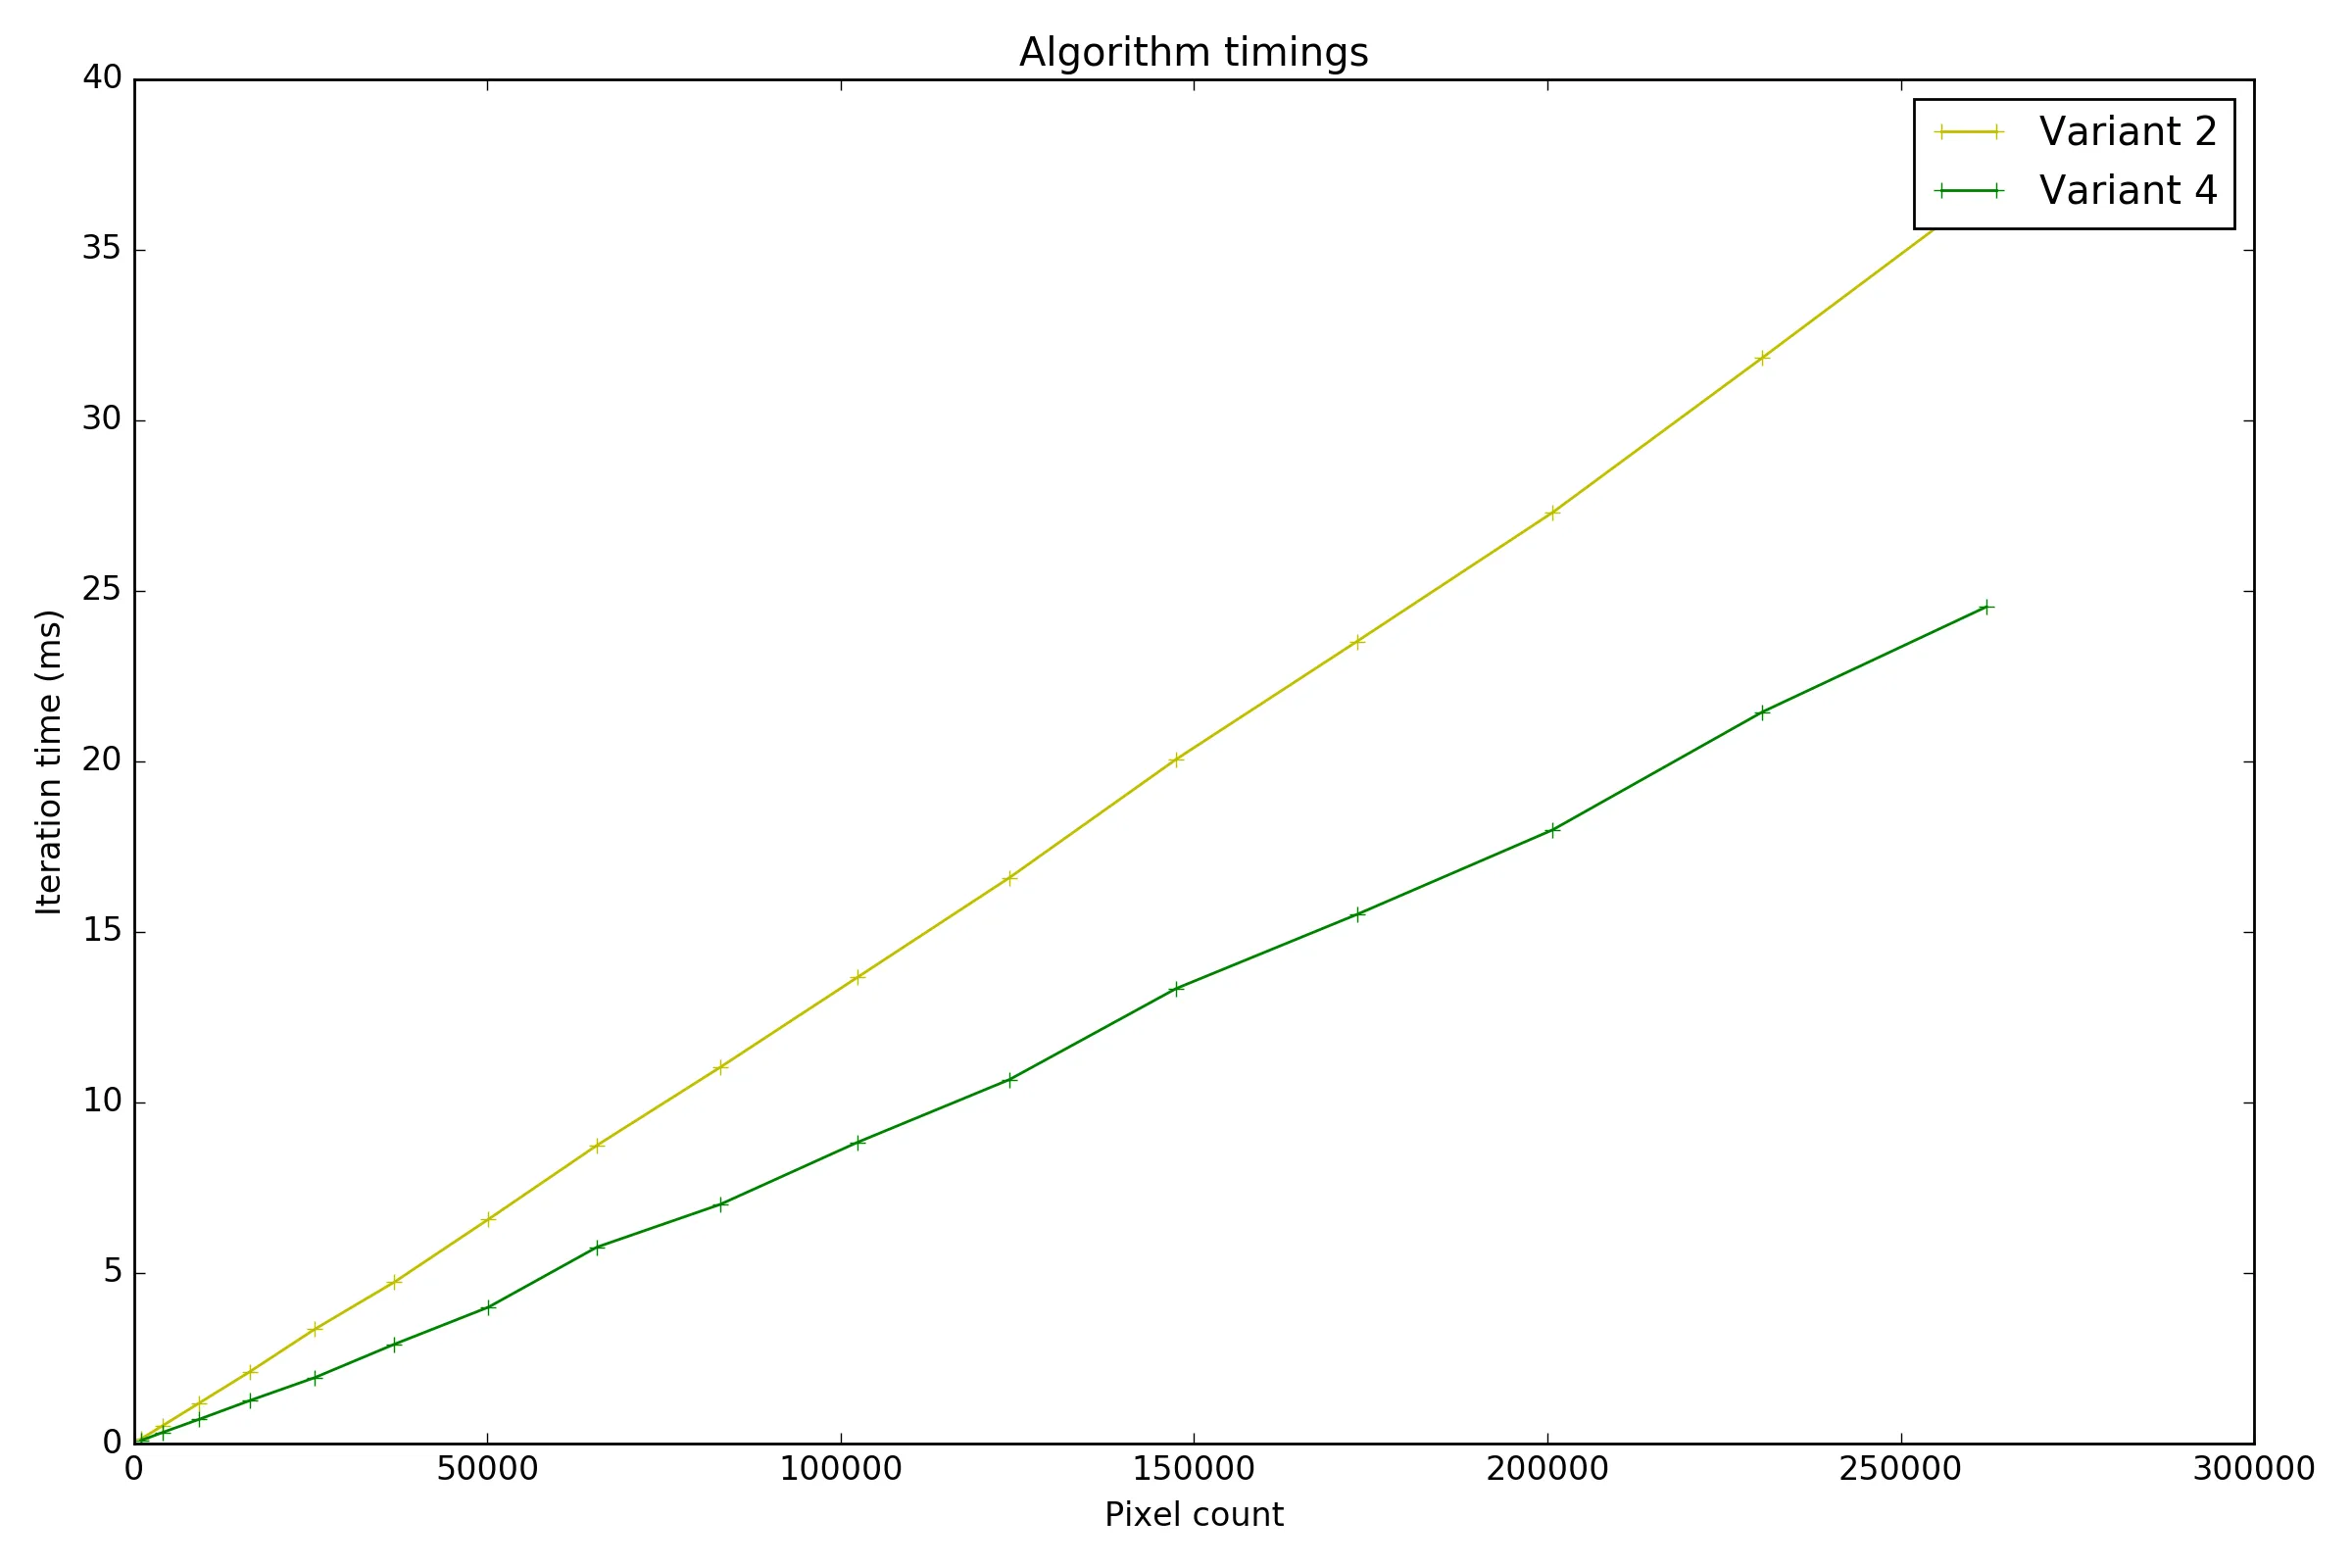
为了性能测试的目的,我们将其称为变量2。
由于numpy数组本身可迭代,因此我们可以跳过第二步。
# img is our input image represented by a numpy array
img_str = ' '.join(map(str,img.flatten()))
很不幸的是,跳过这一步似乎会对性能产生相当大的负面影响。
为了进行性能测试,我们将其称为变体3。
用户Manel Fornos(已删除)的回答给了我另一个想法。虽然这种方法有点hackish,但速度有所提升。
要点是利用现有的工具获取列表的字符串表示形式,并过滤掉不需要的字符。
str_rep = str(img.flatten().tolist())
img_str = str_rep.strip('[]').replace(',','')
为了进行性能测试,我们将称其为变体4。
变体1将是Liam Lawrence代码的修复版本:
pxList = ''
# The height and width of your Mat
height = np.size(img, 0)
width = np.size(img, 1)

# Iterates through the values of your Mat and stores them in pxList
for i in range(height):
    for j in range(width):
        pxList = pxList + " " + str(img[i][j])

pxList = pxList[1:] # Drop the first space
我写了一个简单的脚本来比较算法(完整代码在 pastebin 上)。以下是结果:
# Pixels, Variant 1 (ms), Variant 2 (ms), Variant 3 (ms), Variant 4 (ms)
(1024, 2.8326225819203277, 0.13493335046772717, 1.5932890912113131, 0.09023493209332506)
(4096, 13.339841376487794, 0.5257651461289086, 6.325210327010836, 0.3265428986086241)
(9216, 32.98282323591406, 1.1823080866422975, 14.354809759340927, 0.7088365979475153)
(16384, 75.67087786296861, 2.1013669335069043, 26.917736751458644, 1.2577715882884644)
(25600, 137.34306664673863, 3.3527305844737176, 39.52922089259947, 1.9327700867009523)
(36864, 253.29441311675095, 4.734033934480575, 59.513813906516, 2.9113162427067962)
(50176, 451.560393848939, 6.5756611524649955, 80.0690276278131, 3.998343364868928)
(65536, 730.1453117644841, 8.744634443763166, 103.20875278841335, 5.7598277155337385)
(82944, 1111.2658522242352, 11.029055368769303, 131.75812149309473, 7.009532636131244)
(102400, 1660.044328259597, 13.671936656754369, 163.50234457172607, 8.832774137495392)
(123904, 3752.484254283715, 16.593065599119328, 196.8919234148476, 10.672515640955282)
(147456, 6808.498583618867, 20.05951524565397, 238.21070485215222, 13.339090582743296)
(173056, 11572.846199726502, 23.518125208653373, 275.5151841924039, 15.51396546209105)
(200704, 17107.24135330049, 27.29446060882168, 319.9635533287051, 17.9888784747817)
(230400, 24915.183616213795, 31.83344531218779, 368.9712484407863, 21.44858843792008)
(262144, 34914.46058437594, 36.754758635524354, 423.5016077462319, 24.536341210961155)
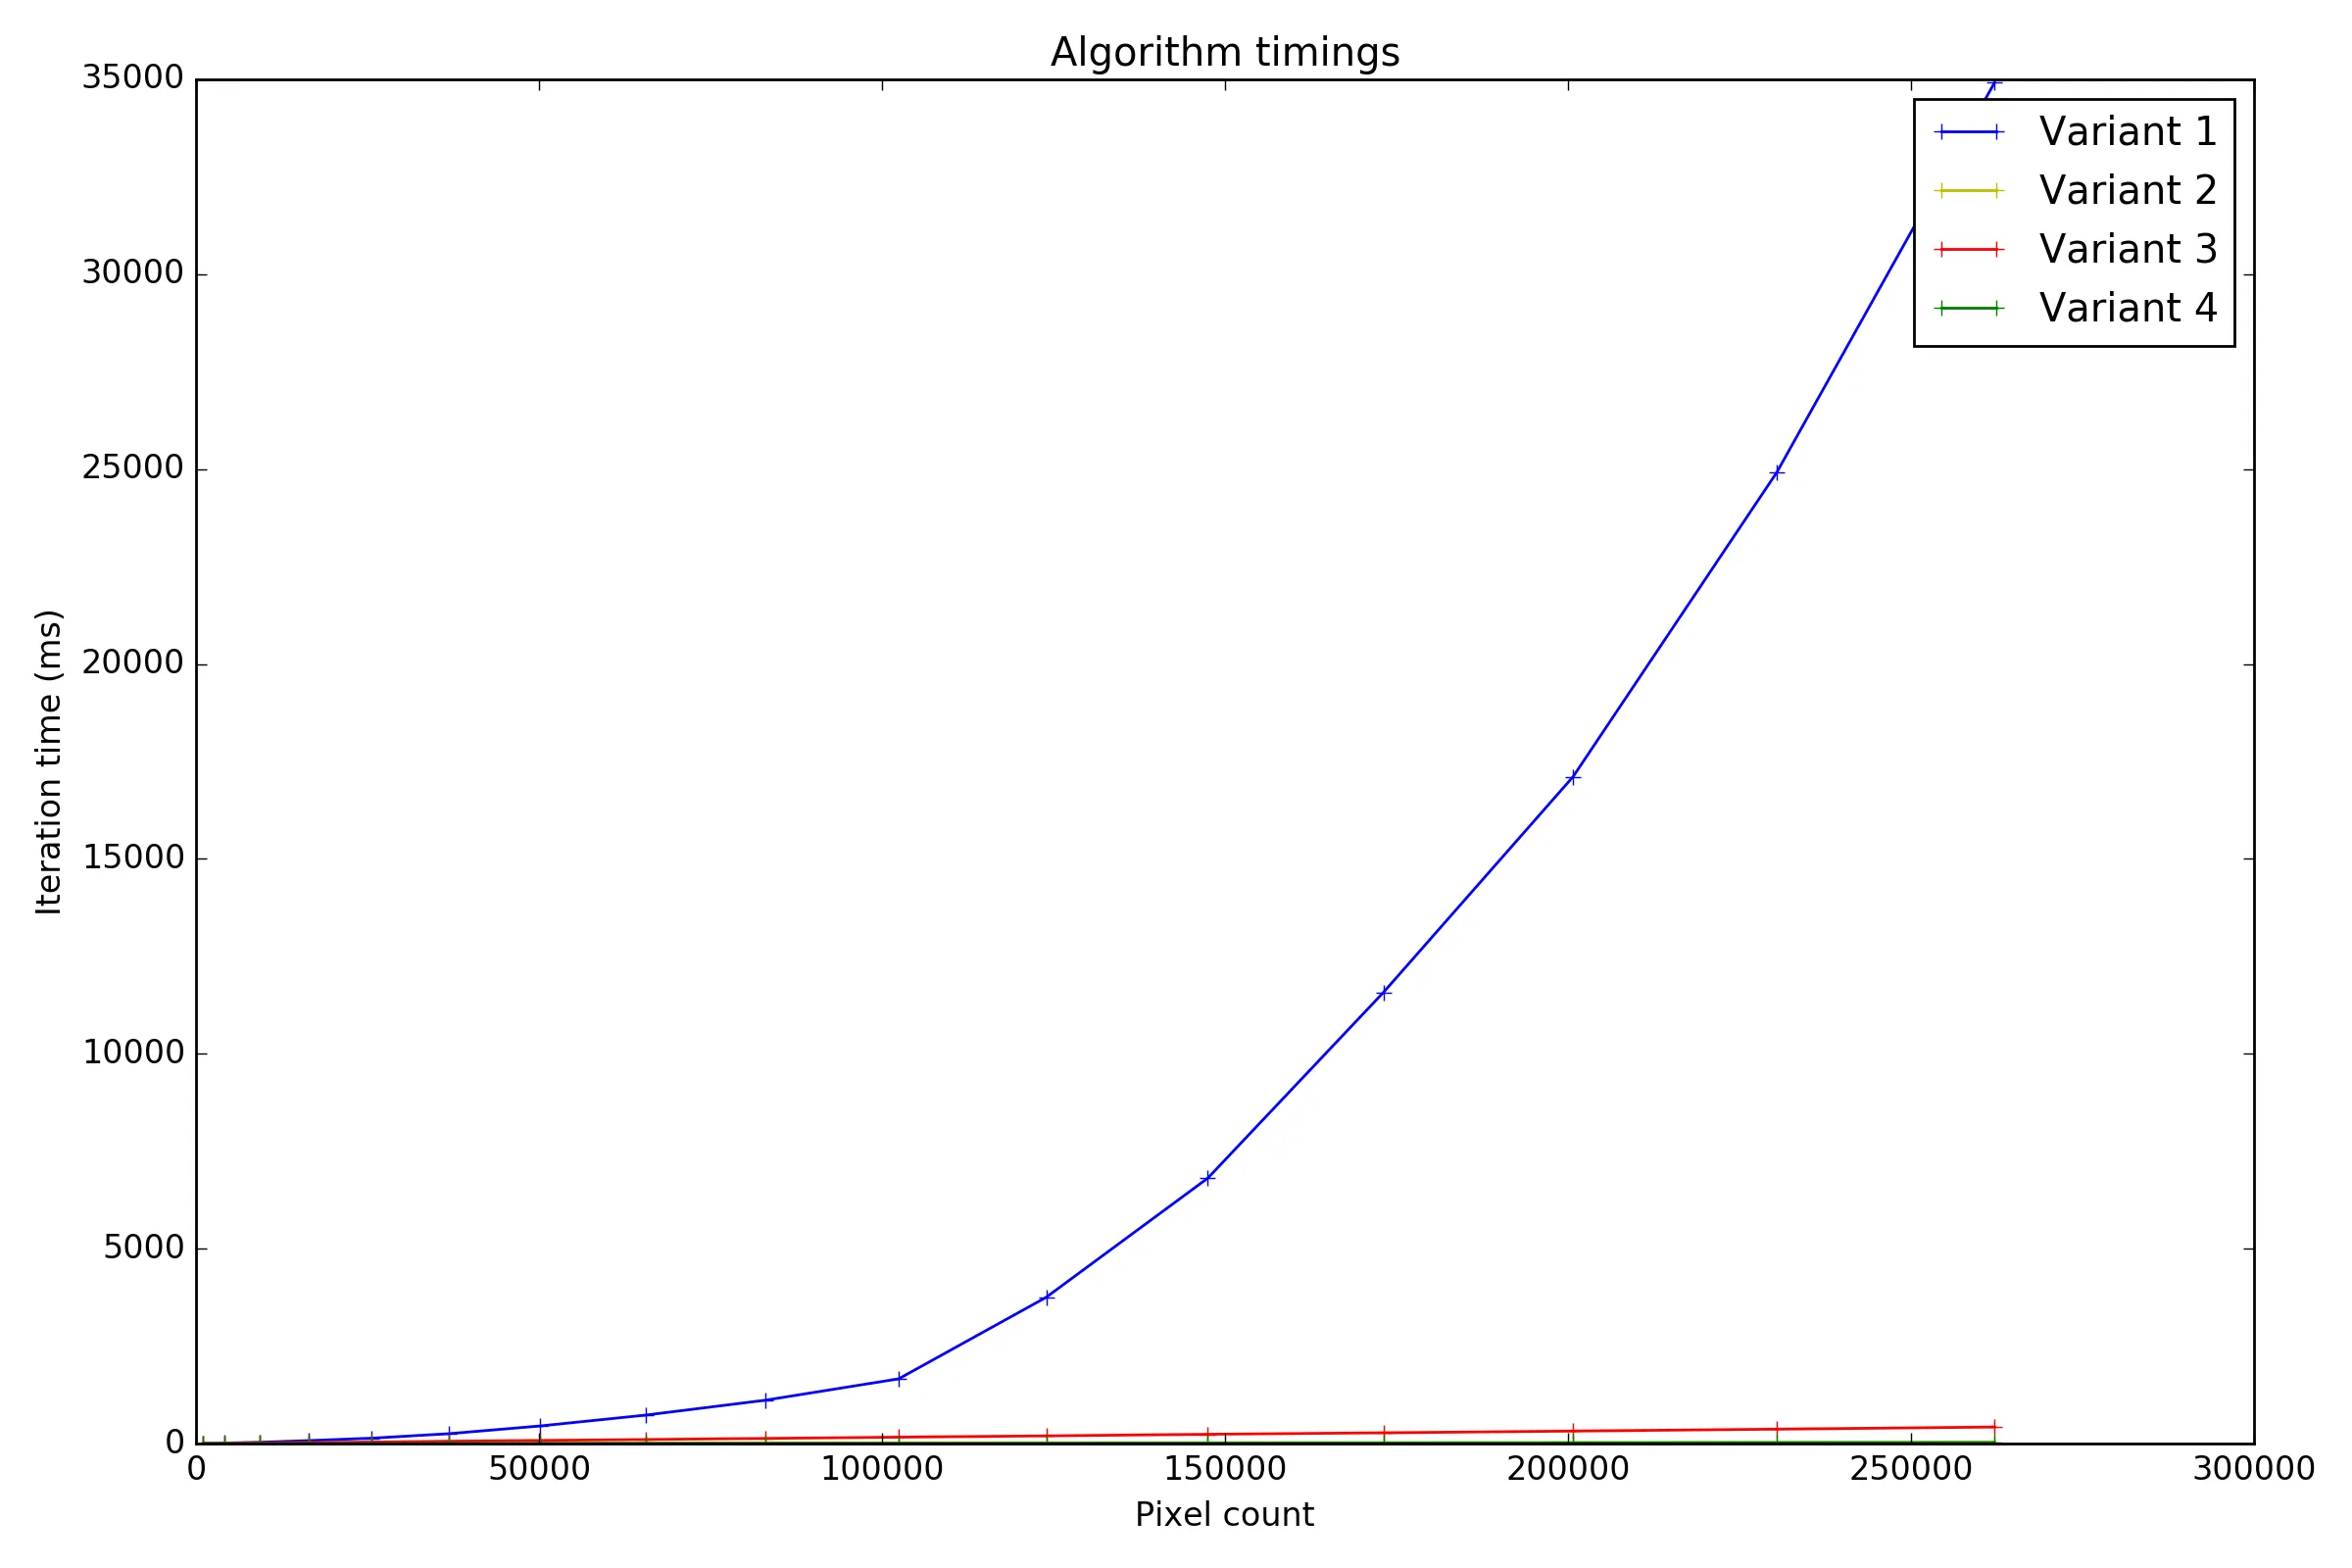
观察时间,Variant 1 的一个显著问题是,其性能与输入的大小(像素数)并不呈线性比例增长,这可能会让人意外。相反,它看起来更像 O(n^2)。明显的罪魁祸首是字符串添加 -- 因为在 Python 中字符串是不可变的,所以每次添加像素值时我们都要复制越来越长的字符串。
缓解这个问题的一种可能方法是使用 cStringIO 模块。
output = cStringIO.StringIO()
# The height and width of your Mat
height = np.size(img, 0)
width = np.size(img, 1)

# Iterates through the values of your Mat and stores them in pxList
for i in range(height):
    for j in range(width):
        output.write(str(img[i][j]) + " ")

output.truncate(output.tell() - 1)
img_str = output.getvalue()
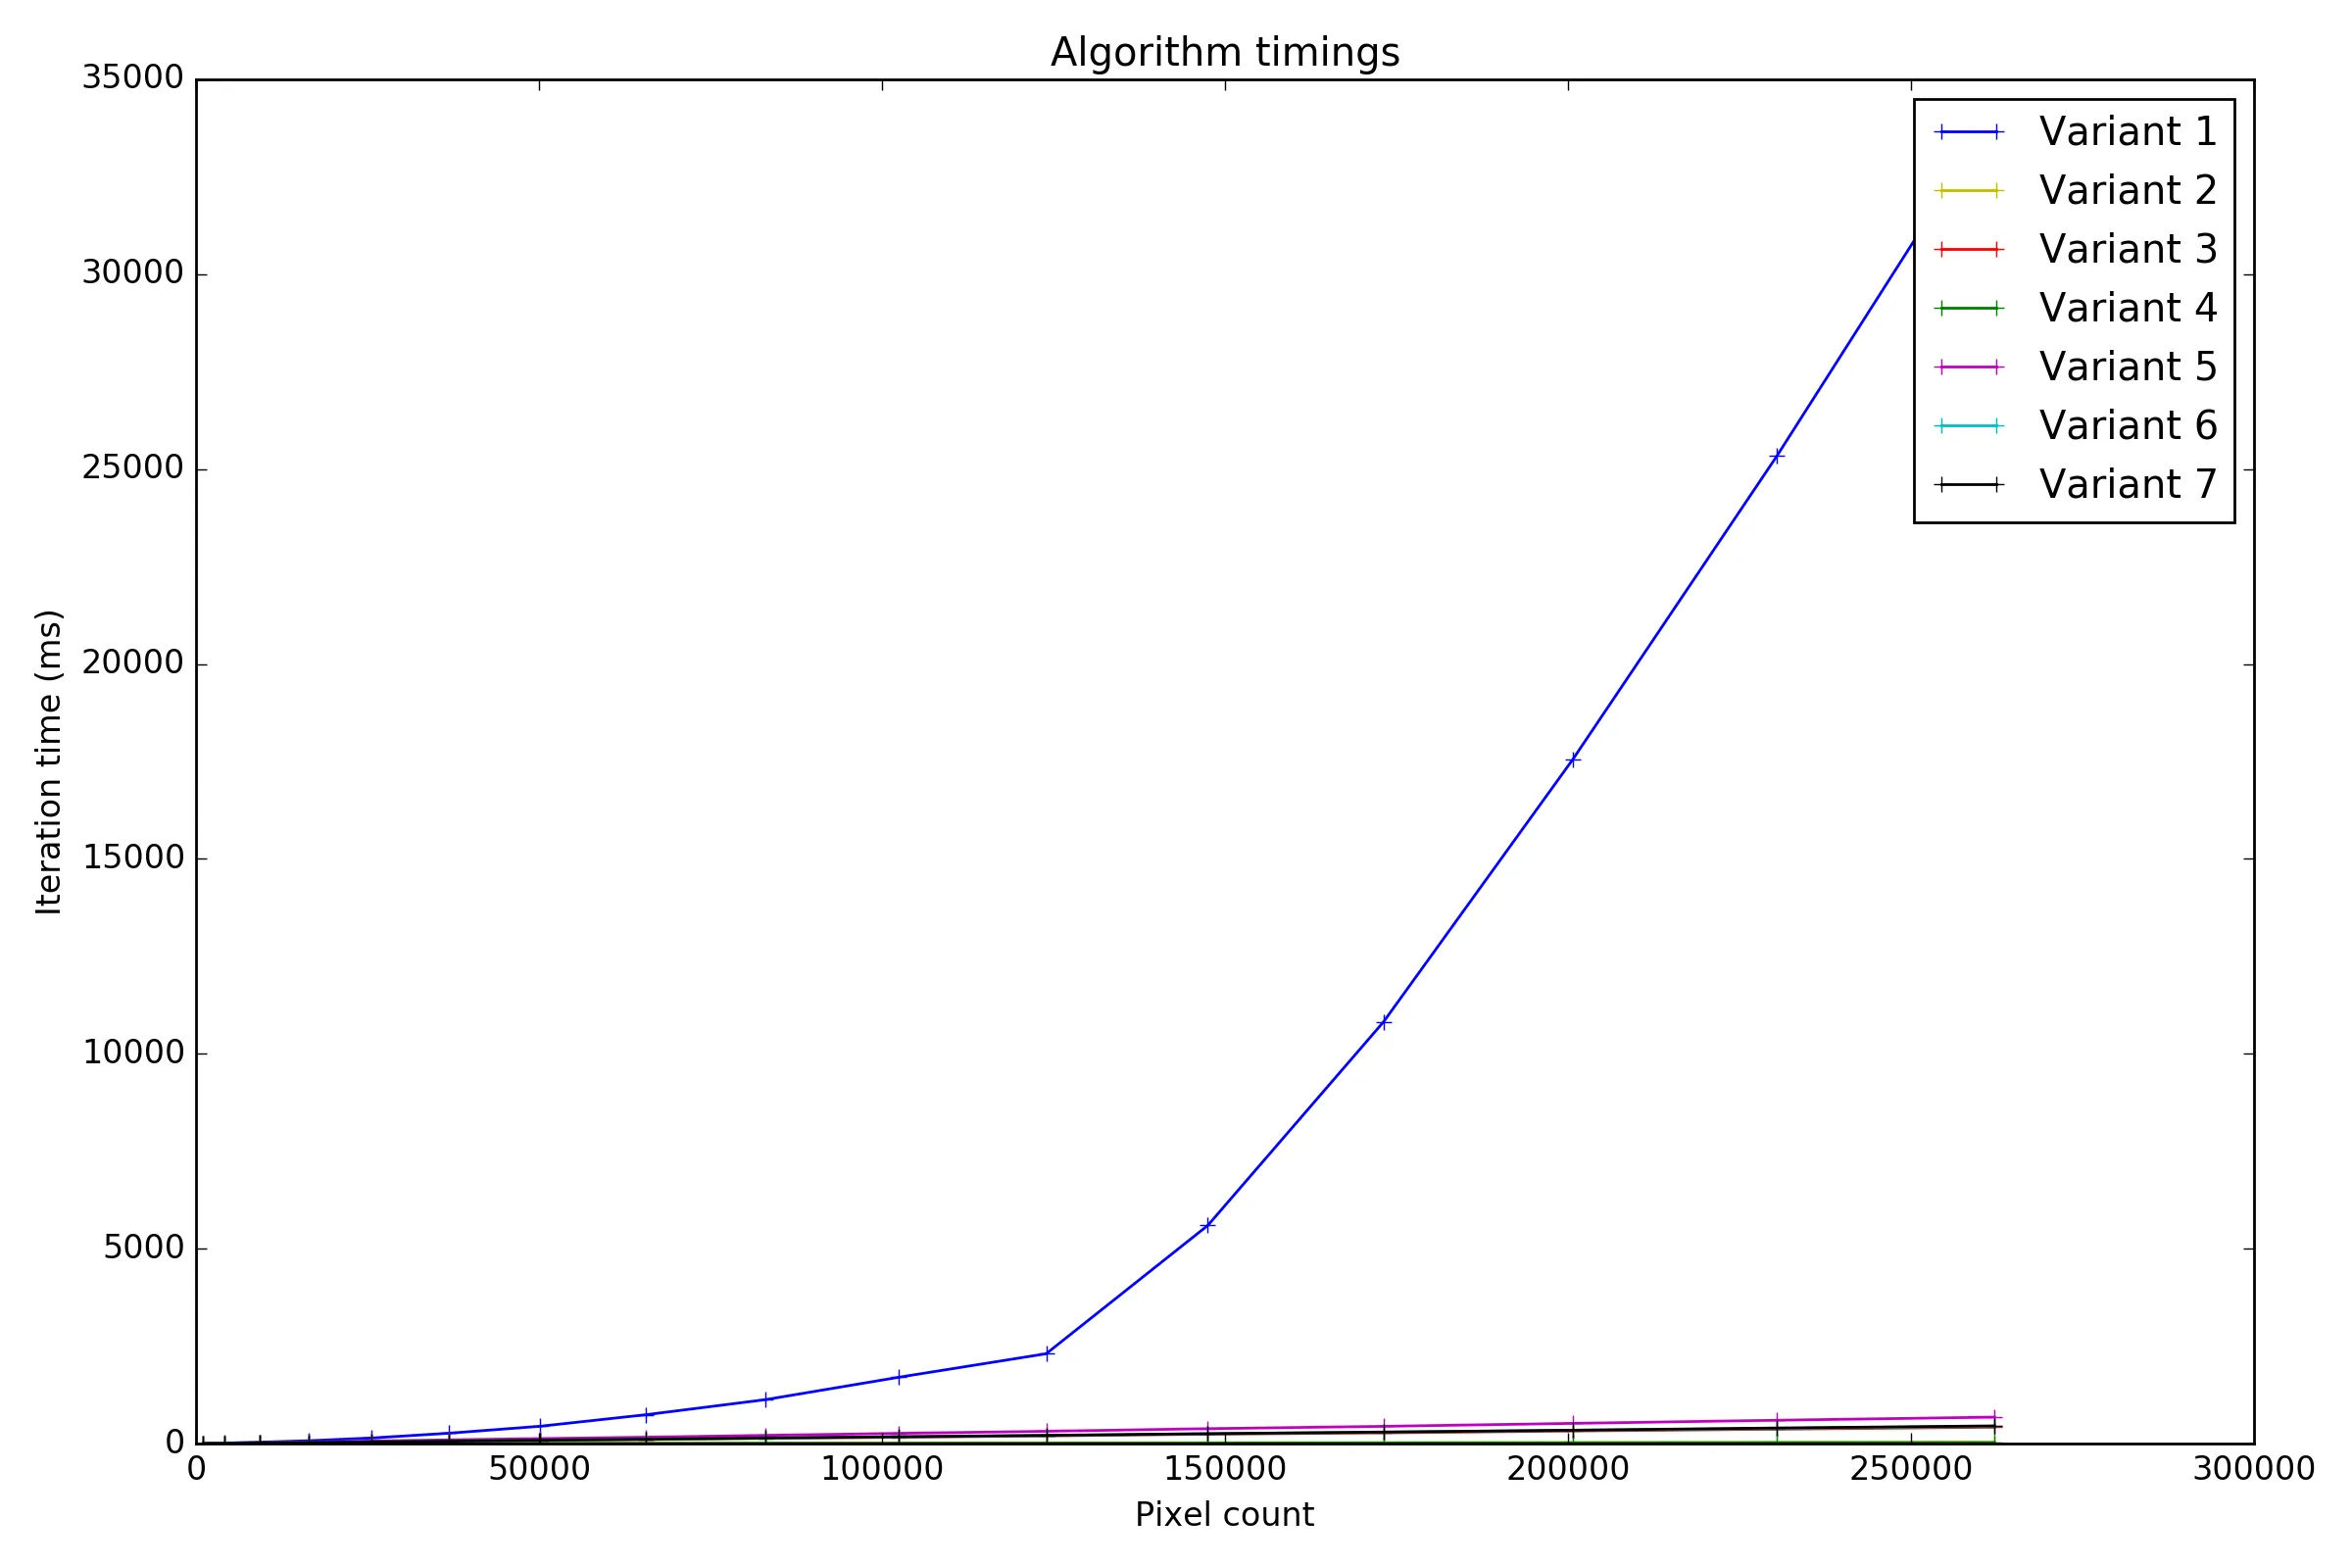
出于性能测试目的,我们将其称为变体5。
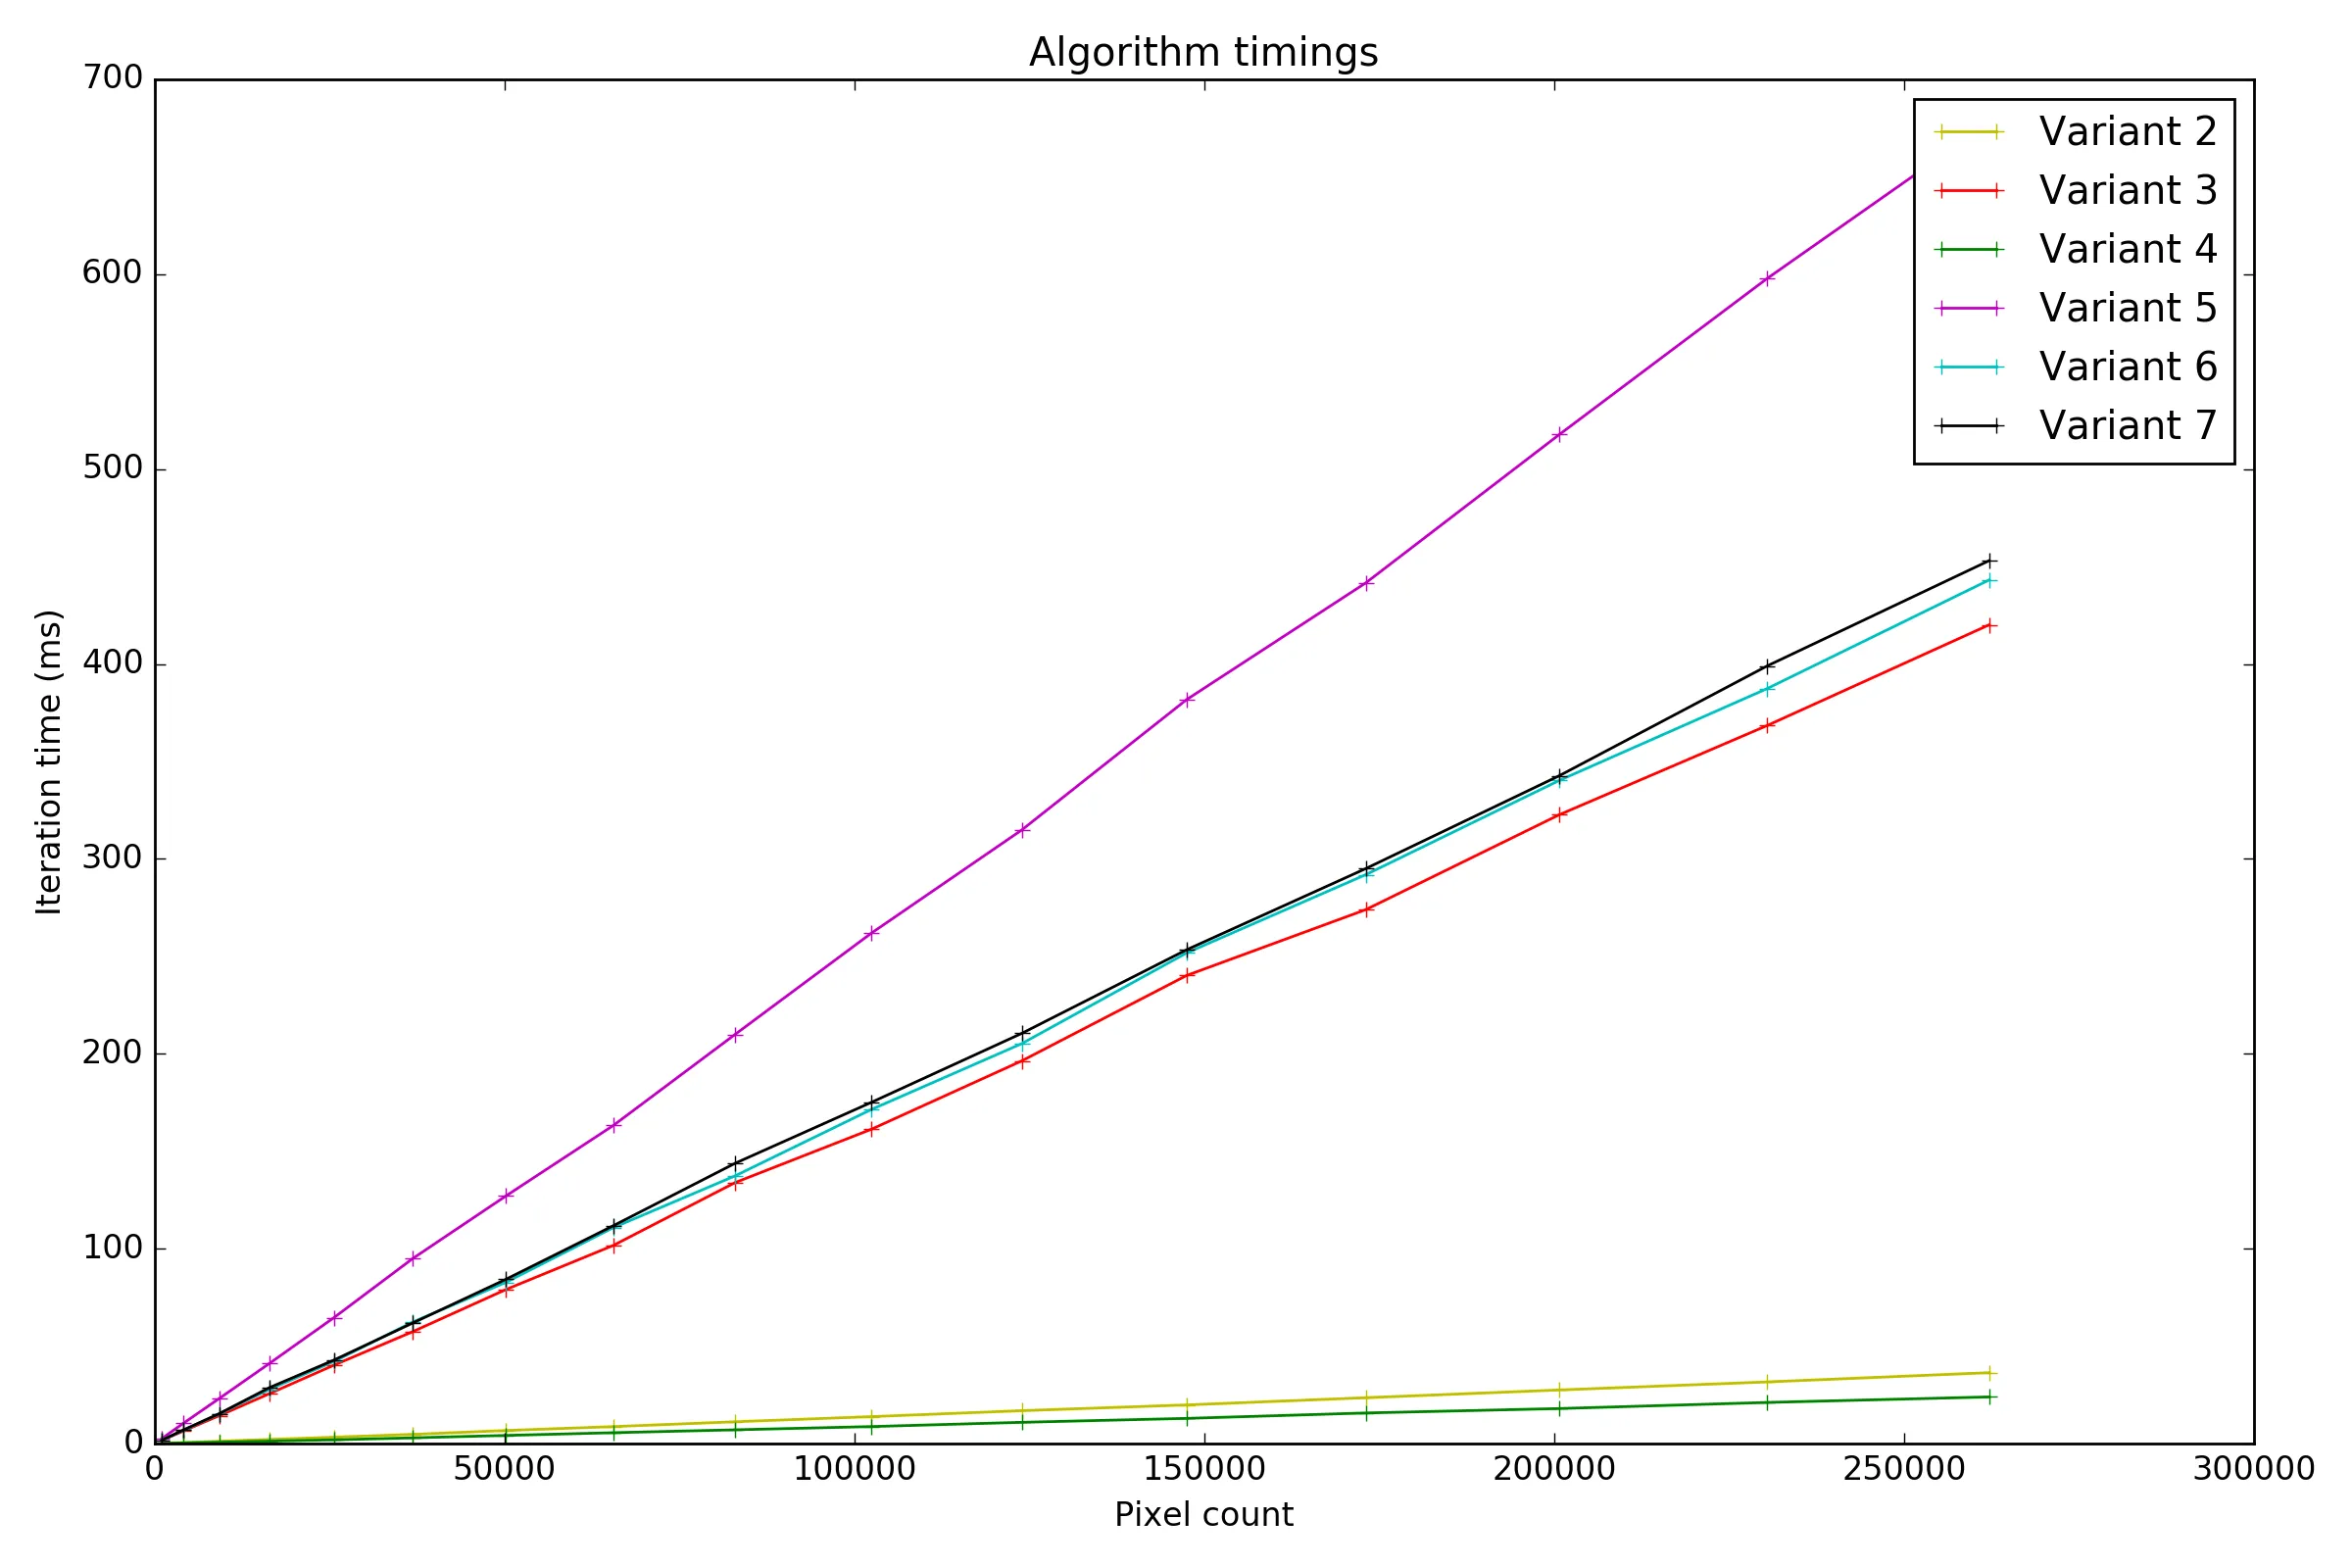
为了完整起见,让我们还包括Manel Fornos的选项、理解列表(变体6)和生成器(变体7)。
# Number of pixels, variants 1..7 (ms)
1024, 2.7356, 0.1330, 1.5844, 0.0870, 2.5578, 1.7027, 1.7354
4096, 13.0483, 0.5250, 6.3810, 0.3227, 10.3566, 6.7979, 6.9346
9216, 34.9096, 1.1787, 14.2764, 0.7047, 23.0620, 15.1704, 15.3179
16384, 72.0128, 2.1126, 25.5553, 1.2306, 41.0506, 27.7385, 28.6510
25600, 142.5863, 3.2655, 40.1804, 1.9044, 64.5345, 42.0542, 42.7847
36864, 265.1944, 4.7110, 57.3741, 2.9238, 94.8722, 62.3143, 61.8108
50176, 444.3202, 6.6906, 78.9869, 4.1656, 126.9877, 82.6736, 84.2270
65536, 739.3482, 8.6936, 101.6483, 5.5619, 163.1796, 110.7537, 111.7517
82944, 1125.0065, 11.1771, 133.8886, 7.0509, 209.9322, 137.3384, 143.7916
102400, 1700.3401, 13.8166, 161.2337, 8.7119, 261.8374, 171.3757, 175.0435
123904, 2304.6573, 16.8627, 196.3455, 10.8982, 314.8287, 205.1966, 210.4597
147456, 5595.0777, 19.8212, 240.1495, 12.9097, 381.7084, 251.7319, 253.3573
173056, 10813.7815, 23.5161, 273.9376, 15.6852, 441.5994, 291.8913, 295.0038
200704, 17561.0637, 27.4871, 322.6305, 17.9567, 517.7028, 340.2233, 342.6525
230400, 25331.5150, 31.6211, 368.3908, 21.0858, 597.7710, 387.3542, 398.9715
262144, 34097.1663, 36.3708, 420.1081, 23.9135, 677.7977, 443.1318, 453.0447
PIL and numpyfrom PIL import Image
import numpy as np
img = Image.open('lena_bw.jpg')
print (np.array(img))
[[135 137 138 ..., 148 131 92]
[136 137 138 ..., 149 134 96]
[137 138 138 ..., 149 135 96]
...,
[ 20 21 24 ..., 71 71 70]
[ 21 22 26 ..., 68 70 73]
[ 23 24 28 ..., 67 69 75]]
这个例子使用了一个 (1216, 1024) 像素的图片。
In [1]: from PIL import Image
        import numpy as np

        img = np.array(Image.open("image_path"))
1) 用户Dan Mašek的原始答案(使用map):
In [2]: %timeit -n10 to_string = ' '.join(map(str, img.flatten().tolist()))
Out[2]: 10 loops, best of 3: 187 ms per loop
2) 用户Dan Mašek提供了一种替代方案,更快的答案(在我的协助下):
In [3]: %timeit -n10 to_string = str(img.flatten().tolist()).strip('[]').replace(',','')
Out[3]: 10 loops, best of 3: 96.4 ms per loop
然而,我想与您分享另外两个选项,当然,比之前的答案慢一些,但也是正确和有效的方法。
3) 使用列表推导式:
In [4]: %timeit -n10 to_string = ' '.join([str(x) for x in img.flatten()])
Out[4]: 10 loops, best of 3: 1.41 s per loop
4) 使用生成器:
In [5]: %timeit -n10 to_string = ' '.join((str(x) for x in img.flatten()))
Out[5]: 10 loops, best of 3: 1.37 s per loop
生成器比较快,因为它使用迭代器协议逐个生成项目,而不是构建整个列表来喂养另一个构造函数,因此可以节省内存。