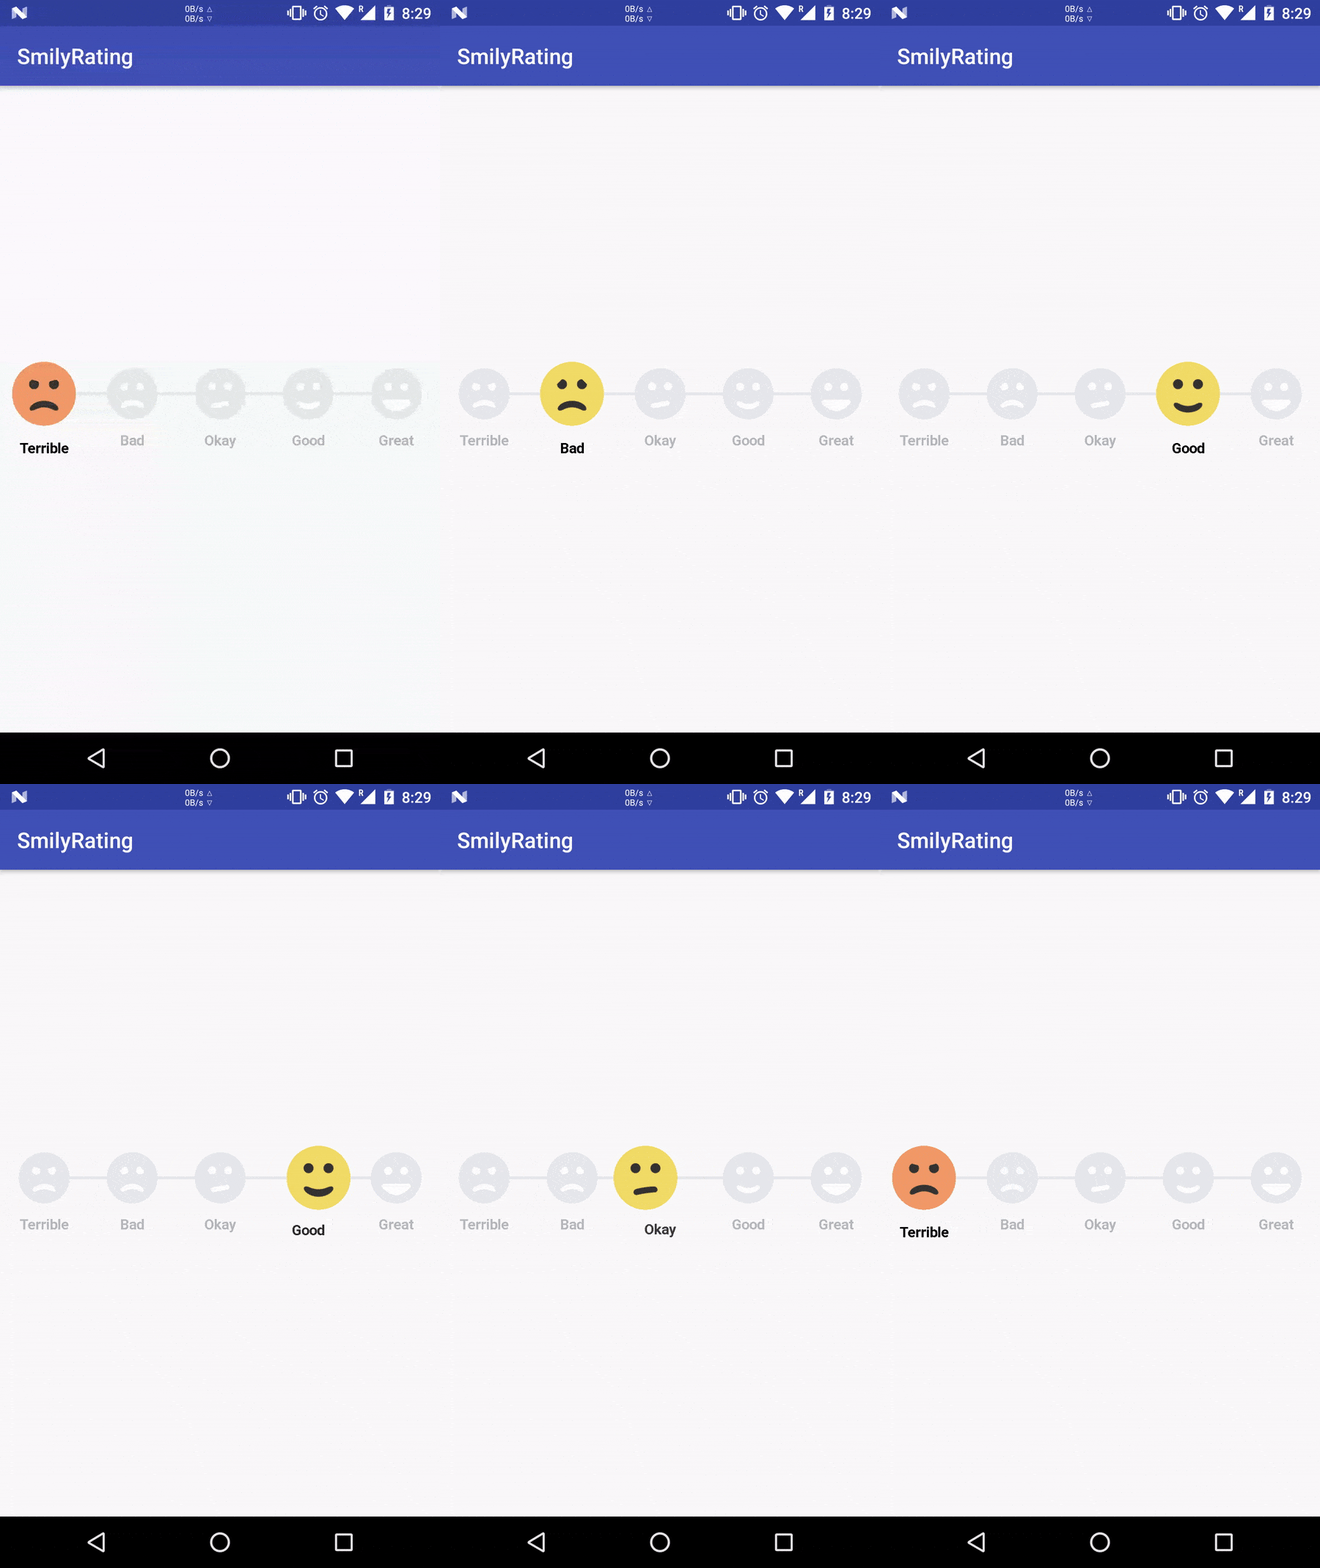
大家好,我需要在我的应用程序中进行评级...所以我需要创建自定义评级栏...有人可以帮我吗?
如何在安卓系统中创建自定义评分栏
1
styles.xml
这个必须放在你的values文件夹中
 <?xml version="1.0" encoding="utf-8"?>
  <resources>
    <style name="foodRatingBar" parent="@android:style/Widget.RatingBar">
       <item name="android:progressDrawable">@drawable/food_rating_bar_full</item>
       <item name="android:minHeight">23dip</item>
       <item name="android:maxHeight">25dip</item>
   </style>
  </resources>
food_rating_bar_full.xml
该文件必须位于Drawable文件夹中。
<?xml version="1.0" encoding="utf-8"?>
<layer-list xmlns:android="http://schemas.android.com/apk/res/android">
    <item android:id="@+id/background"
    android:drawable="@drawable/food_ratingbar_full_empty" />
    <item android:id="@+id/secondaryProgress"
    android:drawable="@drawable/food_ratingbar_full_empty" />
    <item android:id="@+id/progress"
    android:drawable="@drawable/food_ratingbar_full_filled" />
</layer-list>
food_ratingbar_full_empty.xml
这个文件必须放在Drawable文件夹内。
<?xml version="1.0" encoding="utf-8"?>

<!-- This is the rating bar drawable that is used to
 show a filled cookie. -->
<selector
xmlns:android="http://schemas.android.com/apk/res/android">

<item android:state_pressed="true"
      android:state_window_focused="true"
      android:drawable="@drawable/cookiee" />

<item android:state_focused="true"
      android:state_window_focused="true"
      android:drawable="@drawable/cookiee" />

<item android:state_selected="true"
      android:state_window_focused="true"
      android:drawable="@drawable/cookiee" />

<item android:drawable="@drawable/cookiee" />

</selector>
food_ratingbar_full_filled.xml
这个文件必须位于Drawable文件夹中。
<?xml version="1.0" encoding="utf-8"?>

 <!-- This is the rating bar drawable that is used to
 show a unfilled cookie. -->
<selector
xmlns:android="http://schemas.android.com/apk/res/android">

<item android:state_pressed="true"
      android:state_window_focused="true"
      android:drawable="@drawable/cookie" />

<item android:state_focused="true"
      android:state_window_focused="true"
      android:drawable="@drawable/cookie" />

<item android:state_selected="true"
      android:state_window_focused="true"
      android:drawable="@drawable/cookie" />

<item android:drawable="@drawable/cookie" />

</selector>
main.xml文件应该长这样:
<?xml version="1.0" encoding="utf-8"?>
<LinearLayout xmlns:android="http://schemas.android.com/apk/res/android"
    android:orientation="vertical"
    android:layout_width="fill_parent"
    android:layout_height="fill_parent">

    <RatingBar android:id="@+id/ratingBar1"
        style="@style/foodRatingBar"
        android:layout_width="wrap_content"
        android:layout_height="wrap_content">

    </RatingBar>
</LinearLayout>
MainActivity.class 应该如下所示:
import android.app.Activity;
import android.os.Bundle;
import android.widget.RatingBar;
import android.widget.RatingBar.OnRatingBarChangeListener;
import android.widget.Toast;

public class MainActivity extends Activity {
/** Called when the activity is first created. */

RatingBar rb;

@Override
public void onCreate(Bundle savedInstanceState) {
    super.onCreate(savedInstanceState);
    setContentView(R.layout.main);

    rb=(RatingBar)findViewById(R.id.ratingBar1);

    rb.setOnRatingBarChangeListener(new OnRatingBarChangeListener(){

        @Override
        public void onRatingChanged(RatingBar ratingBar, float rating,
                boolean fromUser) {
            // TODO Auto-generated method stub
                Toast.makeText(getApplicationContext(),Float.toString(rating),Toast.LENGTH_LONG).show();

        }

    });
}
}
我使用了两张图片:
cookie.jpg
cookiee.jpg
这两张图片大小相同,一张用于识别已选择的评分条,另一张用于识别未选择的评分条。
12
- android:id="@+id/background" 替换为 @android:id/background
- android:id="@+id/secondaryProgress" 替换为 android:id="@android:id/secondaryProgress"
- android:id="@+id/progress" 替换为 android:id="@android:id/progress"
我需要添加我的解决方案,它比上面那个要简单得多。我们甚至不需要使用样式。
在drawable文件夹中创建一个选择器文件:
custom_ratingbar_selector.xml
<?xml version="1.0" encoding="utf-8"?>
 <layer-list xmlns:android="http://schemas.android.com/apk/res/android">
 <item android:id="@android:id/background"
    android:drawable="@drawable/star_off" />

 <item android:id="@android:id/secondaryProgress"
    android:drawable="@drawable/star_off" />

 <item android:id="@android:id/progress"
    android:drawable="@drawable/star_on" />

</layer-list>
 <RatingBar
        android:id="@+id/ratingBar2"
        android:layout_width="wrap_content"
        android:layout_height="wrap_content"
        android:layout_gravity="center_horizontal"
        android:layout_marginTop="20dp"
        android:progressDrawable="@drawable/custom_ratingbar_selector"
        android:numStars="8"
        android:stepSize="0.2"
        android:rating="3.0" />
这就是我们所需要的全部。
5
首先将图片添加到drawable文件夹:
第一张图片为 "ratingbar_staroff.png",第二张图片为 "ratingbar_staron.png"
然后,在 res/drawable 中创建一个名为 "ratingbar.xml" 的文件。
<?xml version="1.0" encoding="utf-8"?>
<!--suppress AndroidDomInspection -->
<layer-list xmlns:android="http://schemas.android.com/apk/res/android">
    <item android:id="@+android:id/background"
        android:drawable="@drawable/ratingbar_empty" />
    <item android:id="@+android:id/secondaryProgress"
        android:drawable="@drawable/ratingbar_empty" />
    <item android:id="@+android:id/progress"
        android:drawable="@drawable/ratingbar_filled" />
</layer-list>
下一个XML与res/drawable中的相同
"ratingbar_empty.xml"
<?xml version="1.0" encoding="utf-8"?>
<selector xmlns:android="http://schemas.android.com/apk/res/android">

    <item android:state_pressed="true"
        android:state_window_focused="true"
        android:drawable="@drawable/ratingbar_staroff" />

    <item android:state_focused="true"
        android:state_window_focused="true"
        android:drawable="@drawable/ratingbar_staroff" />

    <item android:state_selected="true"
        android:state_window_focused="true"
        android:drawable="@drawable/ratingbar_staroff" />

    <item android:drawable="@drawable/ratingbar_staroff" />

</selector>
"评分条已填满"
<?xml version="1.0" encoding="utf-8"?>
<selector xmlns:android="http://schemas.android.com/apk/res/android">

    <item android:state_pressed="true"
        android:state_window_focused="true"
        android:drawable="@drawable/ratingbar_staron" />

    <item android:state_focused="true"
        android:state_window_focused="true"
        android:drawable="@drawable/ratingbar_staron" />

    <item android:state_selected="true"
        android:state_window_focused="true"
        android:drawable="@drawable/ratingbar_staron" />

    <item android:drawable="@drawable/ratingbar_staron" />

</selector>
接下来要做的是,在res/values/styles中添加这些代码行:
<style name="CustomRatingBar" parent="@android:style/Widget.RatingBar">
    <item name="android:progressDrawable">@drawable/ratingbar</item>
    <item name="android:minHeight">18dp</item>
    <item name="android:maxHeight">18dp</item>
</style>
现在,您已经可以向评分条资源添加样式了
        <RatingBar
            android:layout_width="wrap_content"
            android:layout_height="wrap_content"
            style= "@style/CustomRatingBar"
            android:id="@+id/ratingBar"
            android:numStars="5"
            android:stepSize="0.01"
            android:isIndicator="true"/>
最后,在你的活动中仅声明即可:
RatingBar ratingbar = (RatingBar) findViewById(R.id.ratingbar);
ratingbar.setRating(3.67f);
4
res/values/styles 中定义了 android:minHeight 和 android:maxHeight,将其更改以使星星大小变大。 - Inzimam Tariq IT对于SVG RatingBar,我使用了RatingBar custom Vector Drawables superimposing的解决方案,并参考了erdomester的回答。该解决方案遍历布局中SvgRatingBar视图中的所有可绘制对象,因此在RecyclerView中会有一定的开销。
SvgRatingBar.java:
import android.annotation.SuppressLint;
import android.content.Context;
import android.graphics.Bitmap;
import android.graphics.BitmapShader;
import android.graphics.Canvas;
import android.graphics.Shader;
import android.graphics.drawable.BitmapDrawable;
import android.graphics.drawable.ClipDrawable;
import android.graphics.drawable.Drawable;
import android.graphics.drawable.LayerDrawable;
import android.graphics.drawable.ShapeDrawable;
import android.graphics.drawable.VectorDrawable;
import android.graphics.drawable.shapes.RoundRectShape;
import android.graphics.drawable.shapes.Shape;
import android.os.Build;
import android.util.AttributeSet;
import android.view.Gravity;

import androidx.appcompat.graphics.drawable.DrawableWrapper;
import androidx.vectordrawable.graphics.drawable.VectorDrawableCompat;

import com.example.R; // Your R.java file for R.attr.ratingBarStyle.

public class SvgRatingBar extends androidx.appcompat.widget.AppCompatRatingBar {

    private Bitmap sampleTile;

    public SvgRatingBar(Context context) {
        this(context, null);
    }

    public SvgRatingBar(Context context, AttributeSet attrs) {
        this(context, attrs, R.attr.ratingBarStyle);
    }

    public SvgRatingBar(Context context, AttributeSet attrs, int defStyleAttr) {
        super(context, attrs, defStyleAttr);
        init();
    }

    private void init() {
        LayerDrawable drawable = (LayerDrawable) createTile(getProgressDrawable(), false);
        setProgressDrawable(drawable);
    }

    /**
     * Converts a drawable to a tiled version of itself. It will recursively
     * traverse layer and state list drawables.
     */
    @SuppressLint("RestrictedApi")
    private Drawable createTile(Drawable drawable, boolean clip) {
        if (drawable instanceof DrawableWrapper) {
            Drawable inner = ((DrawableWrapper) drawable).getWrappedDrawable();
            if (inner != null) {
                inner = createTile(inner, clip);
                ((DrawableWrapper) drawable).setWrappedDrawable(inner);
            }
        } else if (drawable instanceof LayerDrawable) {
            LayerDrawable background = (LayerDrawable) drawable;
            final int n = background.getNumberOfLayers();
            Drawable[] outDrawables = new Drawable[n];

            for (int i = 0; i < n; i++) {
                int id = background.getId(i);
                outDrawables[i] = createTile(background.getDrawable(i),
                        (id == android.R.id.progress || id == android.R.id.secondaryProgress));
            }
            LayerDrawable newBg = new LayerDrawable(outDrawables);

            for (int i = 0; i < n; i++) {
                newBg.setId(i, background.getId(i));
            }

            return newBg;

        } else if (drawable instanceof BitmapDrawable) {
            final BitmapDrawable bitmapDrawable = (BitmapDrawable) drawable;
            final Bitmap tileBitmap = bitmapDrawable.getBitmap();
            if (sampleTile == null) {
                sampleTile = tileBitmap;
            }

            final ShapeDrawable shapeDrawable = new ShapeDrawable(getDrawableShape());
            final BitmapShader bitmapShader = new BitmapShader(tileBitmap,
                    Shader.TileMode.REPEAT, Shader.TileMode.CLAMP);
            shapeDrawable.getPaint().setShader(bitmapShader);
            shapeDrawable.getPaint().setColorFilter(bitmapDrawable.getPaint().getColorFilter());
            return (clip) ? new ClipDrawable(shapeDrawable, Gravity.START,
                    ClipDrawable.HORIZONTAL) : shapeDrawable;
        } else if (Build.VERSION.SDK_INT >= Build.VERSION_CODES.LOLLIPOP && drawable instanceof VectorDrawable) {
            return createTile(getBitmapDrawableFromVectorDrawable(drawable), clip);
        } else if (drawable instanceof VectorDrawableCompat) {
            // API 19 support.
            return createTile(getBitmapDrawableFromVectorDrawable(drawable), clip);
        }
        return drawable;
    }

    private BitmapDrawable getBitmapDrawableFromVectorDrawable(Drawable drawable) {
        Bitmap bitmap = Bitmap.createBitmap(drawable.getIntrinsicWidth(), drawable.getIntrinsicHeight(), Bitmap.Config.ARGB_8888);
        Canvas canvas = new Canvas(bitmap);
        drawable.setBounds(0, 0, canvas.getWidth(), canvas.getHeight());
        drawable.draw(canvas);
        return new BitmapDrawable(getResources(), bitmap);
    }

    @Override
    protected synchronized void onMeasure(int widthMeasureSpec, int heightMeasureSpec) {
        super.onMeasure(widthMeasureSpec, heightMeasureSpec);
        if (sampleTile != null) {
            final int width = sampleTile.getWidth() * getNumStars();
            setMeasuredDimension(resolveSizeAndState(width, widthMeasureSpec, 0),
                    getMeasuredHeight());
        }
    }

    private Shape getDrawableShape() {
        final float[] roundedCorners = new float[]{5, 5, 5, 5, 5, 5, 5, 5};
        return new RoundRectShape(roundedCorners, null, null);
    }
}
在您的布局中:
<com.example.common.control.SvgRatingBar
    android:id="@+id/rate"
    android:layout_width="wrap_content"
    android:layout_height="wrap_content"
    android:minHeight="13dp"
    android:numStars="5"
    android:progressDrawable="@drawable/rating_bar"
    android:rating="3.5"
    android:stepSize="0.01"
    />
您还需要创建rating_bar.xml,其中包含两个SVG可绘制对象:
<?xml version="1.0" encoding="utf-8"?>
<layer-list xmlns:android="http://schemas.android.com/apk/res/android">
    <item
        android:id="@android:id/background"
        android:drawable="@drawable/ic_unfilled_star"
        />

    <item
        android:id="@android:id/secondaryProgress"
        android:drawable="@drawable/ic_unfilled_star"
        />

    <item
        android:id="@android:id/progress"
        android:drawable="@drawable/ic_filled_star"
        />

</layer-list>
如果在设计/分割视图中只看到一个星号,请刷新布局:
用Kotlin实现。
import android.annotation.SuppressLint
import android.content.Context
import android.graphics.Bitmap
import android.graphics.BitmapShader
import android.graphics.Canvas
import android.graphics.Shader
import android.graphics.drawable.*
import android.graphics.drawable.shapes.RoundRectShape
import android.os.Build
import android.util.AttributeSet
import android.view.Gravity
import androidx.appcompat.graphics.drawable.DrawableWrapper
import androidx.appcompat.widget.AppCompatRatingBar
import androidx.vectordrawable.graphics.drawable.VectorDrawableCompat
import com.example.R; // Your R.java file for R.attr.ratingBarStyle.

class SvgRatingBar @JvmOverloads constructor(context: Context, attrs: AttributeSet? = null,
                                             defStyleAttr: Int = R.attr.ratingBarStyle) :
    AppCompatRatingBar(context, attrs, defStyleAttr) {

    private var sampleTile: Bitmap? = null
    private val roundedCorners = floatArrayOf(5f, 5f, 5f, 5f, 5f, 5f, 5f, 5f)
    private val roundRectShape = RoundRectShape(roundedCorners, null, null)

    init {
        progressDrawable = createTile(progressDrawable, false) as LayerDrawable
    }

    /**
     * Converts a drawable to a tiled version of itself. It will recursively
     * traverse layer and state list drawables.
     */
    private fun createTile(drawable: Drawable, clip: Boolean): Drawable =
        when {
            drawable is DrawableWrapper -> {
                @SuppressLint("RestrictedApi")
                var inner = drawable.wrappedDrawable
                if (inner != null) {
                    inner = createTile(inner, clip)
                    @SuppressLint("RestrictedApi")
                    drawable.wrappedDrawable = inner
                }
                drawable
            }
            drawable is LayerDrawable -> {
                val n = drawable.numberOfLayers
                val outDrawables = arrayOfNulls<Drawable>(n)
                for (i in 0 until n) {
                    val id = drawable.getId(i)
                    outDrawables[i] = createTile(drawable.getDrawable(i),
                        id == android.R.id.progress || id == android.R.id.secondaryProgress)
                }
                val newBg = LayerDrawable(outDrawables)
                for (i in 0 until n) {
                    newBg.setId(i, drawable.getId(i))
                }
                newBg
            }
            drawable is BitmapDrawable -> {
                val tileBitmap = drawable.bitmap
                if (sampleTile == null) {
                    sampleTile = tileBitmap
                }
                val bitmapShader = BitmapShader(tileBitmap, Shader.TileMode.REPEAT,
                    Shader.TileMode.CLAMP)
                val shapeDrawable = ShapeDrawable(roundRectShape).apply {
                    paint.shader = bitmapShader
                    paint.colorFilter = drawable.paint.colorFilter
                }
                if (clip) ClipDrawable(shapeDrawable, Gravity.START, ClipDrawable.HORIZONTAL)
                else shapeDrawable
            }
            Build.VERSION.SDK_INT >= Build.VERSION_CODES.LOLLIPOP && drawable is VectorDrawable -> {
                createTile(getBitmapDrawableFromVectorDrawable(drawable), clip)
            }
            drawable is VectorDrawableCompat -> {
                // Pre-Lollipop support.
                createTile(getBitmapDrawableFromVectorDrawable(drawable), clip)
            }
            else -> drawable
        }

    private fun getBitmapDrawableFromVectorDrawable(drawable: Drawable): BitmapDrawable {
        val bitmap = Bitmap.createBitmap(drawable.intrinsicWidth, drawable.intrinsicHeight,
            Bitmap.Config.ARGB_8888)
        val canvas = Canvas(bitmap)
        drawable.setBounds(0, 0, canvas.width, canvas.height)
        drawable.draw(canvas)
        return BitmapDrawable(resources, bitmap)
    }

    @Synchronized override fun onMeasure(widthMeasureSpec: Int, heightMeasureSpec: Int) {
        super.onMeasure(widthMeasureSpec, heightMeasureSpec)
        if (sampleTile != null) {
            val width = sampleTile!!.width * numStars
            setMeasuredDimension(resolveSizeAndState(width, widthMeasureSpec, 0),
                measuredHeight)
        }
    }
}
7
DrawableWrapper导入 - Konstantin Konopkoimport androidx.appcompat.graphics.drawable.DrawableWrapperCompat? - CoolMind使用层列表和选择器来制作自定义评分条非常复杂,最好是覆盖RatingBar类并创建自定义的RatingBar。createBackgroundDrawableShape()是您应该放置空状态png的函数,而createProgressDrawableShape()是您应该放置填充状态png的函数。
注意:此代码目前无法使用svg。
public class CustomRatingBar extends RatingBar {

    @Nullable
    private Bitmap mSampleTile;

    public ShapeDrawableRatingBar(final Context context, final AttributeSet attrs) {
        super(context, attrs);
        setProgressDrawable(createProgressDrawable());
    }

    @Override
    protected synchronized void onMeasure(int widthMeasureSpec, int heightMeasureSpec) {
        super.onMeasure(widthMeasureSpec, heightMeasureSpec);

        if (mSampleTile != null) {
            final int width = mSampleTile.getWidth() * getNumStars();
            setMeasuredDimension(resolveSizeAndState(width, widthMeasureSpec, 0), getMeasuredHeight());
        }
    }

    protected LayerDrawable createProgressDrawable() {
        final Drawable backgroundDrawable = createBackgroundDrawableShape();
        LayerDrawable layerDrawable = new LayerDrawable(new Drawable[]{
            backgroundDrawable,
            backgroundDrawable,
            createProgressDrawableShape()
        });

        layerDrawable.setId(0, android.R.id.background);
        layerDrawable.setId(1, android.R.id.secondaryProgress);
        layerDrawable.setId(2, android.R.id.progress);
        return layerDrawable;
    }

    protected Drawable createBackgroundDrawableShape() {
        final Bitmap tileBitmap = drawableToBitmap(getResources().getDrawable(R.drawable.ic_star_empty));
        if (mSampleTile == null) {
            mSampleTile = tileBitmap;
        }
        final ShapeDrawable shapeDrawable = new ShapeDrawable(getDrawableShape());
        final BitmapShader bitmapShader = new BitmapShader(tileBitmap, Shader.TileMode.REPEAT, Shader.TileMode.CLAMP);
        shapeDrawable.getPaint().setShader(bitmapShader);
        return shapeDrawable;
    }

    protected Drawable createProgressDrawableShape() {
        final Bitmap tileBitmap = drawableToBitmap(getResources().getDrawable(R.drawable.ic_star_full));
        final ShapeDrawable shapeDrawable = new ShapeDrawable(getDrawableShape());
        final BitmapShader bitmapShader = new BitmapShader(tileBitmap, Shader.TileMode.REPEAT, Shader.TileMode.CLAMP);
        shapeDrawable.getPaint().setShader(bitmapShader);
        return new ClipDrawable(shapeDrawable, Gravity.LEFT, ClipDrawable.HORIZONTAL);
    }

    Shape getDrawableShape() {
        final float[] roundedCorners = new float[]{5, 5, 5, 5, 5, 5, 5, 5};
        return new RoundRectShape(roundedCorners, null, null);
    }

    public static Bitmap drawableToBitmap(Drawable drawable) {
        if (drawable instanceof BitmapDrawable) {
            return ((BitmapDrawable) drawable).getBitmap();
        }

        int width = drawable.getIntrinsicWidth();
        width = width > 0 ? width : 1;
        int height = drawable.getIntrinsicHeight();
        height = height > 0 ? height : 1;

        final Bitmap bitmap = Bitmap.createBitmap(width, height, Bitmap.Config.ARGB_8888);
        final Canvas canvas = new Canvas(bitmap);
        drawable.setBounds(0, 0, canvas.getWidth(), canvas.getHeight());
        drawable.draw(canvas);

        return bitmap;
    }
}
3
<!-- RatingBar -->
<style name="RatingBar" parent="@android:style/Widget.RatingBar">
    <item name="android:progressDrawable">@drawable/ratingbar_full</item>
    <item name="android:indeterminateDrawable">@drawable/ratingbar_full</item>
    <item name="android:minHeight">13.4dp</item>
    <item name="android:maxHeight">13.4dp</item>
</style>
ratingbar_full.xml (res/drawable)
<?xml version="1.0" encoding="utf-8"?>
<layer-list xmlns:android="http://schemas.android.com/apk/res/android">
    <item android:id="@android:id/background" android:drawable="@drawable/btn_rating_star_off_normal" />
    <item android:id="@android:id/secondaryProgress" android:drawable="@drawable/btn_rating_star_off_normal" />
    <item android:id="@android:id/progress" android:drawable="@drawable/btn_rating_star_on_normal" />
</layer-list>
btn_rating_star_off_normal.png(res/drawable-xxhdpi)
btn_rating_star_on_normal.png(res/drawable-xxhdpi)
activity_ratingbar.xml(res/layout)
<?xml version="1.0" encoding="utf-8"?>
<FrameLayout xmlns:android="http://schemas.android.com/apk/res/android"
    android:layout_width="match_parent"
    android:layout_height="match_parent">

    <androidx.appcompat.widget.AppCompatRatingBar
        android:id="@+id/ratingbar"
        style="@style/RatingBar"
        android:layout_width="wrap_content"
        android:layout_height="13.4dp"
        android:isIndicator="false"
        android:numStars="5"
        android:rating="2.6"
        android:secondaryProgressTint="#00000000"
        android:stepSize="0.1" />
</FrameLayout>
这是结果。
- 请注意,我在
layout_height属性中添加了评分条的实际高度(13.4dp),因为如果它是wrap_content,它会在星星下面绘制线条。(在我的情况下,仅在Android Studio的预览中)
2
1
@Override
protected synchronized void onDraw(Canvas canvas)
{
    int stars = getNumStars();
    float rating = getRating();
    try
    {
        bitmapWidth = getWidth() / stars;
    }
    catch (Exception e)
    {
        bitmapWidth = getWidth();
    }
    float x = 0;

    for (int i = 0; i < stars; i++)
    {
        Bitmap bitmap;
        Resources res = getResources();
        Paint paint = new Paint();

        if ((int) rating > i)
        {
            bitmap = BitmapFactory.decodeResource(res, starColor);
        }
        else
        {
            bitmap = BitmapFactory.decodeResource(res, starDefault);
        }
        Bitmap scaled = Bitmap.createScaledBitmap(bitmap, getHeight(), getHeight(), true);
        canvas.drawBitmap(scaled, x, 0, paint);
        canvas.save();
        x += bitmapWidth;
    }

    super.onDraw(canvas);
}
有关自定义评分栏的信息,请参见http://www.zoftino.com/android-ratingbar-and-custom-ratingbar-example 下面的drawable xml使用点赞图标作为评分栏。
<?xml version="1.0" encoding="utf-8"?>
<layer-list xmlns:android="http://schemas.android.com/apk/res/android">
    <item android:id="@android:id/background">
        <bitmap
            android:src="@drawable/thumb_up"
            android:tint="?attr/colorControlNormal" />
    </item>
    <item android:id="@android:id/secondaryProgress">
        <bitmap
            android:src="@drawable/thumb_up"
            android:tint="?attr/colorControlActivated" />
    </item>
    <item android:id="@android:id/progress">
        <bitmap
            android:src="@drawable/thumb_up"
            android:tint="?attr/colorControlActivated" />
    </item>
</layer-list>
原文链接


