使用Fabric JS模拟位图字体的字距。

6

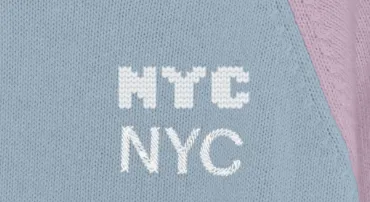
我正在尝试使用Fabric JS创建一个效果,使字母看起来像是“绣”在毛衣上,效果如下:

我可以通过使用这个动作在Photoshop中实现此效果。

我打算通过从Photoshop渲染出每个绣花字母的png来将其放置在基于用户输入的画布上。

但是,这种方法将没有正确的字距。

为了解决这个问题,我试图使用相同字体在Fabric中写出文本,然后在要替换的字母上方覆盖每个绣花png(然后隐藏文本本身)。

以下是我如何呈现文本的方式:

window.chest_text = new fabric.IText("NYC", {
      fill: '#000',
      fontSize: 12,
      left: 210,
      top: 100,
      fontFamily: 'Graphik',
      fontWeight: 500,
      lineHeight: 1,
      originX: 'center',
    });

然后这是我如何渲染刺绣字母的方式:

  var n_url = 'https://res.cloudinary.com/tricot/image/upload/v1598820746/tmp/n-embroidery-test.png'
  var y_url = 'https://res.cloudinary.com/tricot/image/upload/v1598820745/tmp/y-embroidery-test.png'
  var c_url = 'https://res.cloudinary.com/tricot/image/upload/v1598820745/tmp/c-embroidery-test.png'
  
  fabric.Image.fromURL(n_url, function(img) {
    img.set({
      left: Math.round(window.chest_text.aCoords.bl.x),
      top: window.chest_text.top
    })
    
    img.scaleToHeight(Math.floor(window.chest_text.__charBounds[0][0].height / 1.13), true)
    
    canvas.add(img);
  })
  
  fabric.Image.fromURL(y_url, function(img) {
    img.set({
      left: Math.round(window.chest_text.aCoords.bl.x + window.chest_text.__charBounds[0][1].left),
      top: window.chest_text.top
    })
    
    img.scaleToHeight(Math.floor(window.chest_text.__charBounds[0][1].height / 1.13), true)
    
    canvas.add(img);
  })
  
  fabric.Image.fromURL(c_url, function(img) {
    img.set({
      left: Math.round(window.chest_text.aCoords.bl.x + window.chest_text.__charBounds[0][2].left),
      top: window.chest_text.top
    })
    
    img.scaleToHeight(Math.floor(window.chest_text.__charBounds[0][2].height / 1.13), true)
    
    canvas.add(img);
  })
  
  window.chest_text.opacity = 0.5
  
  window.canvas.renderAll()

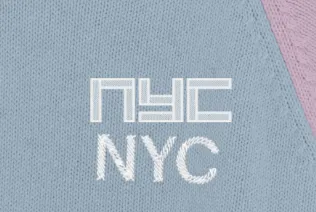
然而,我无法使绣花字母与普通文本完全重叠(即使它们是相同的字体):

enter image description here

我该如何实现这一点?有没有更好的方法让字距正常工作?


1
@melchiar 这很有趣,但在这种情况下,他们并不是在尝试模拟字距,而只是渲染出一个固定宽度的字体。但也许这仍然是一个好的方法!谢谢 - Tom Lehman
1
通过子类化文本类,您可以基本上更改绘制操作,以从图像/精灵中绘制每个字符,而不是从字体本身中绘制。您仍然会使用字体来测量每个字符。我链接的示例覆盖了度量字符功能以返回固定数量,但您可以查看fabric源代码中的原始功能以了解其工作原理。 - melchiar
2
有趣的好建议!我会更仔细地检查它。 - Tom Lehman
1
如果可以的话,创建新字体会很有帮助。访问calligraphr.com网站, 下载一个包含A-Z和0-9的网格png模板。 将你拥有的字母图像粘贴到相应位置。 最后下载ttf文件即可。 - khajaamin
1
“Embroidery”(https://fontstruct.com/fontstructions/show/383008/ncd_embroidery_comp_size)看起来很接近你需要的字体。如果你使用字体而不是图片,可能会有用。 - CobyC
显示剩余3条评论
2个回答

5
使用线段作为针迹,ctx.globalCompositeOperation = "source-atop" 可以只在文字内部绘制。通过变换描边宽度从字体内部开始制作针脚。
不幸的是,线段间距仅对描边中心有效,因此该方法适用于某些字符但并非所有字符。
可以进一步改进,不过没有尝试圆形针脚(每个针脚的高亮和阴影颜色),但由于在线条交汇处无法控制针脚的位置,因此我看不到进一步完善的必要。
将适用于任何字体。
请参见代码片段进行演示和代码。

function stitchIt(text, stitchLen, stitchOffset, threadThickness, size, font, col1, col2 , shadowColor, offset, blur) {
    const can = document.createElement("canvas");
    const ctx = can.getContext("2d");
    ctx.font = size + "px "+font;
    const width = ctx.measureText(text).width;
    can.width = width;
    can.height = size;
    ctx.font = size + "px "+font;
    ctx.textAlign = "center";
    ctx.textBaseline = "middle";
    ctx.globalCompositeOperation = "source-over";
    ctx.lineCap = "butt";
    ctx.lineJoin = "bevel";
    ctx.fillStyle = col2;
    ctx.setTransform(1,0,0,1,width / 2, size / 2);
    ctx.fillText(text, 0, 0);
    ctx.setLineDash([stitchLen, stitchLen]);
    var w = size, off = 0;
    ctx.globalCompositeOperation = "source-atop"
    while (w > 0) {
        ctx.lineWidth = w;
        ctx.strokeStyle = col1;
        ctx.lineDashOffset = off; 
        ctx.strokeText(text, 0, 0);
        if (w > threadThickness) {
            w -= threadThickness / 2;
            ctx.lineWidth = w;
            ctx.lineDashOffset = off + stitchLen; 
            ctx.strokeStyle = col2;
            ctx.strokeText(text, 0, 0);
            off += stitchLen * stitchOffset;
            w -= threadThickness / 2;
        } else {
            break;
        }
    }
    ctx.globalCompositeOperation = "destination-out";
    ctx.globalAlpha = 0.5;
    ctx.strokeStyle = col2;
    ctx.lineWidth = threadThickness / 2;
    ctx.lineDashOffset = off + stitchLen; 
    ctx.strokeText(text, 0, 0);
    ctx.globalCompositeOperation = "destination-over";
    ctx.save();
    ctx.shadowColor = "#000";
    ctx.shadowOffsetX = offset;
    ctx.shadowOffsetY = offset;
    ctx.shadowBlur = blur;
    ctx.fillText(text, 0, 0);
    ctx.restore();    
    ctx.globalCompositeOperation = "source-over";
    return can;
}
ctx = canvas.getContext("2d");
textEl.addEventListener("input", update);
sLenEl.addEventListener("change", update);
sOffEl.addEventListener("change", update);
sThreadEl.addEventListener("change", update);
sFontEl.addEventListener("change", update);
colEl.addEventListener("click", () => {
    color = colors[colIdx++ % colors.length];
    update();
});

// update debounces render
var tHdl;
function update() {
    clearTimeout(tHdl);
    tHdl = setTimeout(draw, 200);
}
const colors=[["#DDD","#888"],["#FFF","#666"],["#F88","#338"],["#8D8","#333"]];
var colIdx = 0;
var color = colors[colIdx++];
stitchIt("STITCH",5, 1.4, 4, 160,"Arial Black","#DDD","#888","#0004" , 4, 5);
function draw() {
    ctx.clearRect(0,0,1500,180);
    if (textEl.value) {
        const image = stitchIt(
            textEl.value,
            Number(sLenEl.value), 
            sOffEl.value / 100 + 0.8, 
            Number(sThreadEl.value), 
            Number(sFontEl.value),
            "Arial Black",
            color[0],
            color[1],
            "#0004" , 
            4, 
            5
        );
        ctx.drawImage(image,0,90-image.height / 2); 
   }
}
draw();
canvas {
    background: #49b;
    border: 2px solid #258;
    position: absolute;
    top: 0px;
    left: 230px;
}
<div>
    <input id="textEl" type="text" value="STITCH"></input><br>
    <button id="colEl">change Color</button><br>
    
    <input id="sLenEl" type="range" min="2" max="16" value="5"><label for="sLenEl">Stitch length</label><br>
    <input id="sOffEl" type="range" min="0" max="100" value="50"><label for="sOffEl">Stitch offset</label><br>
    <input id="sThreadEl" type="range" min="2" max="10" value="4"><label for="sThreadEl">Thread size</label><br>
    <input id="sFontEl" type="range" min="20" max="180" value="140"><label for="sFontEl">Font size</label><br>
</div>
<canvas id="canvas" width="1500" height="180"></canvas>


1

如果你能找到字体,你可以使用它。

有一种字体可能更接近你所需的,NCD Embroidery,但你需要联系设计师获取许可证。

你甚至可能在Photoshop的库中找到这种字体(我对Photoshop不太熟悉,所以这只是一个猜测)

在.css文件中注册字体。

@font-face {
    font-family:'stitchfont';
    src:url('./fonts/fs-mom.ttf') format('truetype');
}
@font-face {
    font-family:'pencilfont';
    src:url('./fonts/fs-ariapenciroman.ttf') format('truetype');
}
@font-face {
    font-family:'fabricon';
    src:url('./fonts/stf-fabricon-cross-section.ttf') format('truetype');
}

.stitch{
    font-family: 'stitchfont';
}
.pencil {
    font-family: 'pencilfont';
}

.fabri {
    font-family: 'fabricon';
}

代码如下:

<body>    
    <canvas id="stitchText" width="400" height="200"></canvas>
    <canvas id="pencilText" width="400" height="200"></canvas>
    <canvas id="fabricText" width="400" height="200"></canvas>

    <div class="stitch" style="visibility: hidden;">if the font is not used it doesn't seem to load consistently</div>
    <div class="pencil" style="visibility: hidden;">so assign the font to any element</div>
    <div class="fabri" style="visibility: hidden;">set the style visibility to hidden , dont use the html hidden tag</div>

    <script src="./lib/fabric.js/fabric.js"></script>
    <script>
        let stitchCanvas = new fabric.Canvas("stitchText")
        let stitchText = new fabric.Text("NYC", {
            fill: '#EEE',
            fontFamily: 'stitchfont',
            fontSize: 60,
            left: 190,
            top: 90,
            originX: 'center',
            originY: 'center'
        });
        stitchCanvas.add(stitchText);
        stitchCanvas.setBackgroundImage("images/embroid.png", stitchCanvas.renderAll.bind(stitchCanvas), { opacity: 0.8, scaleX: 0.28, scaleY: 0.28 });

        let pencilCanvas = new fabric.Canvas("pencilText")
        let pencilText = new fabric.Text("NYC", {
            fill: '#EEE',
            fontFamily: 'pencilfont',
            fontSize: 80,
            left: 190,
            top: 85,
            originX: 'center',
            originY: 'center'
        });
        pencilCanvas.add(pencilText);
        pencilCanvas.setBackgroundImage("images/embroid.png", pencilCanvas.renderAll.bind(pencilCanvas), { opacity: 0.8, scaleX: 0.28, scaleY: 0.28 });

        let fabricCanvas = new fabric.Canvas("fabricText")
        let fabricText = new fabric.Text("NYC", {
            fill: '#EEE',
            fontFamily: 'fabricon',
            fontSize: 40,
            left: 195,
            top: 85,
            originX: 'center',
            originY: 'center'
        });
        fabricCanvas.add(fabricText);
        fabricCanvas.setBackgroundImage("images/embroid.png", fabricCanvas.renderAll.bind(fabricCanvas), { opacity: 0.8, scaleX: 0.28, scaleY: 0.28 });

    </script>
</body>

字体的结果:

fs Mom license

fmMomFont

FS Ariapenciroman license

{{链接1:FS Ariapenciroman}} {{链接2:许可证}}

pencilFont

面料 许可证

fabricFont


网页内容由stack overflow 提供, 点击上面的
可以查看英文原文,
原文链接