我正在Python中实现对象本地化。我遇到的问题是,当我在执行操作时调整可观测区域的大小时,我不知道如何同时更改真实框。因此,会出现以下情况:
我似乎无法正确调整尺寸。我按照this帖子的方法来最初调整边界框的大小。但这种解决方案在这种情况下似乎不起作用。
边界框/真实框格式为:

def next_state(init_input, b, b_prime, g, a):
    """
    Returns the observable region of the next state.

    Formats the next state's observable region, defined
    by b_prime, to be of dimension (224, 224, 3). Adding 16
    additional pixels of context around the original bounding box.
    The ground truth box must be reformatted according to the
    new observable region.

    :param init_input:
        The initial input volume of the current episode.

    :param b:
        The current state's bounding box.

    :param b_prime:
        The subsequent state's bounding box.

    :param g:
        The ground truth box of the target object.

    :param a:
        The action taken by the agent at the current step.
    """

    # Determine the pixel coordinates of the observable region for the following state
    context_pixels = 16
    x1 = max(b_prime[0] - context_pixels, 0)
    y1 = max(b_prime[1] - context_pixels, 0)
    x2 = min(b_prime[2] + context_pixels, IMG_SIZE)
    y2 = min(b_prime[3] + context_pixels, IMG_SIZE)

    # Determine observable region
    observable_region = cv2.resize(init_input[y1:y2, x1:x2], (224, 224))

    # Difference between crop region and image dimensions
    x1_diff = x1
    y1_diff = y1
    x2_diff = IMG_SIZE - x2
    y2_diff = IMG_SIZE - y2

    # Resize ground truth box
    g[0] = int(g[0] - 0.5 * x1_diff)  # x1
    g[1] = int(g[1] - 0.5 * y1_diff)  # y1
    g[2] = int(g[2] + 0.5 * x2_diff)  # x2
    g[3] = int(g[3] + 0.5 * y2_diff)  # y2

    return observable_region, g
我似乎无法正确调整尺寸。我按照this帖子的方法来最初调整边界框的大小。但这种解决方案在这种情况下似乎不起作用。
边界框/真实框格式为:
b = [x1, y1, x2, y2]
init_input 的尺寸为 (224, 224, 3)。 IMG_SIZE = 224 和 context_pixels = 16
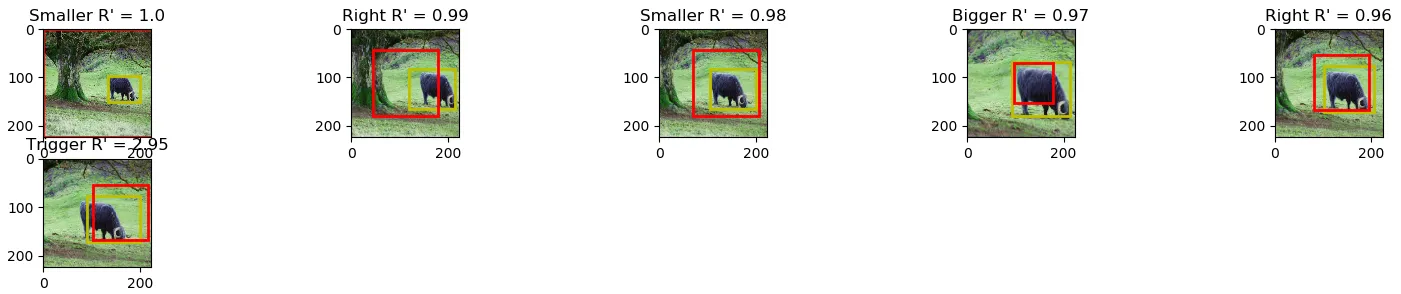
以下是一个额外的示例:

看起来标准框的大小是正确的,但位置不正确。
更新
我已经更新了上面的代码部分。缩放因子似乎不是解决问题的正确方法。通过仅添加/减去要放大的像素数量,我已经接近很多。我相信现在与插值有关,所以如果有人能帮忙使其完美,那将是一个巨大的帮助。
新例子:
更新 2
提供了解决方案。