我想更改在使用 input="file" 时,按钮上的默认文本为 "选择文件"。
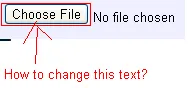
我该如何做?另外,正如您在图像中看到的,按钮位于文本的左侧。我该如何将它放在文本的右侧?
我想更改在使用 input="file" 时,按钮上的默认文本为 "选择文件"。
我该如何做?另外,正如您在图像中看到的,按钮位于文本的左侧。我该如何将它放在文本的右侧?
更新2017:
我已经研究了如何实现这个功能。最好的解释和教程在这里: https://tympanus.net/codrops/2015/09/15/styling-customizing-file-inputs-smart-way/
如果链接不可用,我将在此处写下摘要。所以你应该有HTML代码:
<input type="file" name="file" id="file" class="inputfile" />
<label for="file">Choose a file</label>
接下来使用CSS隐藏该输入框:
.inputfile {
width: 0.1px;
height: 0.1px;
opacity: 0;
overflow: hidden;
position: absolute;
z-index: -1;}
.inputfile + label {
font-size: 1.25em;
font-weight: 700;
color: white;
background-color: black;
display: inline-block;
}
然后你可以选择添加JS来显示文件名:
var inputs = document.querySelectorAll( '.inputfile' );
Array.prototype.forEach.call( inputs, function( input )
{
var label    = input.nextElementSibling,
    labelVal = label.innerHTML;

input.addEventListener( 'change', function( e )
{
    var fileName = '';
    if( this.files && this.files.length > 1 )
        fileName = ( this.getAttribute( 'data-multiple-caption' ) || '' ).replace( '{count}', this.files.length );
    else
        fileName = e.target.value.split( '\\' ).pop();

    if( fileName )
        label.querySelector( 'span' ).innerHTML = fileName;
    else
        label.innerHTML = labelVal;
});
});
但实际上只需要阅读教程和下载演示,这非常不错。
<!DOCTYPE html>
<html lang="en">
<head>

  <style>
    .btn-file {
      position: relative;
      overflow: hidden;
    }

    .btn-file input[type=file] {
      position: absolute;
      top: 0;
      right: 0;
      min-width: 100%;
      min-height: 100%;
      font-size: 100px;
      text-align: right;
      filter: alpha(opacity=0);
      opacity: 0;
      outline: none;
      background: white;
      cursor: inherit;
      display: block;
    }

  </style>
  <title>Bootstrap Example</title>
  <meta charset="utf-8">
  <meta name="viewport" content="width=device-width, initial-scale=1">
  <link rel="stylesheet" href="http://maxcdn.bootstrapcdn.com/bootstrap/3.3.7/css/bootstrap.min.css">
  <script src="https://ajax.googleapis.com/ajax/libs/jquery/1.12.4/jquery.min.js"></script>
  <script src="http://maxcdn.bootstrapcdn.com/bootstrap/3.3.7/js/bootstrap.min.js"></script>
</head>
<body>
  <span class="btn btn-file">Upload image from here<input type="file">
</body>
</html>
这应该可以工作:
input.*className*::-webkit-file-upload-button {
  *style content..*
}
以下是使用Bootstrap完成的步骤,您只需要将原始输入放在某个地方即可...我不确定是否在head中并删除 <br>,因为它只是隐藏了而已,而且也会占用空间 :)
 <head>
 <link rel="stylesheet" href="https://stackpath.bootstrapcdn.com/bootstrap/4.4.1/css/bootstrap.min.css" integrity="sha384-Vkoo8x4CGsO3+Hhxv8T/Q5PaXtkKtu6ug5TOeNV6gBiFeWPGFN9MuhOf23Q9Ifjh" crossorigin="anonymous">
 </head>

 <label for="file" button type="file" name="image" class="btn btn-secondary">Secondary</button> </label>

 <input type="file" id="file" name="image" value="Prebrskaj" style="visibility:hidden;">


 <footer>

 <script src="https://code.jquery.com/jquery-3.4.1.slim.min.js" integrity="sha384-J6qa4849blE2+poT4WnyKhv5vZF5SrPo0iEjwBvKU7imGFAV0wwj1yYfoRSJoZ+n" crossorigin="anonymous"></script>
<script src="https://cdn.jsdelivr.net/npm/popper.js@1.16.0/dist/umd/popper.min.js" integrity="sha384-Q6E9RHvbIyZFJoft+2mJbHaEWldlvI9IOYy5n3zV9zzTtmI3UksdQRVvoxMfooAo" crossorigin="anonymous"></script>
<script src="https://stackpath.bootstrapcdn.com/bootstrap/4.4.1/js/bootstrap.min.js" integrity="sha384-wfSDF2E50Y2D1uUdj0O3uMBJnjuUD4Ih7YwaYd1iqfktj0Uod8GCExl3Og8ifwB6" crossorigin="anonymous"></script>

</footer><!DOCTYPE html>
<html>
<head>
<meta charset="utf-8">
<meta name="viewport" content="width=device-width">
<title>JS Bin</title>
</head>
<body>
<button style="display:block;width:120px; height:30px;" onclick="document.getElementById('getFile').click()">Your text here</button>
<input type='file' id="getFile" style="display:none">
</body>
</html>基本上,我的脚本与这个链接非常相似。
<input data-com="fileBtn" placeholder="选择图片">
<!-- bootstrap.min.css not necessary -->
<link rel="stylesheet" href="https://cdnjs.cloudflare.com/ajax/libs/bootstrap/5.1.0/css/bootstrap.min.css">

<input data-com="fileBtn" placeholder="Select Image"> <!-- com: components -->
<input data-com="fileBtn" placeholder="Select File">
<div class="mt-2">
<input id="build-by-myself" placeholder="Select Video" accept="video/mp4, video/webm">
<div>

<script>
  //  Test
  (()=>{
    window.onload = () =>{
      // FileButton.className ="btn btn-danger"
      FileButton.BuildAll() // auto build all data-com="fileBtn"

      // or you can specify the target that you wanted.
      new FileButton(document.getElementById("build-by-myself"), "btn btn-danger")
    }
  })()

  //  script begin
  class FileButton {
    static className = "btn btn-primary"
    static BuildAll() {
      document.querySelectorAll(`input[data-com="fileBtn"]`).forEach(input=>{
        new FileButton(input, FileButton.className)
      })
    }
    /**
     * @param {HTMLInputElement} input
     * @param {string} btnClsName
     * */
    constructor(input, btnClsName) {
      input.style.display = "none" // [display is better than visibility](https://dev59.com/V3VC5IYBdhLWcg3w-WOs#48495293)
      input.type = "file"
      const frag = document.createRange().createContextualFragment(`<button class="${btnClsName}">${input.placeholder}</button>`)
      const button = frag.querySelector(`button`)

      input.parentNode.insertBefore(frag, input)

      button.onclick = ()=>{
        input.click()
      }
      input.addEventListener(`change`, (e)=>{
        // create a textNode to show the file name.
        const file = input.files[0]
        if (file === undefined) {
          return
        }
        const textNode = document.createTextNode(file.name)
        if (button.textNode) { // create a new attribute to record previous data.
          button.textNode.remove()
        }
        button.textNode = textNode
        button.parentNode.insertBefore(textNode, input)
      })
    }
  }
</script>My solution...
HTML :
<input type="file" id="uploadImages" style="display:none;" multiple>

<input type="button" id="callUploadImages" value="Select">
<input type="button" id="uploadImagesInfo" value="0 file(s)." disabled>
<input type="button" id="uploadProductImages" value="Upload">
Jquery:
$('#callUploadImages').click(function(){

    $('#uploadImages').click();
});

$('#uploadImages').change(function(){

    var uploadImages = $(this);
    $('#uploadImagesInfo').val(uploadImages[0].files.length+" file(s).");
});
This is just evil :D
<button onclick="document.getElementById('fileUpload').click()">Open from File...</button>
<input type="file" id="fileUpload" name="files" style="display:none" />
好的,非常简单的纯CSS方法可以创建您自定义的输入文件。
使用标签,但是如您从之前的答案中了解的那样,标签在Firefox中不会调用onclick函数,可能是一个bug,但以下方法并不影响。
<label for="file" class="custom-file-input"><input type="file" name="file" class="custom-file-input"></input></label>
    .custom-file-input {
        color: transparent;/* This is to take away the browser text for file uploading*/
        /* Carry on with the style you want */
        background: url(../img/doc-o.png);
        background-size: 100%;
        position: absolute;
        width: 200px;
        height: 200px;
        cursor: pointer;
        top: 10%;
        right: 15%;
    }
现在只需隐藏实际的输入按钮,但不能将其设置为visability: hidden
因此,通过设置opacity: 0;来使其不可见。
input.custom-file-input {
    opacity: 0;
    position: absolute;/*set position to be exactly over your input*/
    left: 0;
    top: 0;
}
现在你可能已经注意到了,我在标签和输入框上使用了相同的类,这是因为我希望它们都具有相同的样式,在标签上任何位置点击实际上都是在点击不可见的输入框。
接着我实际上创建了一系列关于这个文件上传按钮的博客文章。
'use strict'

var AMOUNT = 10
var WIDTH = 600
var HEIGHT = 400
var canvas = document.getElementById('canvas')
canvas.width = WIDTH
canvas.height = HEIGHT

//here's how I created the clickable area
//user clicks the clickable area > we send a click event
//to the file opener > the file opener clicks on the open
//file button > the open file dialogue pops up

function clickableAreaListener(e){
  let clickEvent = new CustomEvent("click",{"from":"fileOpenerHandler"});
  document.getElementById("fileOpener").dispatchEvent(clickEvent);
}
function fileOpenerListener(e) {
  document.getElementById("file-btn").click();
  e.preventDefault();
}

function fileSelectedListener(e){
    readFiles(e.target.files);
}

document.getElementById('file-btn').addEventListener('change', fileSelectedListener);
document.getElementById("clickable-area").addEventListener('click', clickableAreaListener);
document.getElementById("fileOpener").addEventListener("click", fileOpenerListener);

function readFiles(files){
  files = [].slice.call(files); //turning files into a normal array

  for (var file of files){
    var reader = new FileReader();

    reader.onload = createOnLoadHandler(file);
    reader.onerror = fileErrorHandler;
    //there are also reader.onloadstart, reader.onprogress, and reader.onloadend handlers

    reader.readAsDataURL(file);
  }
}

function fileErrorHandler(e) {
  switch(e.target.error.code) {
    case e.target.error.NOT_FOUND_ERR:
      throw 'Image not found';
      break;
    case e.target.error.NOT_READABLE_ERR:
      throw 'Image is not readable';
      break;
    case e.target.error.ABORT_ERR:
      break;
    default:
      throw 'An error occurred while reading the Image';
  };
}

function createOnLoadHandler(file){
  console.log('reading ' + file.name + ' of type ' + file.type) //file.type will be either image/jpeg or image/png

  function onLoad(e){
    var data = e.target.result
    display(data);
    var compressedData = compressCanvas(AMOUNT)
    download(compressedData)
  }

  return onLoad
}

function display(data){

    var img = document.createElement('img');
    img.src = data;

    var context = canvas.getContext('2d')
    context.clearRect(0, 0, WIDTH, HEIGHT);
    context.drawImage(img, 0, 0, WIDTH, HEIGHT);
  }

function compressCanvas(){
    return canvas.toDataURL('image/jpeg', AMOUNT / 100);
  }

function download(data) {

    function b64toBlob(b64Data, contentType, sliceSize) {
        contentType = contentType || '';
        sliceSize = sliceSize || 512;

        var byteCharacters = atob(b64Data);
        var byteArrays = [];

        for (var offset = 0; offset < byteCharacters.length; offset += sliceSize) {
            var slice = byteCharacters.slice(offset, offset + sliceSize);

            var byteNumbers = new Array(slice.length);
            for (var i = 0; i < slice.length; i++) {
                byteNumbers[i] = slice.charCodeAt(i);
            }

            var byteArray = new Uint8Array(byteNumbers);

            byteArrays.push(byteArray);
        }

        var blob = new Blob(byteArrays, {type: contentType});
        return blob;
    }

    var chromeApp = Boolean(chrome && chrome.permissions)
    if (chromeApp){

      chrome.fileSystem.chooseEntry({type:'openDirectory'}, function(entry) {
        chrome.fileSystem.getWritableEntry(entry, function(entry) {
          entry.getFile('example.jpg', {create:true}, function(entry) {
            entry.createWriter(function(writer){
              writer.write(b64toBlob(data.slice(23), 'image/jpg'))
            })
          })
        })
      })

    } else {
      let a = document.createElement("a");
      a.href = data;
      a.download = 'downloadExample.jpg'
      document.body.appendChild(a)
      a.click();
      window.URL.revokeObjectURL(a.href);
      a.remove()
  }

}
.fileInput {
display: none;
position: absolute;
top: 0;
right: 0;
font-size: 100px;
}
#clickable-area{
background: #ccc;
width: 500px;
display: flex;
margin-bottom: 50px;
}
#clickable-area-text{
margin: auto;
}
.yellow-button {
cursor: pointer;
color: white;
background: #f1c40f;
height: 30px;
width: 120px;
padding: 30px;
font-size: 22px;
text-shadow: 0 1px 2px rgba(0, 0, 0, 0.25);
}<div id="clickable-area">
<a id='fileOpener'> </a>
<input type="file" class="fileInput" id="file-btn" accept="image/*" multiple/>
<div class="yellow-button"><span>Shrink Image</span>
</div><p id="clickable-area-text">( you can click anywhere in here ) </p>
</div>
<canvas id="canvas"></canvas>Stack Overflow的限制似乎阻止了代码片段实际压缩和下载文件。这里完全相同的代码表明完整的上传/压缩/下载过程确实按预期工作。