点击图片弹出窗口(适用于多张图片)

4

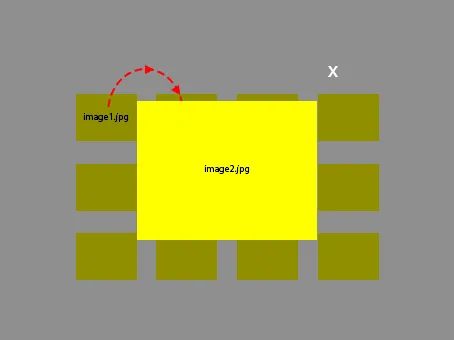
我尝试了单张图片,当点击图片时,会出现相应的弹出窗口,但是我希望对于多张图片也能实现同样的功能,因为我不想为每个图片单独编写js代码。

由于我有多张独立的图片,如果我单击它们中的每一个,弹出窗口都会显示不同的弹出图片,与我所单击的图片不同... 因此,弹出图片的源文件是不同的。

期望输出

在这里输入图片描述

参考

我已经尝试过的 以下是我使用HTML、CSS和JS尝试过的内容:

HTML

 <img id="myImg" class="img-fluid" src="https://cdn.pixabay.com/photo/2015/04/23/22/00/tree-736885__340.jpg">
                                                    <!-- The Modal -->
<div id="myModal" class="modal">
  <span class="close">&times;</span>
  <img class="modal-content"  src="https://encrypted-tbn0.gstatic.com/images?q=tbn%3AANd9GcQS2ol73JZj6-IqypxPZXYS3rRiPwKteoD8vezk9QsRdkjt3jEn&usqp=CAU">


  <div id="caption"></div>
</div>

CSS

<style> 
#myImg {

  border-radius: 5px;
  cursor: pointer;
  transition: 0.3s;
}

#myImg:hover {opacity: 0.7;}


#myImg2 {

  border-radius: 5px;
  cursor: pointer;
  transition: 0.3s;
}

#myImg2:hover {opacity: 0.7;}

/* The Modal (background) */
.modal {
  display: none; /* Hidden by default */
  position: fixed; /* Stay in place */
  z-index: 1; /* Sit on top */
  padding-top: 100px; /* Location of the box */
  left: 0;
  top: 0;
  width: 100%; /* Full width */
  height: 100%; /* Full height */
  overflow: auto; /* Enable scroll if needed */
  background-color: rgb(0,0,0); /* Fallback color */
  background-color: rgba(0,0,0,0.9); /* Black w/ opacity */
}

/* Modal Content (image) */
.modal-content {
  margin: auto;
  display: block;
  width: 80%;
  max-width: 700px;
}

/* Caption of Modal Image */
#caption {
  margin: auto;
  display: block;
  width: 80%;
  max-width: 700px;
  text-align: center;
  color: #ccc;
  padding: 10px 0;
  height: 150px;
}

/* Add Animation */
.modal-content, #caption {  
  -webkit-animation-name: zoom;
  -webkit-animation-duration: 0.6s;
  animation-name: zoom;
  animation-duration: 0.6s;
}

@-webkit-keyframes zoom {
  from {-webkit-transform:scale(0)} 
  to {-webkit-transform:scale(1)}
}

@keyframes zoom {
  from {transform:scale(0)} 
  to {transform:scale(1)}
}

/* The Close Button */
.close {
  position: absolute;
  top: 15px;
  right: 35px;
  color: #f1f1f1;
  font-size: 40px;
  font-weight: bold;
  transition: 0.3s;
}

.close:hover,
.close:focus {
  color: #bbb;
  text-decoration: none;
  cursor: pointer;
}

/* 100% Image Width on Smaller Screens */
@media only screen and (max-width: 700px){
  .modal-content {
    width: 100%;
  }
}

</style>    

JS

<script>

// Get the modal
var modal = document.getElementById("myModal");

// Get the image and insert it inside the modal - use its "alt" text as a caption
var img = document.getElementById("myImg");
var modalImg = document.getElementById("img01");
var captionText = document.getElementById("caption");
img.onclick = function(){
  modal.style.display = "block";
  modalImg.src = this.src;
  captionText.innerHTML = this.alt;
}

// Get the <span> element that closes the modal
var span = document.getElementsByClassName("close")[0];

// When the user clicks on <span> (x), close the modal
span.onclick = function() { 
  modal.style.display = "none";
}

</script>
Codepen链接


你看到了吗?你正在使用两个不同的URL来加载同一张图片? 另外,为什么不创建一个函数来处理多张图片的模态效果呢? - Deniz
嗨@Deniz,我已编辑所期望的输出。 - zab
你能在你的示例中添加更多的图片并重现你的问题吗? - Deniz
嗨@Deniz,我已经编辑了Codepen链接。 - zab
1个回答

5

我稍微修改了你的codepen。所以我做了以下几件事:

  • 移除了你的“on click”处理程序
  • 添加了一个处理程序来处理所有点击事件
  • 仅应用于你的图片
  • modal-img添加了id

我不建议你使用相同值的多个id,最好改用类来代替。

// Get the modal
var modal = document.getElementById("myModal");

// Get the image and insert it inside the modal - use its "alt" text as a caption
// var img = document.getElementById("myImg");
var modalImg = document.getElementById("modal-img");
var captionText = document.getElementById("caption");
// img.onclick = function(){
//   modal.style.display = "block";
//   modalImg.src = this.src;
//   captionText.innerHTML = this.alt;
// }


document.addEventListener("click", (e) => {
  const elem = e.target;
  if (elem.id==="myImg") {
    modal.style.display = "block";
    modalImg.src = elem.dataset.biggerSrc || elem.src;
    captionText.innerHTML = elem.alt; 
  }
})

// Get the <span> element that closes the modal
var span = document.getElementsByClassName("close")[0];

// When the user clicks on <span> (x), close the modal
span.onclick = function() { 
  modal.style.display = "none";
}
#myImg {

  border-radius: 5px;
  cursor: pointer;
  transition: 0.3s;
}

#myImg:hover {opacity: 0.7;}


#myImg2 {

  border-radius: 5px;
  cursor: pointer;
  transition: 0.3s;
}

#myImg2:hover {opacity: 0.7;}

/* The Modal (background) */
.modal {
  display: none; /* Hidden by default */
  position: fixed; /* Stay in place */
  z-index: 1; /* Sit on top */
  padding-top: 100px; /* Location of the box */
  left: 0;
  top: 0;
  width: 100%; /* Full width */
  height: 100%; /* Full height */
  overflow: auto; /* Enable scroll if needed */
  background-color: rgb(0,0,0); /* Fallback color */
  background-color: rgba(0,0,0,0.9); /* Black w/ opacity */
}

/* Modal Content (image) */
.modal-content {
  margin: auto;
  display: block;
  width: 80%;
  max-width: 700px;
}

/* Caption of Modal Image */
#caption {
  margin: auto;
  display: block;
  width: 80%;
  max-width: 700px;
  text-align: center;
  color: #ccc;
  padding: 10px 0;
  height: 150px;
}

/* Add Animation */
.modal-content, #caption {  
  -webkit-animation-name: zoom;
  -webkit-animation-duration: 0.6s;
  animation-name: zoom;
  animation-duration: 0.6s;
}

@-webkit-keyframes zoom {
  from {-webkit-transform:scale(0)} 
  to {-webkit-transform:scale(1)}
}

@keyframes zoom {
  from {transform:scale(0)} 
  to {transform:scale(1)}
}

/* The Close Button */
.close {
  position: absolute;
  top: 15px;
  right: 35px;
  color: #f1f1f1;
  font-size: 40px;
  font-weight: bold;
  transition: 0.3s;
}

.close:hover,
.close:focus {
  color: #bbb;
  text-decoration: none;
  cursor: pointer;
}

/* 100% Image Width on Smaller Screens */
@media only screen and (max-width: 700px){
  .modal-content {
    width: 100%;
  }
}
<img style="width:30%" id="myImg" class="img-fluid" src="https://cdn.pixabay.com/photo/2015/04/23/22/00/tree-736885__340.jpg"
data-bigger-src="http://qnimate.com/wp-content/uploads/2014/03/images2.jpg"
>

 <img style="width:28%"  id="myImg" class="img-fluid" src="https://cdn.pixabay.com/photo/2015/06/19/21/24/the-road-815297__340.jpg">
 <img style="width:29%"  id="myImg" class="img-fluid" src="https://image.shutterstock.com/image-photo/mountains-during-sunset-beautiful-natural-260nw-407021107.jpg">

                                                    <!-- The Modal -->
<div id="myModal" class="modal">
  <span class="close">&times;</span>
  <img id="modal-img" class="modal-content"  src="https://encrypted-tbn0.gstatic.com/images?q=tbn%3AANd9GcQS2ol73JZj6-IqypxPZXYS3rRiPwKteoD8vezk9QsRdkjt3jEn&usqp=CAU">
    
  
  <div id="caption"></div>
</div>


我不希望相同的图像放大后得到相同的结果,但例如在 Gmail 中,我们有一个图像(尺寸较小,但不是其中所有内容)作为附件,如果我们单击它,它会显示更大和详细的图像。 - zab
@zab,你可以在img元素中添加自定义数据属性和第二个img src。我已经将其添加到代码片段中的第一张图片上了。这是你想要的吗? - Oleksandr Blyzniuk
例如在 Gmail 帳戶中,當我們看到任何圖像附件時,它是一種在點擊之前裁剪圖像的類型,當我們點擊它時,它將變成完整的圖像,因此有兩個圖像,一個是裁剪過的圖像,另一個是完整或實際的圖像,我想在這裡實現相同的功能。 - zab
1
所以你只需要在服务器上放置每个图像的两个版本。将较小的版本链接到src,将较大的版本链接到data-bigger-src <img src='/images/img1_small.jpg' data-bigger-src='/images/img1_big.jpg' /> - Oleksandr Blyzniuk

网页内容由stack overflow 提供, 点击上面的
可以查看英文原文,
原文链接