我有一个名为“theImageView”的UIImageView,其中UIImage仅为单色(透明背景),就像下面的黑色左心一样。如何在iOS 7或更高版本中以与iOS 7+导航栏图标使用的着色方法相同的方式通过编程来更改此图像的色调?
这种方法是否也可以在Apple Watch应用程序的WatchKit中工作?

iOS
对于一个使用Swift 3、4或5的iOS应用程序:
theImageView.image = theImageView.image?.withRenderingMode(.alwaysTemplate)
theImageView.tintColor = UIColor.red
对于 Swift 2:
theImageView.image = theImageView.image?.imageWithRenderingMode(UIImageRenderingMode.AlwaysTemplate)
theImageView.tintColor = UIColor.redColor()
同时,现代化的 Objective-C 解决方案是:
theImageView.image = [theImageView.image imageWithRenderingMode:UIImageRenderingModeAlwaysTemplate];
[theImageView setTintColor:[UIColor redColor]];
WatchKit
在苹果手表应用的 WatchKit 中,您可以为模板图像设置色调颜色(tint color)。
要在 Swift 3 或 4 中设置色调颜色:
theImage.setTintColor(UIColor.red)
Swift 2:
theImage.setTintColor(UIColor.redColor())
在Objective-C中设置色调颜色的方法如下:
[self.theImage setTintColor:[UIColor redColor]];
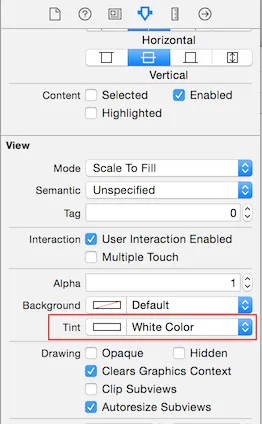
theImage着色为浅蓝色。在Storyboard和Image Assets中,您也可以修改这两个方面:
将渲染模式更新为Template Image
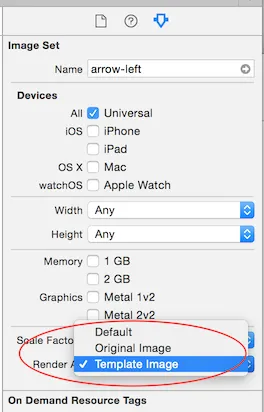
在Views中更新tintColor。
imageView.tintColor。 - Kamil Powałowski这是一个可以解决问题的分类
@interface UIImage(Overlay)
@end

@implementation UIImage(Overlay)

- (UIImage *)imageWithColor:(UIColor *)color1
{
        UIGraphicsBeginImageContextWithOptions(self.size, NO, self.scale);
        CGContextRef context = UIGraphicsGetCurrentContext();
        CGContextTranslateCTM(context, 0, self.size.height);
        CGContextScaleCTM(context, 1.0, -1.0);
        CGContextSetBlendMode(context, kCGBlendModeNormal);
        CGRect rect = CGRectMake(0, 0, self.size.width, self.size.height);
        CGContextClipToMask(context, rect, self.CGImage);
        [color1 setFill];
        CGContextFillRect(context, rect);
        UIImage *newImage = UIGraphicsGetImageFromCurrentImageContext();
        UIGraphicsEndImageContext();
        return newImage;
}
@end
那么您需要这样做:
theImageView.image = [theImageView.image imageWithColor:[UIColor redColor]];
我在Swift中使用extension实现了这个功能。
我想分享一下我是怎么做的:
extension UIImage {
    func imageWithColor(color1: UIColor) -> UIImage {
        UIGraphicsBeginImageContextWithOptions(self.size, false, self.scale)
        color1.setFill()

        let context = UIGraphicsGetCurrentContext() as CGContextRef
        CGContextTranslateCTM(context, 0, self.size.height)
        CGContextScaleCTM(context, 1.0, -1.0);
        CGContextSetBlendMode(context, CGBlendMode.Normal)

        let rect = CGRectMake(0, 0, self.size.width, self.size.height) as CGRect
        CGContextClipToMask(context, rect, self.CGImage)
        CGContextFillRect(context, rect)

        let newImage = UIGraphicsGetImageFromCurrentImageContext() as UIImage
        UIGraphicsEndImageContext()

        return newImage
    }
}
使用方法:
theImageView.image = theImageView.image.imageWithColor(UIColor.redColor())
适用于Swift 4
extension UIImage {
    func imageWithColor(color1: UIColor) -> UIImage {
        UIGraphicsBeginImageContextWithOptions(self.size, false, self.scale)
        color1.setFill()

        let context = UIGraphicsGetCurrentContext()
        context?.translateBy(x: 0, y: self.size.height)
        context?.scaleBy(x: 1.0, y: -1.0)
        context?.setBlendMode(CGBlendMode.normal)

        let rect = CGRect(origin: .zero, size: CGSize(width: self.size.width, height: self.size.height))
        context?.clip(to: rect, mask: self.cgImage!)
        context?.fill(rect)

        let newImage = UIGraphicsGetImageFromCurrentImageContext()
        UIGraphicsEndImageContext()

        return newImage!
    }
}
用法:
theImageView.image = theImageView.image?.imageWithColor(color1: UIColor.red)
color1.setFill()移动到方法UIGraphicsBeginImageContextWithOptions(self.size, false, self.scale)的第一иҰЊдё‹йқұпәЊиү™ж‰ҚеҮ№ж€‘иµ·дҢњз”ЁгЂ‚ - AaronCGBlendMode.Normal替代。 - Adolfo如果有人想要一种不使用UIImageView的解决方案:
// (Swift 3)
extension UIImage {
    func tint(with color: UIColor) -> UIImage {
        var image = withRenderingMode(.alwaysTemplate)
        UIGraphicsBeginImageContextWithOptions(size, false, scale)
        color.set()

        image.draw(in: CGRect(origin: .zero, size: size))
        image = UIGraphicsGetImageFromCurrentImageContext()!
        UIGraphicsEndImageContext()
        return image
    }
}
更改唯一颜色图像的UIImage SVG / PDF的色调:


import Foundation

// MARK: - UIImage extensions

public extension UIImage {

    //
    /// Tint Image
    ///
    /// - Parameter fillColor: UIColor
    /// - Returns: Image with tint color
    func tint(with fillColor: UIColor) -> UIImage? {
        let image = withRenderingMode(.alwaysTemplate)
        UIGraphicsBeginImageContextWithOptions(size, false, scale)
        fillColor.set()
        image.draw(in: CGRect(origin: .zero, size: size))

        guard let imageColored = UIGraphicsGetImageFromCurrentImageContext() else {
            return nil
        }

        UIGraphicsEndImageContext()
        return imageColored
    }
}
如何改变UIImageView中唯一颜色的图片的色调:
let imageView = UIImageView(frame: CGRect(x: 50, y: 50, width: 50, height: 50))
imageView.image = UIImage(named: "hello.png")!.withRenderingMode(.alwaysTemplate)
imageView.tintColor = .yellow


import Foundation

// MARK: - Extensions UIImage

public extension UIImage {

    /// Tint, Colorize image with given tint color
    /// This is similar to Photoshop's "Color" layer blend mode
    /// This is perfect for non-greyscale source images, and images that
    /// have both highlights and shadows that should be preserved<br><br>
    /// white will stay white and black will stay black as the lightness of
    /// the image is preserved
    ///
    /// - Parameter TintColor: Tint color
    /// - Returns:  Tinted image
    public func tintImage(with fillColor: UIColor) -> UIImage {

        return modifiedImage { context, rect in
            // draw black background - workaround to preserve color of partially transparent pixels
            context.setBlendMode(.normal)
            UIColor.black.setFill()
            context.fill(rect)

            // draw original image
            context.setBlendMode(.normal)
            context.draw(cgImage!, in: rect)

            // tint image (loosing alpha) - the luminosity of the original image is preserved
            context.setBlendMode(.color)
            fillColor.setFill()
            context.fill(rect)

            // mask by alpha values of original image
            context.setBlendMode(.destinationIn)
            context.draw(context.makeImage()!, in: rect)
        }
    }

    /// Modified Image Context, apply modification on image
    ///
    /// - Parameter draw: (CGContext, CGRect) -> ())
    /// - Returns:        UIImage
    fileprivate func modifiedImage(_ draw: (CGContext, CGRect) -> ()) -> UIImage {

        // using scale correctly preserves retina images
        UIGraphicsBeginImageContextWithOptions(size, false, scale)
        let context: CGContext! = UIGraphicsGetCurrentContext()
        assert(context != nil)

        // correctly rotate image
        context.translateBy(x: 0, y: size.height)
        context.scaleBy(x: 1.0, y: -1.0)

        let rect = CGRect(x: 0.0, y: 0.0, width: size.width, height: size.height)

        draw(context, rect)

        let image = UIGraphicsGetImageFromCurrentImageContext()
        UIGraphicsEndImageContext()
        return image!
    }
}
使用Swift
let commentImageView = UIImageView(frame: CGRectMake(100, 100, 100, 100))
commentImageView.image = UIImage(named: "myimage.png")!.imageWithRenderingMode(UIImageRenderingMode.AlwaysTemplate)
commentImageView.tintColor = UIColor.blackColor()
addSubview(commentImageView)
.AlwaysTemplate。 - Rui Peres为了适用于Swift 3
theImageView.image = theImageView.image!.withRenderingMode(.alwaysTemplate)
theImageView.tintColor = UIColor.red
这里有一个适用于 Swift 5 的简单扩展:
extension UIImageView {

func setImageTintColor(_ color: UIColor) {
    let tintedImage = self.image?.withRenderingMode(.alwaysTemplate)
    self.image = tintedImage
    self.tintColor = color
  }
}
使用方法:
myImageView.setImageTintColor(.systemBlue)
另外,在iOS 13及更高版本中,有一种干净的方法。
let image = UIImage(named: "imageName")?.withTintColor(.white, renderingMode: .alwaysTemplate)
UIImageRenderingModeAlwaysTemplate设置了UIImage的属性,并将tintColor设置为UIImageView的属性,这样做是可以正常工作的。 - Vinzzz