我已经写了一份详细的关于如何使用GeometryReader、视图偏好和锚点偏好的说明。下面的代码使用了这些概念。如果想要更深入地了解它们的工作原理,请查看我发布的这篇文章:
https://swiftui-lab.com/communicating-with-the-view-tree-part-1/
下面的解决方案将正确地动画显示下划线:
我很费劲地让它工作,并且我同意你的看法。有时候,你只需要能够在层次结构中向上或向下传递一些框架信息。实际上,WWDC2019第237节(使用SwiftUI构建自定义视图)解释了视图如何持续通信其大小。它基本上说父视图向子视图提出建议,子视图决定如何布局并向父视图返回。他们是怎么做到的?我怀疑anchorPreference与此有关。但是它非常晦涩,尚未完全记录。API已公开,但理解这些长函数原型的方式...那是我现在没有时间的地方。
我认为苹果将其未记录下来是为了迫使我们重新思考整个框架,并忘记“旧”的UIKit习惯,开始声明性地思考。然而,仍然有时需要这样做。您是否曾经想过背景修饰符是如何工作的?我很想看到那个实现。它会解释很多!我希望苹果会在不久的将来记录首选项。我一直在尝试使用自定义PreferenceKey,看起来很有趣。
现在回到您的具体需求,我设法解决了它。您需要两个维度(文本的x位置和宽度)。一个我完全明白,另一个似乎有点黑客。尽管如此,它完美地工作。
我通过创建自定义水平对齐方式来解决文本的x位置。更多信息请参见第237节(在19:00处)。虽然我建议您观看整个过程,但它为布局过程提供了很多启示。
然而,宽度方面,我并不感到自豪... ;-) 它需要DispatchQueue才能避免在显示时更新视图。
更新:我在下面的第二个实现中修复了它
首次实现
extension HorizontalAlignment {
private enum UnderlineLeading: AlignmentID {
static func defaultValue(in d: ViewDimensions) -> CGFloat {
return d[.leading]
}
}
static let underlineLeading = HorizontalAlignment(UnderlineLeading.self)
}
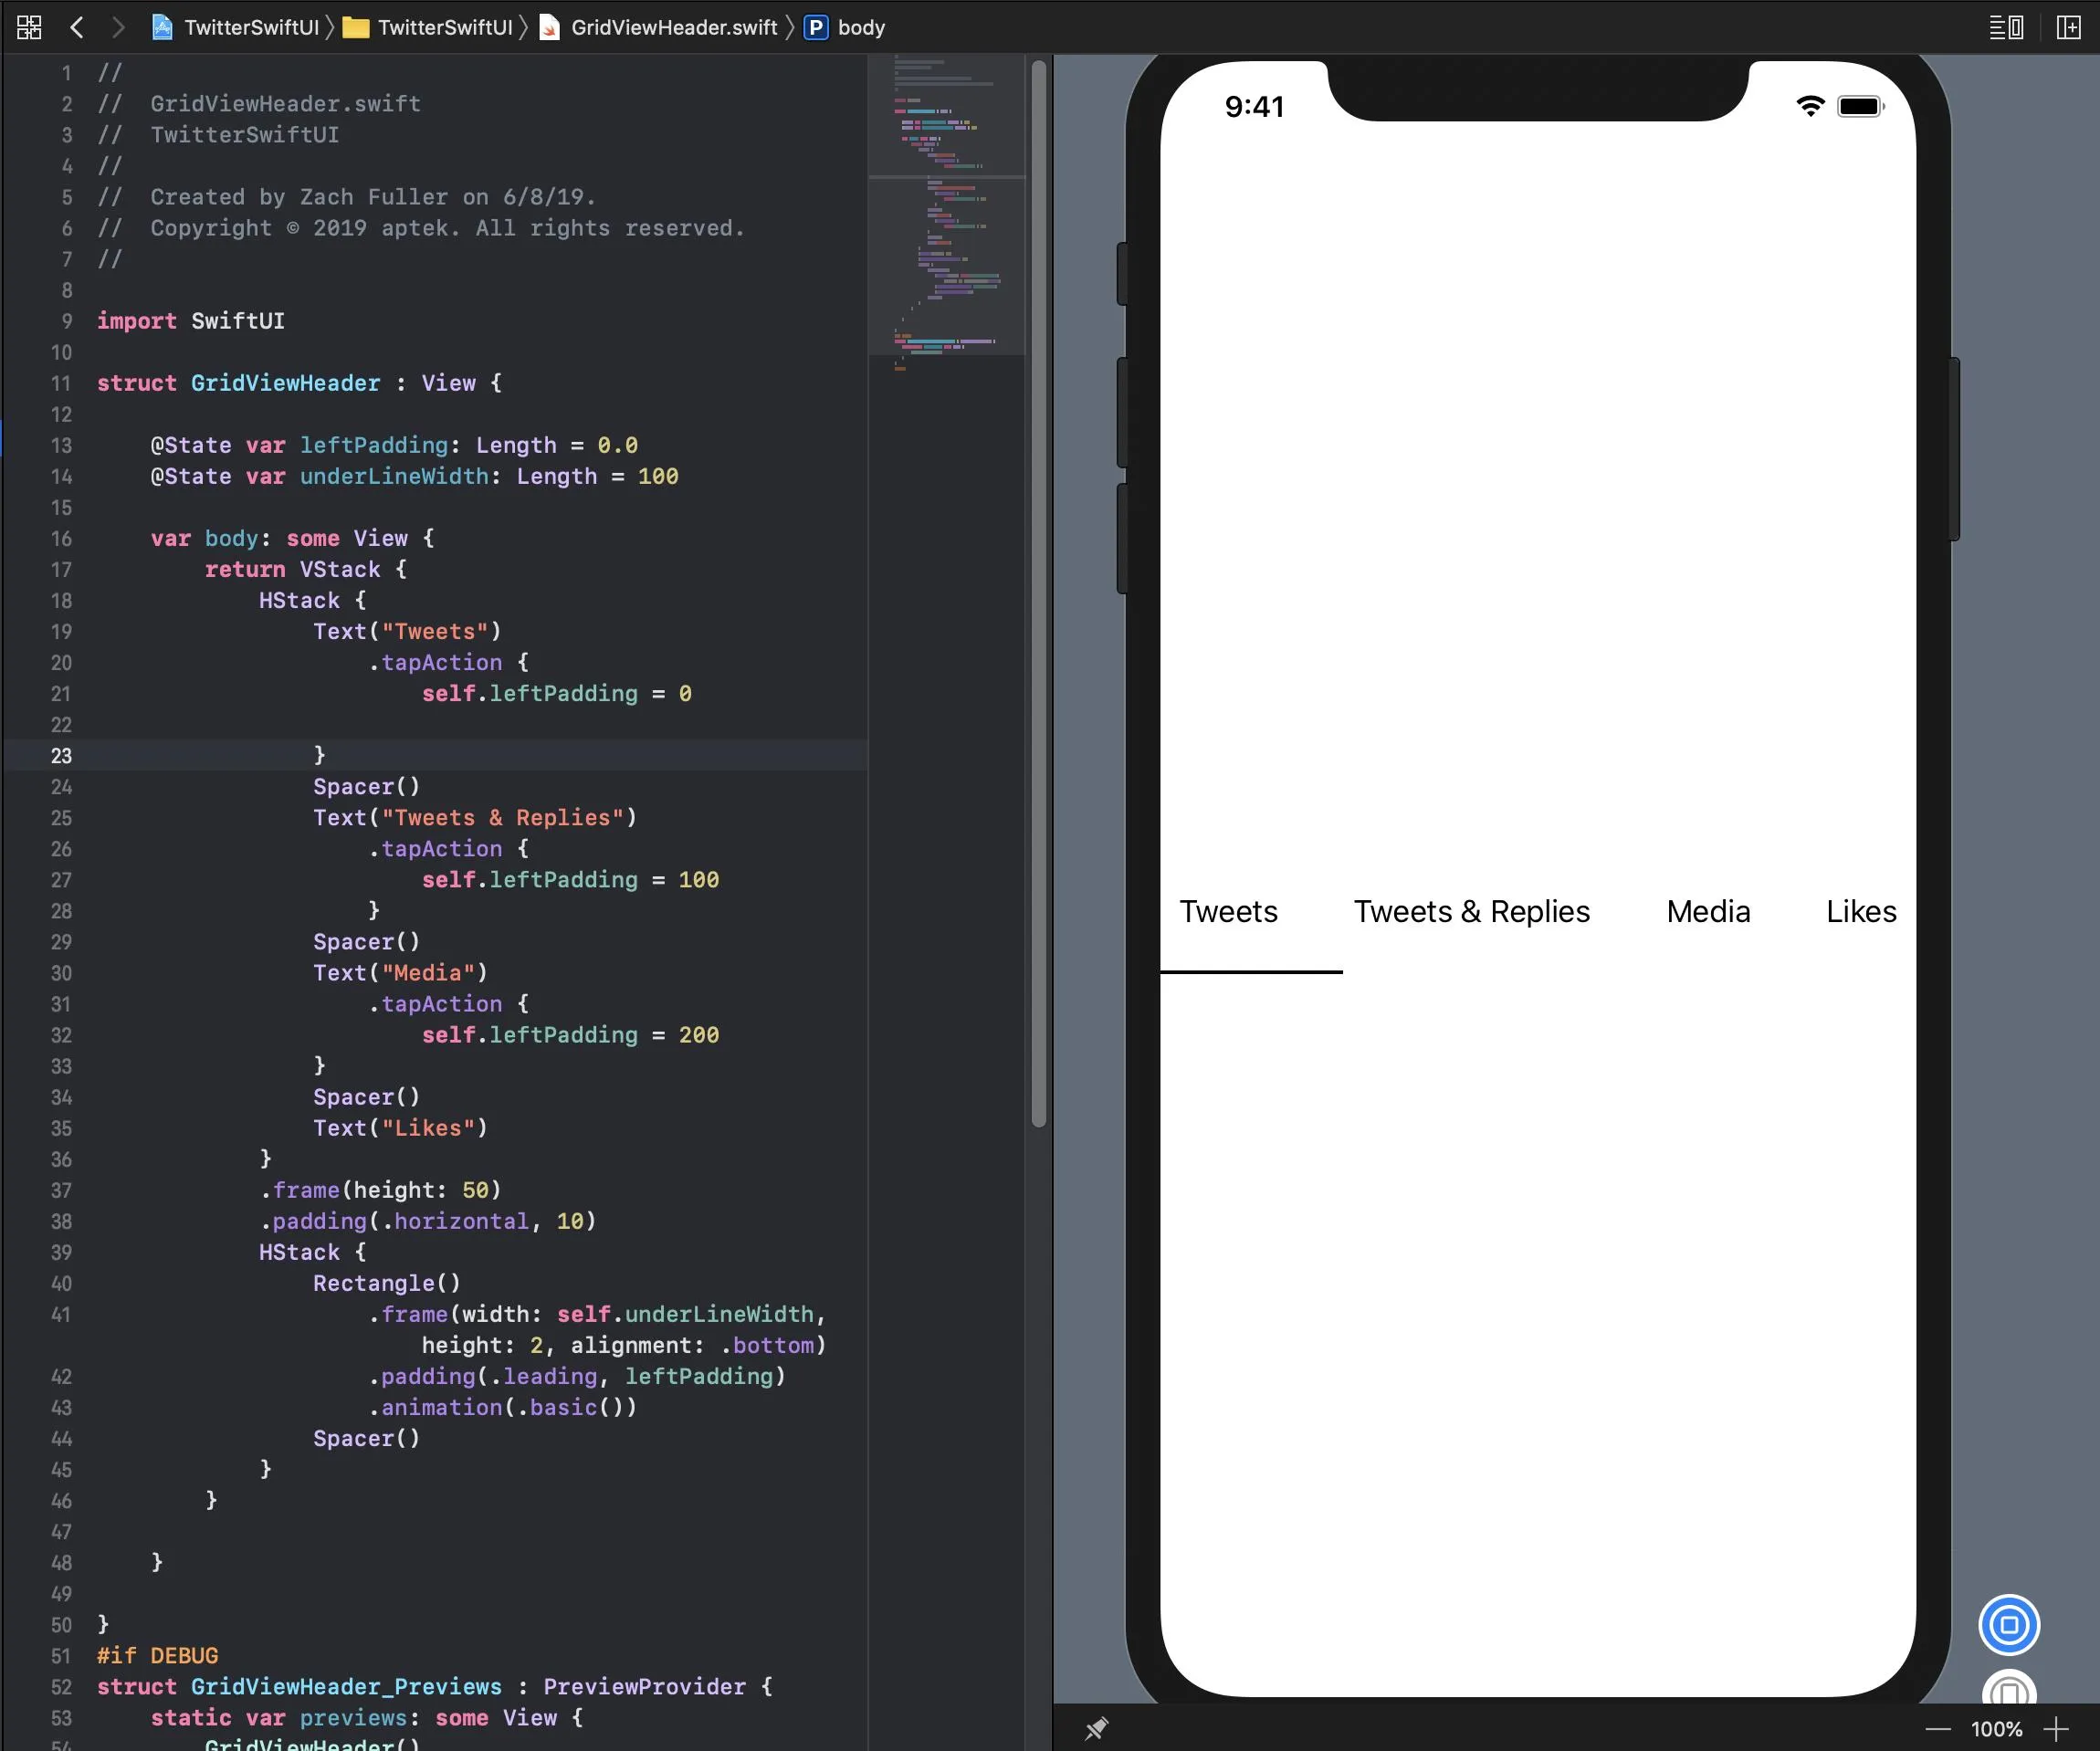
struct GridViewHeader : View {
@State private var activeIdx: Int = 0
@State private var w: [CGFloat] = [0, 0, 0, 0]
var body: some View {
return VStack(alignment: .underlineLeading) {
HStack {
Text("Tweets").modifier(MagicStuff(activeIdx: $activeIdx, widths: $w, idx: 0))
Spacer()
Text("Tweets & Replies").modifier(MagicStuff(activeIdx: $activeIdx, widths: $w, idx: 1))
Spacer()
Text("Media").modifier(MagicStuff(activeIdx: $activeIdx, widths: $w, idx: 2))
Spacer()
Text("Likes").modifier(MagicStuff(activeIdx: $activeIdx, widths: $w, idx: 3))
}
.frame(height: 50)
.padding(.horizontal, 10)
Rectangle()
.alignmentGuide(.underlineLeading) { d in d[.leading] }
.frame(width: w[activeIdx], height: 2)
.animation(.linear)
}
}
}
struct MagicStuff: ViewModifier {
@Binding var activeIdx: Int
@Binding var widths: [CGFloat]
let idx: Int
func body(content: Content) -> some View {
Group {
if activeIdx == idx {
content.alignmentGuide(.underlineLeading) { d in
DispatchQueue.main.async { self.widths[self.idx] = d.width }
return d[.leading]
}.onTapGesture { self.activeIdx = self.idx }
} else {
content.onTapGesture { self.activeIdx = self.idx }
}
}
}
}
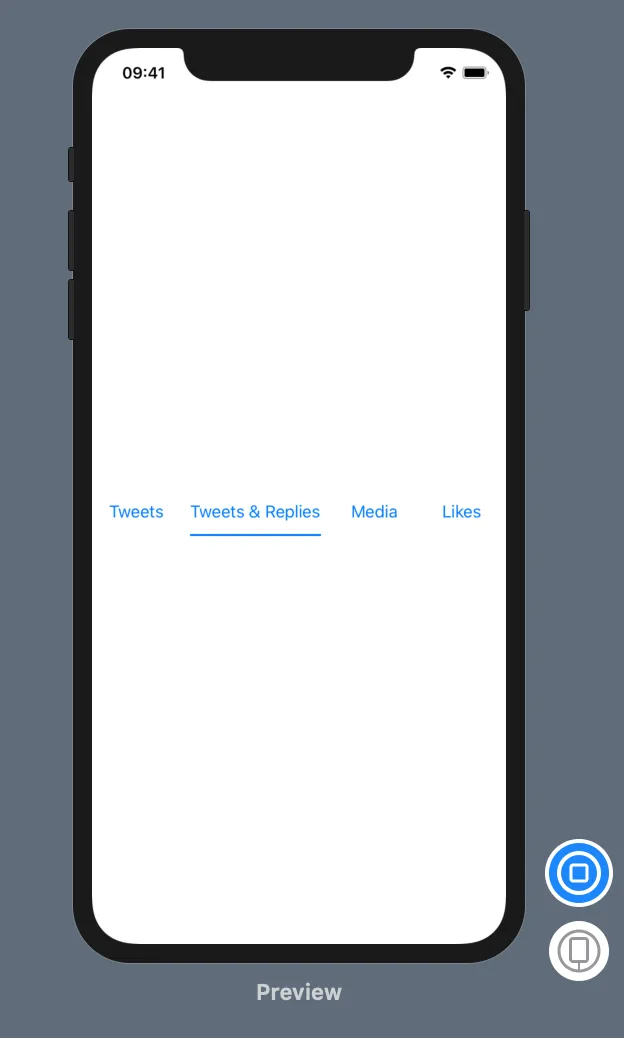
更新:更好的实现方式,不使用DispatchQueue
我的第一个解决方案可以工作,但我对将宽度传递给下划线视图的方式并不满意。
我找到了更好的方法来实现相同的效果。事实证明,background修饰符非常强大。它不仅仅是一个可以让您装饰视图背景的修饰符。
基本步骤如下:
- 使用
Text("text").background(TextGeometry())。TextGeometry是一个自定义视图,其父视图具有与文本视图相同的大小。这就是.background()所做的事情。非常强大。
- 在我的实现中,我使用GeometryReader来获取父视图的几何形状,这意味着我获得了文本视图的几何形状,也就是说我现在拥有了宽度。
- 现在为了将宽度传回,我使用Preferences。关于它们没有任何文档,但经过一些实验后,我认为preferences就像是“视图属性”一样。我创建了自己的自定义PreferenceKey,称为WidthPreferenceKey,并在TextGeometry中使用它来“附加”宽度到视图上,以便可以在更高层次中读取。
- 回到祖先,我使用onPreferenceChange来检测宽度的变化,并相应地设置宽度数组。
这可能听起来过于复杂,但代码最能说明问题。以下是新的实现方式:
import SwiftUI

extension HorizontalAlignment {
    private enum UnderlineLeading: AlignmentID {
        static func defaultValue(in d: ViewDimensions) -> CGFloat {
            return d[.leading]
        }
    }

    static let underlineLeading = HorizontalAlignment(UnderlineLeading.self)
}

struct WidthPreferenceKey: PreferenceKey {
    static var defaultValue = CGFloat(0)

    static func reduce(value: inout CGFloat, nextValue: () -> CGFloat) {
        value = nextValue()
    }

    typealias Value = CGFloat
}


struct GridViewHeader : View {

    @State private var activeIdx: Int = 0
    @State private var w: [CGFloat] = [0, 0, 0, 0]

    var body: some View {
        return VStack(alignment: .underlineLeading) {
            HStack {
                Text("Tweets")
                    .modifier(MagicStuff(activeIdx: $activeIdx, idx: 0))
                    .background(TextGeometry())
                    .onPreferenceChange(WidthPreferenceKey.self, perform: { self.w[0] = $0 })

                Spacer()

                Text("Tweets & Replies")
                    .modifier(MagicStuff(activeIdx: $activeIdx, idx: 1))
                    .background(TextGeometry())
                    .onPreferenceChange(WidthPreferenceKey.self, perform: { self.w[1] = $0 })

                Spacer()

                Text("Media")
                    .modifier(MagicStuff(activeIdx: $activeIdx, idx: 2))
                    .background(TextGeometry())
                    .onPreferenceChange(WidthPreferenceKey.self, perform: { self.w[2] = $0 })

                Spacer()

                Text("Likes")
                    .modifier(MagicStuff(activeIdx: $activeIdx, idx: 3))
                    .background(TextGeometry())
                    .onPreferenceChange(WidthPreferenceKey.self, perform: { self.w[3] = $0 })

                }
                .frame(height: 50)
                .padding(.horizontal, 10)
            Rectangle()
                .alignmentGuide(.underlineLeading) { d in d[.leading]  }
                .frame(width: w[activeIdx],  height: 2)
                .animation(.linear)
        }
    }
}

struct TextGeometry: View {
    var body: some View {
        GeometryReader { geometry in
            return Rectangle().fill(Color.clear).preference(key: WidthPreferenceKey.self, value: geometry.size.width)
        }
    }
}

struct MagicStuff: ViewModifier {
    @Binding var activeIdx: Int
    let idx: Int

    func body(content: Content) -> some View {
        Group {
            if activeIdx == idx {
                content.alignmentGuide(.underlineLeading) { d in
                    return d[.leading]
                }.onTapGesture { self.activeIdx = self.idx }

            } else {
                content.onTapGesture { self.activeIdx = self.idx }
            }
        }
    }
}

Text和Rectangle都作为自己的“自定义视图”——无论是在代码中还是在布局中——并将下划线作为其中的一部分吗?(1) 设计你的View,使其具有带有下划线的单个文本——即使需要使用ZStack和Rectangle。相信它将不会有填充。(2) 现在,如果需要,将此视图放入带有填充的矩形中。这是一个单一视图。不要担心大小,而要担心层次结构。 - user7014451List。对于你们两个,我建议观看两个(或更多)WWDC会议-介绍SwiftUI(https://developer.apple.com/videos/play/wwdc2019/204/)和SwiftUI Essentials(https://developer.apple.com/videos/play/wwdc2019/216/)。这是一种与`UIKit`不同的思维方式,但值得花时间去学习。 - user7014451