使用HTML5画布和JavaScript绘制奥运五环

5
<center><canvas id=c1 width=400 height=400></canvas>
<script>
    ctx = c1.getContext('2d')
    ctx.fillStyle = '#7ef' // draw blue background with the darker frame
    ctx.fillRect(0, 0, 400, 400)
    ctx.fillStyle = '#9ff'
    ctx.fillRect(10, 10, 400-20, 400-20)

    var X = 75, W = 50, G = 20
    ctx.lineWidth = 10
    var colors = ['blue', 'black', 'red', 'yellow', 'green']
    var args = [
        [X,X,W],
        [X+W+W+G,X,W],
        [X+W+W+G+W+W+G,X,W],
        [X+W+G/2,X+W,W],
        [X+W+G/2+W+W+G,X+W,W]]

    while (colors.length > 0) {
        ctx.strokeStyle = colors.shift()
        ctx.beginPath()
        ctx.arc.apply(ctx, args.shift().concat([0,Math.PI*2,true]))
        ctx.stroke()
    }
</script>

以下是我目前的代码。我的目标是让孩子们感到开心,其中包括12岁的男孩,但我的代码还不够惊人,是否可以通过删除所有手动编码的坐标来减少无聊感?另外,让圆环“相互连接”会很酷,但如何实现呢?
这是我的当前代码的输出: enter image description here 奥林匹克运动会的圆环应该看起来像这样: enter image description here

你需要画出不完整的圆来制作正确的交叉部分。 - Valdas
@Trojan,那只是一个复制粘贴的错误,对此我很抱歉。 - exebook
1
@exebook 我认为这并没有什么魔法...你必须得自己想一个算法或者其他方法来绘制它。 - Passerby
1
12岁的男孩?嗯...有趣。我喜欢。 - bjb568
@bjb568,如果你12岁了,你觉得这段代码无聊还是有趣,简单还是困难? - exebook
显示剩余3条评论
2个回答

5

献给12岁的你们!

我为你们写了一些代码,它并不无聊或有趣,也不容易或困难,但它能完成任务:

var canvas = document.getElementById('c1').getContext('2d');
var radius = 50;

var circles = [
  {
    color:'blue',
    x : 2*radius - radius/2,
    y : 2*radius,
    isTop: true
  } , {
    color:'black',
    x : 4*radius,
    y : 2*radius,
    isTop: true
  } , {
    color:'red',
    x : 6*radius + radius/2,
    y : 2*radius,
    isTop: true
  } , {
    color:'yellow',
    x : 3*radius - radius/4,
    y : 3*radius,
    isTop: false
  } , {
    color:'green',
    x : 5*radius + radius/4,
    y : 3*radius,
    isTop: false
  }
];

function drawArc(canvas, color, x, y, start, end) {
  if (color !== 'white') drawArc(canvas, 'white', x, y, start, end);

  canvas.lineWidth = color === 'white' ? 16 : 10;
  canvas.strokeStyle = color;

  canvas.beginPath();
  canvas.arc(x, y, radius, start - Math.PI/2, end - Math.PI/2, true);
  canvas.stroke();
}

circles.forEach(function(circle){
  drawArc(canvas, circle.color, circle.x, circle.y, 0, Math.PI*2);
});

circles.forEach(function(circle){
  if (circle.isTop) {
     drawArc(canvas, circle.color, circle.x, circle.y, Math.PI, Math.PI*2/3);
     drawArc(canvas, circle.color, circle.x, circle.y, Math.PI*5/3, Math.PI*4/3);
  } else {
     drawArc(canvas, circle.color, circle.x, circle.y, 0, Math.PI/3);
     drawArc(canvas, circle.color, circle.x, circle.y, Math.PI*2/3, Math.PI/3);
  }
});

http://jsbin.com/IrOJOhIg/1/edit

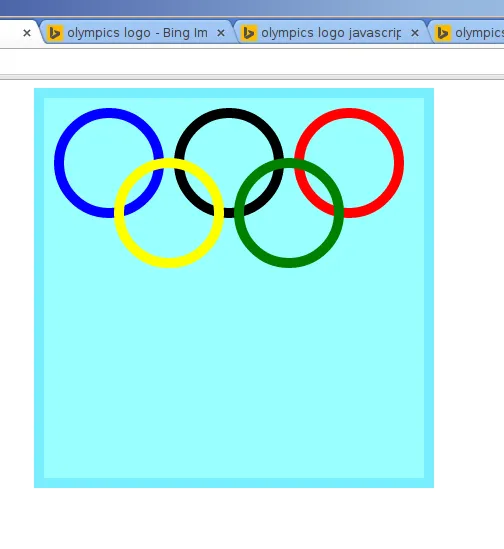
如果我要解释这段代码,我会从“circles”变量开始讲起,它是一个数组,用于指定每个圆的颜色、中心位置以及它是否在顶部行。我会注释掉“+= radius/2”和“radius/4”的部分,并运行代码,展示圆圈之间距离太近的结果,然后取消注释,演示改变x坐标移动它们的效果。

接下来,我会解释“drawArc”函数,该函数绘制圆的一部分,首先是白色,然后是实际颜色,线宽不同。这几乎是整个脚本中最难的部分。

最后,我会再次运行脚本,注释掉最后的forEach,展示最后绘制的环完全覆盖了先前的环,并请12岁的孩子想出解决方案。你应该试图绘制圆的一部分。

我将圆分成6个部分,从顶部开始,如果你好好看它们,你会发现如果圆在顶部行或不在顶部行,则相同的部分可以被覆盖或在顶部。最后的forEach重新绘制每个圆的2个必须在交叉点上的部分。

最后,如果12岁的孩子注意到我的代码中实际上交叉点是反向的,那么会得到额外的奖励分数;如果有人想出解决方案,也会得到更多的奖励分数。(显然,最简单的解决方案就是调整最后的forEach)。编辑:事实上,将条件设置为“!circle.isTop”更加简单。

PS:由于四周的园弧相遇时存在舍入误差,导致出现细白线。这些可以修复,但我没有去管它们。


+1 很不错的尝试,但并非完全正确。 你的链接没有适当地上下交错。我建议将蓝色、黑色和红色画成实心圆,然后将黄色和绿色分成两部分,以便正确地上下交错。 :) - markE
如果您查看最后一段,在PS之前,您将会看到它们为什么会被颠倒。此外,要计算如何绘制黄色圆弧,使其看起来像蓝色圆弧在上面是相当困难的。我认为我的方法更容易编写和理解,即先画出位于上方的蓝色圆的圆弧。 - Tibos

1

{{链接1:JSFIDDLE}}

var canvas = document.getElementById('c1').getContext('2d');
var radius = 50;

var circles = [
    { color:'blue',   x: 2*radius - radius/2, y: 2*radius, q: [1,2,3,0] },
    { color:'black',  x: 4*radius,            y: 2*radius, q: [2,0,1,3] },
    { color:'red',    x: 6*radius + radius/2, y: 2*radius, q: [2,0,1,3] },
    { color:'yellow', x: 3*radius - radius/4, y: 3*radius, q: [3,0,1,2] },
    { color:'green',  x: 5*radius + radius/4, y: 3*radius, q: [3,0,1,2] }
];

function drawArc(canvas, circle, q) {
    var s = (circle.q[q]+0.5)/2 * Math.PI,
        e = (circle.q[q]-0.5)/2 * Math.PI;

    canvas.lineWidth   = 16;
    canvas.strokeStyle = 'white';
    canvas.beginPath();
    canvas.arc( circle.x, circle.y, radius, s, e, true );
    canvas.stroke();

    canvas.lineWidth   = 10;
    canvas.strokeStyle = circle.color;
    canvas.beginPath();
    canvas.arc( circle.x, circle.y, radius, s, e, true );
    canvas.stroke();
}

for ( var q = 0; q < 4; ++q ){
    circles.forEach(function(circle){
        drawArc( canvas, circle, q );
    })
}

在每个 for 循环步骤中,为每个圆绘制一个四分之一弧(象限)- circle.q 确定了绘制象限的顺序,并通过仔细排序使其在另一个环绕圆之前绘制这些象限,从而实现了象限在另一个环绕圆上方的效果。(感谢 Tibos 提供的初始代码)
如果您想让它更有趣,可以使弧长更小,并在每次绘制之间添加延迟以“动画”出环的外观。

网页内容由stack overflow 提供, 点击上面的
可以查看英文原文,
原文链接