您可以通过以下3个步骤完成:
使用图像创建蒙版
mask = np.zeros((height, width))
points = np.array([[[10,150],[150,100],[300,150],[350,100],[310,20],[35,10]]])
cv2.fillPoly(mask, points, (255))
将蒙版应用于原始图像
res = cv2.bitwise_and(img,img,mask = mask)
可选择性地裁剪图像以缩小大小
rect = cv2.boundingRect(points) # 返回矩形的(x,y,w,h)
cropped = res[rect[1]: rect[1] + rect[3], rect[0]: rect[0] + rect[2]]
这样最终您应该得到已剪裁的图像。
更新
为了完整起见,这是完整代码:
import numpy as np
import cv2
img = cv2.imread("test.png")
height = img.shape[0]
width = img.shape[1]
mask = np.zeros((height, width), dtype=np.uint8)
points = np.array([[[10,150],[150,100],[300,150],[350,100],[310,20],[35,10]]])
cv2.fillPoly(mask, points, (255))
res = cv2.bitwise_and(img,img,mask = mask)
rect = cv2.boundingRect(points)
cropped = res[rect[1]: rect[1] + rect[3], rect[0]: rect[0] + rect[2]]
cv2.imshow("cropped" , cropped )
cv2.imshow("same size" , res)
cv2.waitKey(0)
使用彩色背景版本,可以像这样使用代码:
import numpy as np
import cv2
img = cv2.imread("test.png")
height = img.shape[0]
width = img.shape[1]
mask = np.zeros((height, width), dtype=np.uint8)
points = np.array([[[10,150],[150,100],[300,150],[350,100],[310,20],[35,10]]])
cv2.fillPoly(mask, points, (255))
res = cv2.bitwise_and(img,img,mask = mask)
rect = cv2.boundingRect(points)
im2 = np.full((res.shape[0], res.shape[1], 3), (0, 255, 0), dtype=np.uint8 )
maskInv = cv2.bitwise_not(mask)
colorCrop = cv2.bitwise_or(im2,im2,mask = maskInv)
finalIm = res + colorCrop
cropped = finalIm[rect[1]: rect[1] + rect[3], rect[0]: rect[0] + rect[2]]
cv2.imshow("cropped" , cropped )
cv2.imshow("same size" , res)
cv2.waitKey(0)
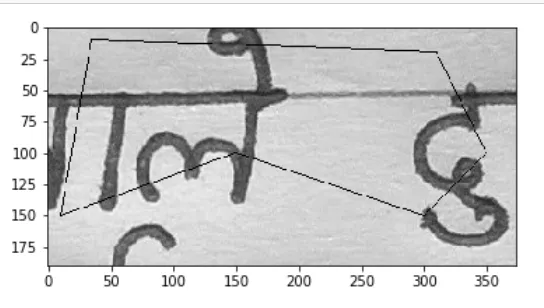 。
并且封闭多边形的坐标为
[10,150],[150,100],[300,150],[350,100],[310,20],[35,10]。我想使用opencv剪裁由凹多边形界定的区域。我搜索了其他类似的问题,但没有找到正确的答案。这就是为什么我要问它?能帮帮我吗?
。
并且封闭多边形的坐标为
[10,150],[150,100],[300,150],[350,100],[310,20],[35,10]。我想使用opencv剪裁由凹多边形界定的区域。我搜索了其他类似的问题,但没有找到正确的答案。这就是为什么我要问它?能帮帮我吗?