在Flutter中具有Snap效果的可水平滚动卡片

92
我想创建一个卡片列表,可以在左右滑动时实现捕捉效果。
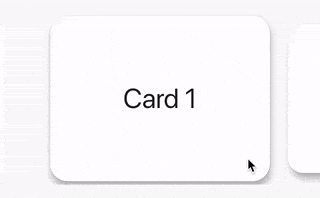
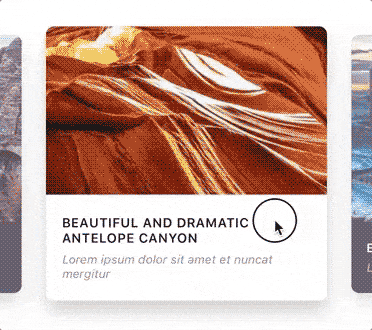
每个卡片之间有一些间距,并且适合屏幕,类似于下面的图片。

enter image description here

除此之外,这些可水平滚动的列表元素应该包含在一个可垂直滚动的列表中。
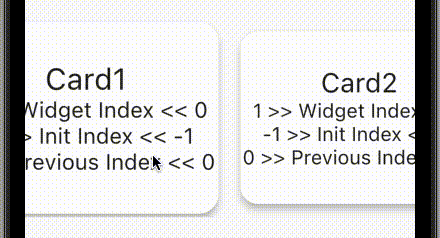
我所能做到的只是按照Flutter文档中的示例显示一组水平滚动卡片。
class SnapCarousel extends StatelessWidget {
  @override
  Widget build(BuildContext context) {
    final title = 'Horizontal List';

    return MaterialApp(
      title: title,
      home: Scaffold(
        appBar: AppBar(
          title: Text(title),
        ),
        body: Container(
          margin: EdgeInsets.symmetric(vertical: 20.0),
          height: 200.0,
          child: ListView(
            scrollDirection: Axis.horizontal,
            children: <Widget>[
              Container(
                width: 160.0,
                color: Colors.red,
              ),
              Container(
                width: 160.0,
                color: Colors.blue,
              ),
              Container(
                width: 160.0,
                color: Colors.green,
              ),
              Container(
                width: 160.0,
                color: Colors.yellow,
              ),
              Container(
                width: 160.0,
                color: Colors.orange,
              ),
            ],
          ),
        ),
      ),
    );
  }
}

4
可能是在Flutter中创建图像轮播的重复问题。 - Rémi Rousselet
2
@RémiRousselet 上面的链接部分解决了我的问题,因为我也想把它们放在一个垂直可滚动的列表中。垂直可滚动列表中的每个组件将是一组元素,这些元素将水平滚动。 - WitVault
没有任何阻止你使用之前的链接来完成这个任务。 - Rémi Rousselet
1
@RémiRousselet,您能否提供一个基本示例?我不知道如何使其垂直滚动。 - WitVault
不要使其垂直滚动。相反,将其包装在“ListView”中。 - Rémi Rousselet
你可以在这里找到类似的答案。 - Pratik
8个回答

119

使用 PageViewListView:

import 'package:flutter/material.dart';

main() => runApp(MaterialApp(home: MyHomePage()));

class MyHomePage extends StatelessWidget {
  @override
  Widget build(BuildContext context) {
    return Scaffold(
      appBar: AppBar(
        title: Text('Carousel in vertical scrollable'),
      ),
      body: ListView.builder(
        padding: EdgeInsets.symmetric(vertical: 16.0),
        itemBuilder: (BuildContext context, int index) {
          if(index % 2 == 0) {
            return _buildCarousel(context, index ~/ 2);
          }
          else {
            return Divider();
          }
        },
      ),
    );
  }

  Widget _buildCarousel(BuildContext context, int carouselIndex) {
    return Column(
      mainAxisSize: MainAxisSize.min,
      children: <Widget>[
        Text('Carousel $carouselIndex'),
        SizedBox(
          // you may want to use an aspect ratio here for tablet support
          height: 200.0,
          child: PageView.builder(
            // store this controller in a State to save the carousel scroll position
            controller: PageController(viewportFraction: 0.8),
            itemBuilder: (BuildContext context, int itemIndex) {
              return _buildCarouselItem(context, carouselIndex, itemIndex);
            },
          ),
        )
      ],
    );
  }

  Widget _buildCarouselItem(BuildContext context, int carouselIndex, int itemIndex) {
    return Padding(
      padding: EdgeInsets.symmetric(horizontal: 4.0),
      child: Container(
        decoration: BoxDecoration(
          color: Colors.grey,
          borderRadius: BorderRadius.all(Radius.circular(4.0)),
        ),
      ),
    );
  }
}

第一页有一些填充..如何去除它? - Rahul Devanavar
页面在小部件中居中。您可以将viewportFraction增加到1.0,使页面全宽。 - boformer
我想要实现类似于这个 https://ibb.co/GcPp3bd 的效果。viewportFraction 1.0 可以让屏幕充满整个页面。 - Rahul Devanavar
1
你找到办法了吗,@RahulDevanavar? - Underfrog
我不理解为什么你需要在ListView.builder中嵌套。 - Shababb Karim
显示剩余2条评论

99

屏幕截图:

输入图像描述


如果您不想使用任何第三方软件包,可以尝试以下方法:

class _HomePageState extends State<HomePage> {
  int _index = 0;

  @override
  Widget build(BuildContext context) {
    return Scaffold(
      appBar: AppBar(),
      body: Center(
        child: SizedBox(
          height: 200, // card height
          child: PageView.builder(
            itemCount: 10,
            controller: PageController(viewportFraction: 0.7),
            onPageChanged: (int index) => setState(() => _index = index),
            itemBuilder: (_, i) {
              return Transform.scale(
                scale: i == _index ? 1 : 0.9,
                child: Card(
                  elevation: 6,
                  shape: RoundedRectangleBorder(borderRadius: BorderRadius.circular(20)),
                  child: Center(
                    child: Text(
                      "Card ${i + 1}",
                      style: TextStyle(fontSize: 32),
                    ),
                  ),
                ),
              );
            },
          ),
        ),
      ),
    );
  }
}

3
scale的值从0.9更新为0.95 - CopsOnRoad
我在第一项之前得到了一个小的白色空格。 - Nifal Nizar
@NifalNizar 好的,你说的是初始间距,我需要在这里和那里进行一些调整,目前已经几天没能工作了,让我再过一天左右回到机器上,我会更新解决方案。 - CopsOnRoad
@CopsOnRoad 谢谢,我们如何在中心项周围放置多个项?在您的实现中,我们只有一个项,例如我们如何放置两个项?并且如何像帖子所有者附加的屏幕截图一样更改不透明度? - DolDurma
@NifalNizar 这边已经很晚了,但是要去掉起始的左边距,请在PageView中添加padEnds: false - undefined
显示剩余11条评论

35

要通过ListView实现Snap效果,只需将物理属性设置为PageScrollPhysics。

const List<Widget> children = [
  ContainerCard(),
  ContainerCard(),
  ContainerCard(),
];
ListView.builder(
    scrollDirection: Axis.horizontal,
    physics: const PageScrollPhysics(), // this for snapping
    itemCount: children.length,
    itemBuilder: (_, index) => children[index],
  )

1
这应该是2023年的被接受答案。 - dsignr
这应该是被接受的答案 :D - tbm98

33

这是一个旧问题,我来到这里是为了寻找其他内容;-),但是WitVault所寻找的东西可以使用这个包轻松完成:https://pub.dev/packages/flutter_swiper

演示图片

实现方法:

将依赖项放入pubsec.yaml中:

dependencies:
   flutter_swiper: ^1.1.6

将其导入到需要它的页面:

import 'package:flutter_swiper/flutter_swiper.dart';

在布局中:

new Swiper(
  itemBuilder: (BuildContext context, int index) {
    return new Image.network(
      "http://via.placeholder.com/288x188",
      fit: BoxFit.fill,
    );
  },
  itemCount: 10,
  viewportFraction: 0.8,
  scale: 0.9,
)

1
我们尝试过这个包。但是我们的体验不如预期。可能是因为有大量未解决的问题(撰写时有158个问题,大多数是“求助”)。https://github.com/best-flutter/flutter_swiper/issues -- 我们选择了另一个解决方案。 - Alexandre Jean
3
@AlexJean 请与社区分享另一个解决方案。 - Marcos Maliki
PageView就像在这个问题的副本中所指示的那样,是我们最终选择的解决方案。此帖子及其副本中的其他解决方案也很舒适。副本链接:https://dev59.com/mlYN5IYBdhLWcg3wfoNj - Alexandre Jean
由于似乎有兴趣 - 我们也成功地使用了这个受欢迎的包 https://pub.dev/packages/carousel_slider,这在答案中迄今尚未提到。 - Alexandre Jean
看起来 flutter_swiper 没有维护(甚至没有支持空安全)。发现了一个名为 card_swiper 的新分支,它稍微新一点。 - Guy Luz
@GuyLuz 或者你可以自己做,不用使用包。在这里检查我的答案 answer - anas

1

enter image description here


我认为CopsOnRoad的解决方案对于不想使用第三方库的人来说更好、更简单。然而,由于没有动画,我在查看卡片(展开)和滑动上一个卡片(缩小)时使用了索引添加了比例动画。所以当页面首次加载时,第一张和第二张卡片将没有任何动画效果,而当卡片被滑动时,只有前一个和当前卡片具有比例动画。这是我的实现:

class MyHomePage extends StatefulWidget {


const MyHomePage({super.key, required this.title});

  final String title;

  @override
  State<MyHomePage> createState() => _MyHomePageState();
}
class _MyHomePageState extends State<MyHomePage> {
  int currentIndex = -1, previousIndex = 0;

  double getAnimationValue(int currentIndex, int widgetIndex, int previousIndex,
      {bool begin = true}) {
    if (widgetIndex == currentIndex) {
      return begin ? 0.9 : 1;
    } else {
      return begin ? 1 : 0.9;
    }
  }

  @override
  Widget build(BuildContext context) {
    return Scaffold(
      appBar: AppBar(
        title: Text(widget.title),
      ),
      body: Column(
        mainAxisAlignment: MainAxisAlignment.center,
        children: <Widget>[
          SizedBox(
            height: 200, // card height
            child: PageView.builder(
              itemCount: 10,
              controller: PageController(viewportFraction: 0.7),
              onPageChanged: (int index) {
                setState(() {
                  if (currentIndex != -1) {
                    previousIndex = currentIndex;
                  }
                  currentIndex = index;
                });
              },
              itemBuilder: (_, widgetIndex) {
                return (currentIndex != -1 &&
                        (previousIndex == widgetIndex ||
                            widgetIndex == currentIndex))
                    ? TweenAnimationBuilder(
                        duration: const Duration(milliseconds: 400),
                        tween: Tween<double>(
                          begin: getAnimationValue(
                            currentIndex,
                            widgetIndex,
                            previousIndex,
                          ),
                          end: getAnimationValue(
                            currentIndex,
                            widgetIndex,
                            previousIndex,
                            begin: false,
                          ),
                        ),
                        builder: (context, value, child) {
                          return Transform.scale(
                            scale: value,
                            child: Card(
                              elevation: 6,
                              shape: RoundedRectangleBorder(
                                  borderRadius: BorderRadius.circular(20)),
                              child: Column(
                                mainAxisAlignment: MainAxisAlignment.center,
                                children: [
                                  Text(
                                    "Card${widgetIndex + 1}",
                                    style: const TextStyle(fontSize: 30),
                                  ),
                                  Text(
                                    "$widgetIndex >> Widget Index << $widgetIndex",
                                    style: const TextStyle(fontSize: 22),
                                  ),
                                  Text(
                                    "$currentIndex >> Current Index << $currentIndex",
                                    style: const TextStyle(fontSize: 22),
                                  ),
                                  Text(
                                    "$previousIndex >> Previous Index << $previousIndex",
                                    style: const TextStyle(fontSize: 22),
                                  ),
                                ],
                              ),
                            ),
                          );
                        },
                      )
                    : Transform.scale(
                        // this is used when you want to disable animation when initialized the page
                        scale:
                            (widgetIndex == 0 && currentIndex == -1) ? 1 : 0.9,
                        child: Card(
                          elevation: 6,
                          shape: RoundedRectangleBorder(
                              borderRadius: BorderRadius.circular(20)),
                          child: Column(
                            mainAxisAlignment: MainAxisAlignment.center,
                            children: [
                              Text(
                                "Card${widgetIndex + 1}",
                                style: const TextStyle(fontSize: 30),
                              ),
                              Text(
                                "$widgetIndex >> Widget Index << $widgetIndex",
                                style: const TextStyle(fontSize: 22),
                              ),
                              Text(
                                "$currentIndex >> Init Index << $currentIndex",
                                style: const TextStyle(fontSize: 22),
                              ),
                              Text(
                                "$previousIndex >> Previous Index << $previousIndex",
                                style: const TextStyle(fontSize: 22),
                              ),
                            ],
                          ),
                        ),
                      );
              },
            ),
          ),
        ],
      ),
    );
  }
}

我在这个动画中使用了TweenAnimationBuilder并硬编码了小部件。您可以为您的小部件使用方法,或者在需要时使用flutter_animate包进行简单的动画。


0

高级Snap列表

如果您正在寻找高级用法,例如动态项目大小、可配置的捕捉点、项目可视化和基本控制(如scrollToIndex、animate),则应使用基于本地的SnappyListView,它具有更多功能。

SnappyListView(
  itemCount: Colors.accents.length,
  itemBuilder: (context, index) {
    return Container(
        height: 100,
        color: Colors.accents.elementAt(index),
        child: Text("Index: $index"),
    ),
);

嗨,保罗,你知道这个包是否提供了垂直轴吗?谢谢。 - user6600549
是的!这个基于本地的包将为您提供ListView/PageView所期望的一切及更多(免责声明:我是该包的主要开发人员)。 - Paul
谢谢!我正在寻找如何在不分页的情况下使用列表进行操作的解决方案。 - Michał Jabłoński

0
如果您想使用 ListView,并且您的项目具有固定宽度,则可以使用基于 PageScrollPhysicsScrollPhysics 实现,该实现由 PageView 使用。但是请注意,这种方法的局限性在于仅适用于大小相等的子元素。
import 'package:flutter/material.dart';

class SnapScrollPhysics extends ScrollPhysics {
  const SnapScrollPhysics({super.parent, required this.snapSize});

  final double snapSize;

  @override
  SnapScrollSize applyTo(ScrollPhysics? ancestor) {
    return SnapScrollSize(parent: buildParent(ancestor), snapSize: snapSize);
  }

  double _getPage(ScrollMetrics position) {
    return position.pixels / snapSize;
  }

  double _getPixels(ScrollMetrics position, double page) {
    return page * snapSize;
  }

  double _getTargetPixels(
      ScrollMetrics position, Tolerance tolerance, double velocity) {
    double page = _getPage(position);
    if (velocity < -tolerance.velocity) {
      page -= 0.5;
    } else if (velocity > tolerance.velocity) {
      page += 0.5;
    }
    return _getPixels(position, page.roundToDouble());
  }

  @override
  Simulation? createBallisticSimulation(
      ScrollMetrics position, double velocity) {
    // If we're out of range and not headed back in range, defer to the parent
    // ballistics, which should put us back in range at a page boundary.
    if ((velocity <= 0.0 && position.pixels <= position.minScrollExtent) ||
        (velocity >= 0.0 && position.pixels >= position.maxScrollExtent)) {
      return super.createBallisticSimulation(position, velocity);
    }
    final Tolerance tolerance = this.tolerance;
    final double target = _getTargetPixels(position, tolerance, velocity);
    if (target != position.pixels) {
      return ScrollSpringSimulation(spring, position.pixels, target, velocity,
          tolerance: tolerance);
    }
    return null;
  }

  @override
  bool get allowImplicitScrolling => false;
}

你可以在这里看到它的运作:


import 'package:flutter/material.dart';

void main() => runApp(MyApp());

class MyApp extends StatelessWidget {
  @override
  Widget build(BuildContext context) {
    return MaterialApp(
      title: 'Flutter Demo',
      debugShowCheckedModeBanner: false,
      theme: ThemeData(
        primarySwatch: Colors.blue,
      ),
      home: MyHomePage(title: 'Flutter Demo Home Page'),
    );
  }
}

class MyHomePage extends StatefulWidget {
  MyHomePage({Key? key, required this.title}) : super(key: key);

  final String title;

  @override
  _MyHomePageState createState() => _MyHomePageState();
}

class _MyHomePageState extends State<MyHomePage> {
  @override
  Widget build(BuildContext context) {
    return Scaffold(
      appBar: AppBar(
        title: Text(widget.title),
      ),
      body: ListView(
        physics: SnapScrollPhysics(snapSize: MediaQuery.of(context).size.width/3),
        scrollDirection: Axis.horizontal,
        children: <Widget>[
          Container(
            width: MediaQuery.of(context).size.width/3,
            color: Colors.amber[900],
            child: const Center(child: Text('Entry A')),
          ),
          Container(
            width: MediaQuery.of(context).size.width/3,
            color: Colors.amber[800],
            child: const Center(child: Text('Entry B')),
          ),
          Container(
            width: MediaQuery.of(context).size.width/3,
            color: Colors.amber[700],
            child: const Center(child: Text('Entry C')),
          ),
          Container(
            width: MediaQuery.of(context).size.width/3,
            color: Colors.amber[600],
            child: const Center(child: Text('Entry D')),
          ),
          Container(
            width: MediaQuery.of(context).size.width/3,
            color: Colors.amber[500],
            child: const Center(child: Text('Entry E')),
          ),
          Container(
            width: MediaQuery.of(context).size.width/3,
            color: Colors.amber[400],
            child: const Center(child: Text('Entry F')),
          ),
          Container(
            width: MediaQuery.of(context).size.width/3,
            color: Colors.amber[300],
            child: const Center(child: Text('Entry G')),
          ),
        ],
      ),
    );
  }
}


class SnapScrollSize extends ScrollPhysics {
  const SnapScrollSize({super.parent, required this.snapSize});

  final double snapSize;

  @override
  SnapScrollSize applyTo(ScrollPhysics? ancestor) {
    return SnapScrollSize(parent: buildParent(ancestor), snapSize: snapSize);
  }

  double _getPage(ScrollMetrics position) {
    return position.pixels / snapSize;
  }

  double _getPixels(ScrollMetrics position, double page) {
    return page * snapSize;
  }

  double _getTargetPixels(
      ScrollMetrics position, Tolerance tolerance, double velocity) {
    double page = _getPage(position);
    if (velocity < -tolerance.velocity) {
      page -= 0.5;
    } else if (velocity > tolerance.velocity) {
      page += 0.5;
    }
    return _getPixels(position, page.roundToDouble());
  }

  @override
  Simulation? createBallisticSimulation(
      ScrollMetrics position, double velocity) {
    // If we're out of range and not headed back in range, defer to the parent
    // ballistics, which should put us back in range at a page boundary.
    if ((velocity <= 0.0 && position.pixels <= position.minScrollExtent) ||
        (velocity >= 0.0 && position.pixels >= position.maxScrollExtent)) {
      return super.createBallisticSimulation(position, velocity);
    }
    final Tolerance tolerance = this.tolerance;
    final double target = _getTargetPixels(position, tolerance, velocity);
    if (target != position.pixels) {
      return ScrollSpringSimulation(spring, position.pixels, target, velocity,
          tolerance: tolerance);
    }
    return null;
  }

  @override
  bool get allowImplicitScrolling => false;
}


0
如果您的所有项目宽度相同,您可以使用我编写的这些自定义滚动物理效果,它基于PageScrollPhysics
它还考虑了超出滚动、快速滚动、元素居中以及ListView的水平填充,该填充应与项目之间的填充相等。
class _SnapPageScrollPhysics extends ScrollPhysics {
  const _SnapPageScrollPhysics({
    super.parent,
    required this.elementWidth,
    required this.elementPadding,
  });

  final double elementWidth;
  final double elementPadding;

  @override
  _SnapPageScrollPhysics applyTo(ScrollPhysics? ancestor) {
    return _SnapPageScrollPhysics(
      parent: buildParent(ancestor),
      elementWidth: elementWidth,
      elementPadding: elementPadding,
    );
  }

  double _getTargetPixels(
    ScrollMetrics position,
    Tolerance tolerance,
    double velocity,
  ) {
    final pageWidth = elementWidth + elementPadding;
    final page = position.pixels / pageWidth + velocity / 3000;
    final offset = (position.viewportDimension - elementWidth) / 2;
    final target = page.roundToDouble() * pageWidth - offset + elementPadding;
    return max(0, min(target, position.maxScrollExtent));
  }

  @override
  Simulation? createBallisticSimulation(
    ScrollMetrics position,
    double velocity,
  ) {
    // If we're out of range and not headed back in range, defer to the parent
    // ballistics, which should put us back in range at a page boundary.
    if ((velocity <= 0.0 && position.pixels <= position.minScrollExtent) ||
        (velocity >= 0.0 && position.pixels >= position.maxScrollExtent)) {
      return super.createBallisticSimulation(position, velocity);
    }
    final tolerance = toleranceFor(position);
    final target = _getTargetPixels(position, tolerance, velocity);
    if (target != position.pixels) {
      return ScrollSpringSimulation(
        spring,
        position.pixels,
        target,
        velocity,
        tolerance: tolerance,
      );
    }
    return null;
  }

  @override
  bool get allowImplicitScrolling => false;
}

例如:

ListView.separated(
  physics: _SnapPageScrollPhysics(
    elementPadding: padding,
    elementWidth: _width,
  ),
  padding: EdgeInsets.symmetric(horizontal: padding),
  scrollDirection: Axis.horizontal,
  itemBuilder: itemBuilder,
  itemCount: itemCount,
  separatorBuilder: (context, index) => SizedBox(width: padding),
),

网页内容由stack overflow 提供, 点击上面的
可以查看英文原文,
原文链接