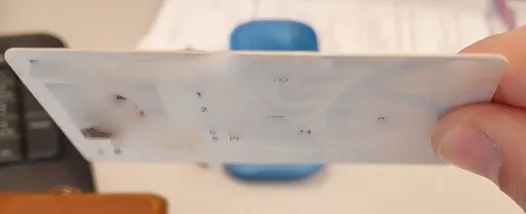
检测边缘模糊、背景不同的卡片

3

这是我的测试照片

enter image description here

我试图找到卡片的边缘。然而,正如您所见,边缘有些模糊。

为了找到边缘,我首先增强了图像的对比度,以便模糊的边缘会变得不那么模糊,更容易找到: enter image description here 
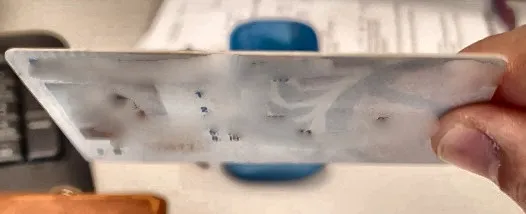
然后我使用高斯模糊对其进行了轻微平滑处理(我尝试过去除高斯模糊,但边缘检测器在背景和卡片中发现了太多细节)。

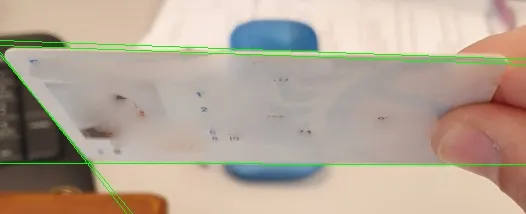
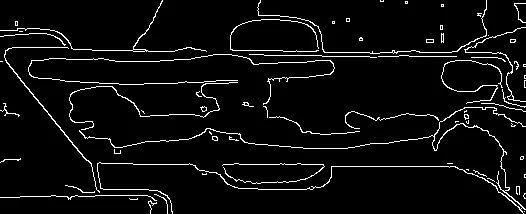
然后我使用带有“动态阈值”的Canny算法,并得到以下结果: enter image description here 
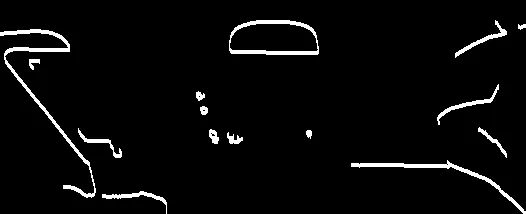
正如您所见,我几乎没有找到卡片的任何边缘(除了左边的一个,因为背景很暗)。是否有一种稳健的方法来找到直线模糊边缘?(我不想在这个图像上“过度拟合”)

在这里找到了一些建议: 模糊边缘检测 如何从模糊图像中准确地找到扭曲矩形的角位置?,但没有一个能够得到满意的结果。

完整代码:

def auto_canny(image, sigma=0.5):
    v = np.median(image)
    lower = int(max(0, (1.0 - sigma) * v))
    upper = int(min(255, (1.0 + sigma) * v))
    return cv2.Canny(image, lower, upper)

def add_contrast(img, contrast_level=8):
    lab = cv2.cvtColor(img, cv2.COLOR_BGR2LAB)

    l, a, b = cv2.split(lab)

    clahe = cv2.createCLAHE(clipLimit=3.0, tileGridSize=(contrast_level, contrast_level))
    cl = clahe.apply(l)

    limg = cv2.merge((cl, a, b))

    final = cv2.cvtColor(limg, cv2.COLOR_LAB2BGR)

    return final

# ------------------------------------------ #
# FIND EDGES
# ------------------------------------------ #
img = add_contrast(img=img, contrast_level=8)

gray = cv2.cvtColor(img, cv2.COLOR_BGR2GRAY)
cv2.imshow("gray", gray)

kernel_size = 5
blur_gray = cv2.GaussianBlur(gray, (kernel_size, kernel_size), 0)

edges = auto_canny(image=blur_gray) 

# Show images for testing
cv2.imshow('edges', edges)
cv2.waitKey(0)
cv2.destroyAllWindows()

ID的底部在一步中很难找到。您可以将阈值放宽到canny并对返回的边进行后处理,或编写自己的边缘检测方法。某种程度上,顶部和左侧边缘的检测应该更容易。您真正需要的是一个左上角和左下角来查找倾斜和比例。 - Croolman
1
测试图片的信息是否已经使用红色涂抹掉了?还是你在发布图片之前手动添加的呢? - stateMachine
@eldesgraciado 我在发布这张图片之前手动添加了红色,但是我没有在这张图片上运行算法。 - Alex Goft
2个回答

5
这也不是一个完整的解决方案,但如果红色部分有问题,您可以先使用cv2.inpaint()函数修复这些部分。然后,您可以应用其余方法来查找卡片边缘。
# create an inpainting mask with "red-enough" pixels
mask = cv2.inRange(img_src_rgb, np.array([200,0,0]), np.array([255,50,50]))
# enlarge the mask to cover the borders
kernel = np.ones((3,3),np.uint8)
mask = cv2.dilate(mask,kernel,iterations = 1)
# inpaint the red parts using Navier-Stokes based approach
img_dst = cv2.inpaint(img_src, mask,50,cv2.INPAINT_NS)
cv2.imshow("no_red", img_dst)

以下是生成的图像。

enter image description here

编辑: 现在我们知道你要求什么了,下面是完整的解决方案。

修复后,您可以应用霍夫变换来查找图像中的强直线。

gray = cv2.cvtColor(img_dst, cv2.COLOR_RGB2GRAY)
edges = auto_canny(gray) # your auto_canny function, WITHOUT blur
lines = cv2.HoughLines(edges, 1, np.pi/90, 50)
for line in lines:
    rho,theta = line[0]
    a = np.cos(theta)
    b = np.sin(theta)
    x0 = a*rho
    y0 = b*rho
    x1 = int(x0 + 10000*(-b))
    y1 = int(y0 + 10000*(a))
    x2 = int(x0 - 10000*(-b))
    y2 = int(y0 - 10000*(a))
    cv2.line(img_dst,(x1,y1),(x2,y2),(0,255,0),1)

cv2.imwrite('linesDetected.jpg', img_dst)

以下是生成的线条。 enter image description here

这是个好主意!然而,那不是我的问题。我希望找到一种检测模糊边缘的方法。 - Alex Goft
2
在你的例子中,模糊的边缘被红色区域的边界所主导,因此我建议将其作为预处理步骤。你应该更正你的问题,说明红色部分不是原始图像中的一部分,并基于原始图像生成一个示例输出,以便我们提供帮助。 - ilke444
2
@AlexGoft,请参见上面的完整答案。 - ilke444
非常感谢您的出色回答,同时也很抱歉给您带来了不便。请问您能否详细说明一下为什么在使用Canny算法时不需要进行模糊处理呢? - Alex Goft
2
你实际上需要边缘和角落,而高斯模糊会使它们变得平滑,因此你也会失去卡片的边缘。如果你想要一些边缘感知的平滑效果,可以尝试双边滤波器。 此外,增加对比度会引入新的边缘,这些边缘对噪声的贡献大于你所寻找的边缘。针对这种情况,你应该利用数据中的假设:卡片边缘是直线。 - ilke444

3

您可以使用cv2.floodFill来填充背景的部分,从而改善解决方案。

在查找边缘之前增强对比度是一个不错的想法,但似乎会产生一些人工制品,使得查找边缘更加困难。

以下是代码示例:

import numpy as np
import cv2


def auto_canny(image, sigma=0.5):
    v = np.median(image)
    lower = int(max(0, (1.0 - sigma) * v))
    upper = int(min(255, (1.0 + sigma) * v))
    return cv2.Canny(image, lower, upper)


img = cv2.imread('card.png')

h, w = img.shape[0], img.shape[1]

# Seed points for floodFill (use few points at each corner for improving robustness)
seedPoints = ((5, 5), (w-5, 5), (5, h-5), (w-5, h-5), 
              (w//2, 5), (w//2, h-5), (5, h//2), (w-5, h//2), 
              (w//4, 5), (w//4, h-5), (5, h//4),  (w-5, h//4),
              (w*3//4, 5), (w*3//4, h-5), (5, h*3//4),  (w-5, h*3//4))

# Fill parts of the background with black color
for seed in seedPoints:
    cv2.floodFill(img, None, seedPoint=seed, newVal=(0, 0, 0), loDiff=(2, 2, 2), upDiff=(2, 2, 2))

# ------------------------------------------ #
# FIND EDGES
# ------------------------------------------ #
gray = cv2.cvtColor(img, cv2.COLOR_BGR2GRAY)
cv2.imshow("gray", gray)

kernel_size = 5
blur_gray = cv2.GaussianBlur(gray, (kernel_size, kernel_size), 0)

# Second, process edge detection use Canny.
edges = auto_canny(image=blur_gray)

# Show images for testing
cv2.imshow('edges', edges)
cv2.waitKey(0)
cv2.destroyAllWindows()

结果:
在这里输入图片描述

我知道这不是完整的解决方案,但我希望它有所帮助...


1
点只是沿着图像的边缘均匀分布(我应该使用循环)。 - Rotem

网页内容由stack overflow 提供, 点击上面的
可以查看英文原文,
原文链接