我想给我的应用程序添加相同的功能,在经过多次查阅教程(raywenderlich 是最好的自行解决方案),我发现苹果有其自己的 UITableViewRowAction 类,非常方便。
你需要将TableView的常规方法更改为如下所示:
override func tableView(tableView: UITableView, editActionsForRowAtIndexPath indexPath: NSIndexPath) -> [AnyObject]? {
var shareAction = UITableViewRowAction(style: UITableViewRowActionStyle.Default, title: "Share" , handler: { (action:UITableViewRowAction!, indexPath:NSIndexPath!) -> Void in
let shareMenu = UIAlertController(title: nil, message: "Share using", preferredStyle: .ActionSheet)
let twitterAction = UIAlertAction(title: "Twitter", style: UIAlertActionStyle.Default, handler: nil)
let cancelAction = UIAlertAction(title: "Cancel", style: UIAlertActionStyle.Cancel, handler: nil)
shareMenu.addAction(twitterAction)
shareMenu.addAction(cancelAction)
self.presentViewController(shareMenu, animated: true, completion: nil)
})
var rateAction = UITableViewRowAction(style: UITableViewRowActionStyle.Default, title: "Rate" , handler: { (action:UITableViewRowAction!, indexPath:NSIndexPath!) -> Void in
let rateMenu = UIAlertController(title: nil, message: "Rate this App", preferredStyle: .ActionSheet)
let appRateAction = UIAlertAction(title: "Rate", style: UIAlertActionStyle.Default, handler: nil)
let cancelAction = UIAlertAction(title: "Cancel", style: UIAlertActionStyle.Cancel, handler: nil)
rateMenu.addAction(appRateAction)
rateMenu.addAction(cancelAction)
self.presentViewController(rateMenu, animated: true, completion: nil)
})
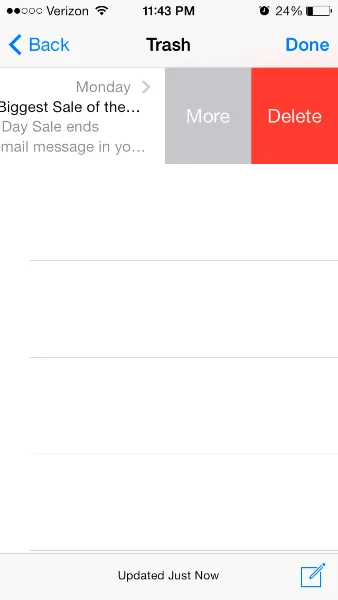
return [shareAction,rateAction]
}
您可以在
此网站上了解更多信息。苹果公司的
官方文档对于更改背景颜色非常有用:
块引用:
操作按钮的背景颜色。
声明 OBJECTIVE-C @property(nonatomic, copy) UIColor
*backgroundColor 讨论 使用此属性指定按钮的背景颜色。如果您未为此属性指定值,则UIKit基于样式属性中的值分配默认颜色。
可用性 适用于iOS 8.0及更高版本。
如果您想更改按钮的字体,这会有点棘手。我在SO上看到过
另一篇文章。为了提供代码以及链接,这是他们在那里使用的代码。您必须更改按钮的外观。您必须特定引用tableviewcell,否则您将更改整个应用程序中的按钮外观(我不希望那样,但可能您希望,我不知道:))
Objective C:
+ (void)setupDeleteRowActionStyleForUserCell {
UIFont *font = [UIFont fontWithName:@"AvenirNext-Regular" size:19];
NSDictionary *attributes = @{NSFontAttributeName: font,
NSForegroundColorAttributeName: [UIColor whiteColor]};
NSAttributedString *attributedTitle = [[NSAttributedString alloc] initWithString: @"DELETE"
attributes: attributes];
[[UIButton appearanceWhenContainedIn:[UIView class], [UserCell class], nil] setAttributedTitle: attributedTitle
forState: UIControlStateNormal];
}
Swift:
    //create your attributes however you want to
    let attributes = [NSFontAttributeName: UIFont.systemFontOfSize(UIFont.systemFontSize())] as Dictionary!

   //Add more view controller types in the []
    UIButton.appearanceWhenContainedInInstancesOfClasses([ViewController.self])
这是我认为最简单、最流畅的版本。希望能对你有所帮助。
更新:这是 Swift 3.0 版本:
func tableView(_ tableView: UITableView, editActionsForRowAt indexPath: IndexPath) -> [UITableViewRowAction]? {
var shareAction:UITableViewRowAction = UITableViewRowAction(style: .default, title: "Share", handler: {(action, cellIndexpath) -> Void in
let shareMenu = UIAlertController(title: nil, message: "Share using", preferredStyle: .actionSheet)
let twitterAction = UIAlertAction(title: "Twitter", style: .default, handler: nil)
let cancelAction = UIAlertAction(title: "Cancel", style: .cancel, handler: nil)
shareMenu.addAction(twitterAction)
shareMenu.addAction(cancelAction)
self.present(shareMenu,animated: true, completion: nil)
})
var rateAction:UITableViewRowAction = UITableViewRowAction(style: .default, title: "Rate" , handler: {(action, cellIndexpath) -> Void in
let rateMenu = UIAlertController(title: nil, message: "Rate this App", preferredStyle: .actionSheet)
let appRateAction = UIAlertAction(title: "Rate", style: .default, handler: nil)
let cancelAction = UIAlertAction(title: "Cancel", style: .cancel, handler: nil)
rateMenu.addAction(appRateAction)
rateMenu.addAction(cancelAction)
self.present(rateMenu, animated: true, completion: nil)
})
return [shareAction,rateAction]
}