如何在下拉选项框上添加浮动标签

90

在使用Android Design Support Library的TextInputLayout将浮动标签放置在EditText组件上后,我想知道是否有一种方法可以向Spinner组件添加浮动标签(不一定要使用Design Library)。

我的意思是,在Spinner上方放置类似于TextView的东西(显然没有像TextInputLayout那样的动画),但我希望文本大小、字体和颜色与TextInputLayout的浮动标签相匹配

例如,它看起来可能像这样(请参见Spinner上面的标签):

enter image description here

作为我之前提到的,我的主要目标是在
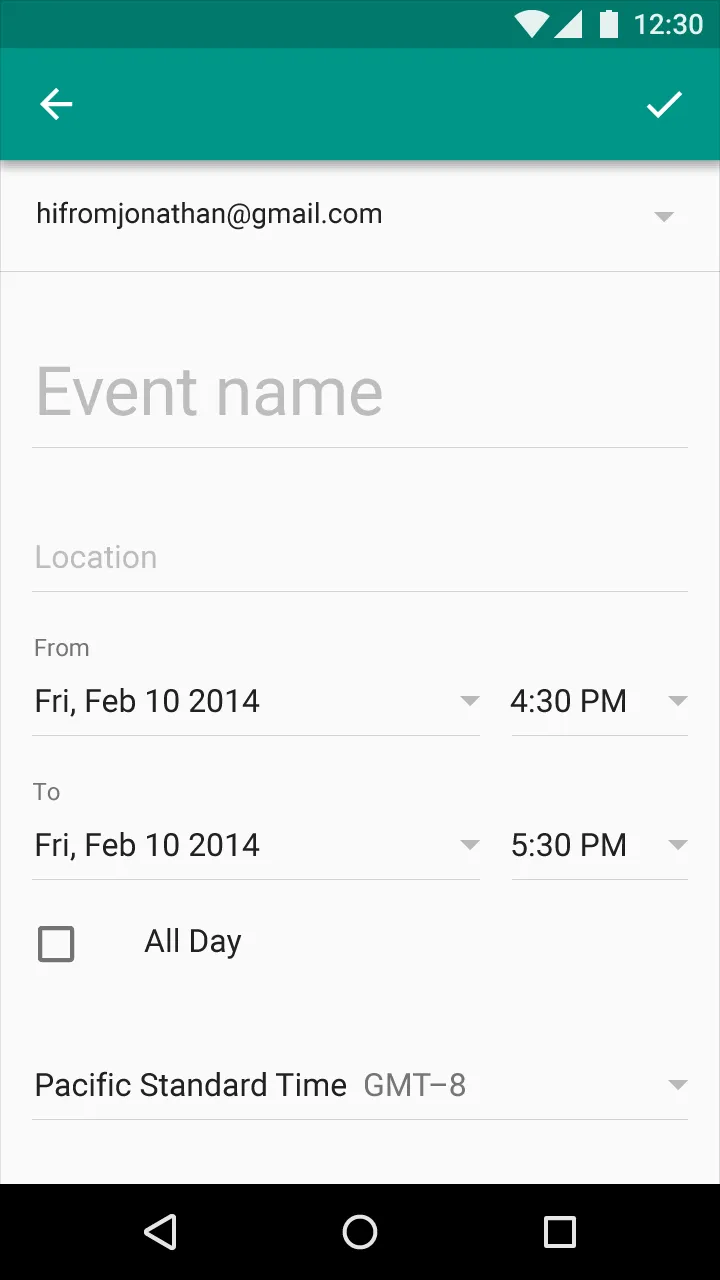
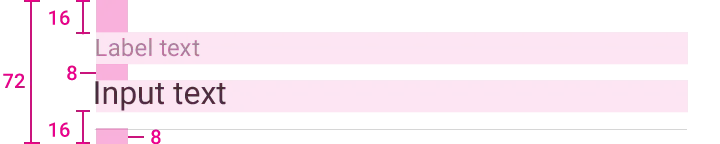
Spinner上方有一个标签,就像在TextInputLayout中一样 - 因此文字大小、字体、颜色以及标签与组件之间的距离将是相同的。
Google Design关于浮动标签文本字段的页面上,有一个显示标签相对于组件的尺寸的图表,但没有显示标签文本的颜色或大小:

enter image description here

总结一下,我的问题是:
- 如果有特殊组件或自定义视图可以实现我所要求的功能,那么它是什么,我该如何使用它。
- 如果没有,那么浮动标签文本的大小、颜色和字体是多少,这样我就可以在上面显示一个TextView,并且布局尺寸应与上图所示相同。


编辑:

Google设计指南中的文本字段中,浮动标签应该如下:

提示和输入字体:Roboto Regular 16sp
标签字体:Roboto Regular 12sp
图块高度:72dp
文本顶部和底部填充:16dp
文本字段分隔符填充:8dp

以上是相关图片。

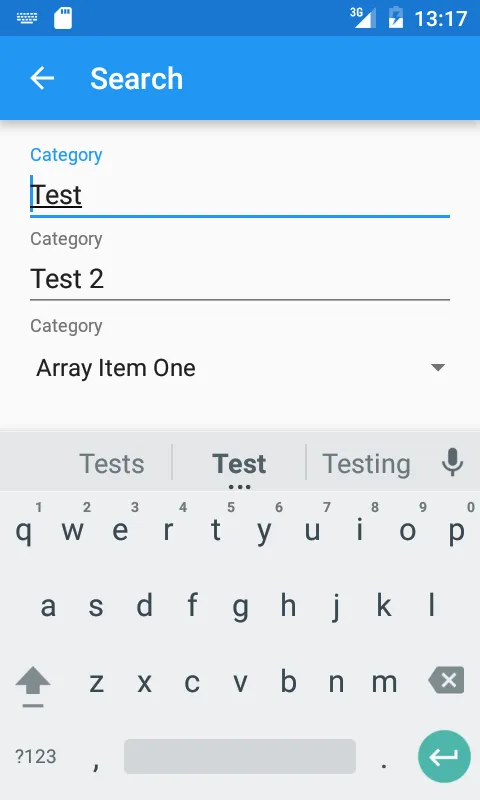
因此,浮动标签字体为:Roboto Regular 12sp。您可以使用TextView来显示Spinner标签,因为我不知道您可以使用任何自定义View或特殊组件。

然而,在尝试后,它看起来并不像图中的示例那样好看。 自定义视图可能更好,因为它可能看起来更漂亮,但上面的解决方案只是实现与我最初想要的东西相似的方法之一。

10个回答

45

我希望文本的大小、字体和颜色与TextInputLayout的浮动标签相匹配。

可以很容易地实现这一点,不需要任何外部库。尝试过hack TextInputLayout甚至制作自定义视图后,我意识到使用简单的TextView代码更少,可能更有效。

文本样式可以从AppCompat库中复制。

样式

从Material Design指南中,我们得到以下信息:

  • 标签应该有8dp的底部边距
  • 标签应该与输入文本垂直对齐

以下是Material EditText的指南未提及的内容:

  • 它有一个左填充为4dp
  • 其标签实际上没有16dp的上方间距,这留给界面设计人员:这是有道理的,因为如果您将其放置在另一个EditText下面,您只需要额外的8dp的空间即可。

此外,Design Support Library包含了一个聚焦元素标签的样式:

<style name="TextAppearance.Design.Hint" parent="TextAppearance.AppCompat.Caption">
    <item name="android:textColor">?attr/colorControlActivated</item>
</style>

未激活的元素只需使用TextAppearance.AppCompat.Caption

实现

将以下内容添加到您的dimens.xml文件中:

<dimen name="input_label_vertical_spacing">8dp</dimen>
<dimen name="input_label_horizontal_spacing">4dp</dimen>

然后将以下内容添加到styles.xml中:

<style name="InputLabel" parent="TextAppearance.AppCompat.Caption">
    <item name="android:paddingBottom">@dimen/input_label_vertical_spacing</item>
    <item name="android:paddingLeft">@dimen/input_label_horizontal_spacing</item>
    <item name="android:paddingRight">@dimen/input_label_horizontal_spacing</item>
</style>

如果您希望标签始终具有突出显示(强调)颜色,请使用Google设计支持库中的TextAppearance.Design.Hint替换TextAppearance.AppCompat.Caption。但是,如果在同一屏幕上还有带标签的EditText视图,则此操作可能看起来有点奇怪。

最后,您可以在应用样式后,将一个TextView放置在Spinner(或任何其他元素)上方:

<TextView
    android:layout_width="match_parent"
    android:layout_height="wrap_content"
    android:text="@string/category"
    style="@style/InputLabel" />

结果

以下屏幕截图显示了两个普通 TextInputLayout 视图,后面跟着一个标签和一个 Spinner 的简单示例。我没有应用额外的 8dp 间距来进一步分隔它们,但这表明它们的大小,字体和颜色得到了反映。

然而,在 Spinner 内部的元素具有不同的填充,但我更喜欢保持与所有其他标签的垂直对齐以获得更加统一的外观。

输入图像描述


1
是的,完全可以在不使用外部库的情况下实现这一点。事实上,在创建我的自定义视图时,我使用了相同的方法,它实际上是一个由样式化的TextView、Spinner和分隔线View组成的复合视图。我之所以制作自定义视图,是因为将其作为一个视图在布局层次结构中管理比尝试管理两个或三个视图更容易。 - Farbod Salamat-Zadeh
3
你可能希望在样式中添加 <item name="android:textColor">?android:textColorHint</item>,以便在未聚焦状态下,自定义标签与 TextInputLayout 中使用的文本颜色相同。 - se.solovyev
然而,如果您在同一个屏幕上也有标记的EditText视图,这可能会看起来有点奇怪。 您可以具体指定并将样式命名为SpinnerLabel而不是InputLabel,以便仅将其用于Spinners。 - Robin Hood
1
Spinner内部的元素具有不同的填充,但我更喜欢保持与所有其他标签的垂直对齐以获得更统一的外观。如果您仍然希望将相同的左填充应用于标签,以使其与Spinner元素对齐,则该值为8dp,如此处所定义。 - Omar Sharaki

35

我通过使用AutoCompleteTextView实现了这一点,禁用了键盘,并在触摸时显示选项。

ArrayAdapter<String> adapter = new ArrayAdapter<String>(this, android.R.layout.simple_spinner_item, getResources().getStringArray(R.array.locations));

AutoCompleteTextView mTextView = (AutoCompleteTextView) findViewById(R.id.location);

mTextView.setAdapter(adapter);
mTextView.setKeyListener(null);
mTextView.setOnTouchListener(new View.OnTouchListener(){
    @Override
    public boolean onTouch(View v, MotionEvent event){
        ((AutoCompleteTextView) v).showDropDown();
        return false;
    }
});

3
小改进:使用R.layout.support_simple_spinner_dropdown_item代替android.R.layout.simple_spinner_item - BoD
非常聪明的黑客技巧。但它仍然是一种黑客技巧。 - Sevastyan Savanyuk
4
如果您使用 mTextView.setText(...),您将无法在下拉列表中接收适配器的所有值...调用 adapter.getFilter().filter(null); 可以再次显示所有建议。 - maresmar
如果您调用 setKeyListener(null),则物理键盘将无法触发自动完成,因此该解决方案是不完整的。 - Anarchofascist
遗憾的是,这会破坏大多数UI测试工具,因为AutoCompleteTextView会弹出一个奇怪的弹窗,无法作为屏幕的一部分显示。 - Kevin
显示剩余3条评论

34

1
“我不需要旋转器”这句话的确切含义是什么?在你的Gist中,何处提到“用EditText比使用旋转器更好”?UI界面只是一个EditText吗? - Farbod Salamat-Zadeh
我使用带有TextInput Layout的EditText作为Spinner的替代品。当用户点击此自定义EditText时,我会打开一个对话框以供选择选项。当然,如果能够通过其他视图类型展示选项,就更好了。我接受任何改进建议,就像Spinner一样。 - Rodrigo Henriques
1
我将把这个Gist升级为一个带有示例的Github项目,然后希望得到帮助来改进这个解决方案。 - Rodrigo Henriques
5
onDraw(canvas) 方法中添加 setInputType(InputType.TYPE_NULL);,以禁止对编辑框的任何输入。否则,例如长按将会弹出上下文菜单并启用用户粘贴文本。 - Capricorn
1
这很棒,但如果您决定将其升级为Github库,请确保提供选择EditTextAppCompatEditText的选项! - Muhammad Naderi
显示剩余3条评论

11

我创建了一个复合视图组件View,它在Spinner上方显示一个标签。标签的文本可以使用XML或Java设置。

该组件具有Spinner的关键功能(并非全部),同时外观类似于TextInputLayout组件。

我将其命名为LabelledSpinner,作为我的UsefulViews Android库的一部分,根据Apache 2.0许可证在GitHub上提供。

要使用它,在build.gradle文件中添加库依赖项:

compile 'com.satsuware.lib:usefulviews:+'

可以在 GitHub 存储库中找到它的用法示例(包括示例应用程序和使用指南)。


@LavekushAgrawal,请告诉我具体是什么问题,或在存储库上开启一个问题。 - Farbod Salamat-Zadeh
1
实际上它是可以工作的,但标签不像编辑框一样浮动。 - Lavekush Agrawal
@LavekushAgrawal 在Spinner上方有一个小标签,类似于在EditText组件上方有小标签的方式,这些标签被包裹在TextInputLayout中。你对此有什么想法? - Farbod Salamat-Zadeh
@FarbodSalamat-Zadeh 这是一个很酷的库,但它在Lollipop上无法工作。 - Jorge
@FarbodSalamat-Zadeh 是的,在API 23上出现了InflateException。 - Blablablabli
2
无法在Gradle 3.5上工作,仅适用于Gradle 2.0非常旧的库。 - Arthur Melo

11

你可以通过这种方式实现: 在此输入图片描述

使用类似以下的新 Material 库样式:

<com.google.android.material.textfield.TextInputLayout
        android:id="@+id/fullNameLay"
        style="@style/Widget.MaterialComponents.TextInputLayout.OutlinedBox.ExposedDropdownMenu"
        android:layout_width="wrap_content"
        android:layout_height="wrap_content">

    <androidx.appcompat.widget.AppCompatAutoCompleteTextView
            android:id="@+id/fullNameEt"
            android:layout_width="match_parent"
            android:layout_height="wrap_content"/>
</com.google.android.material.textfield.TextInputLayout>

了解更多信息,请访问: https://material.io/develop/android/components/menu/

更新: 不可编辑的变体: 通过在AutoCompleteTextView上设置android:inputType="none"来禁用用户输入,从而获得菜单的不可编辑版本。


这不是Spinner。 - user924
3
这是一个旋转器,只是设计不同。 - Amin Keshavarzian

5

5

我有一个替代方案,利用TextInputLayout的行为和自定义DialogFragment(AlertDialog)来模拟下拉框对话框弹出。

layout.xml:

<android.support.design.widget.TextInputLayout
    android:layout_width="match_parent"
    android:layout_height="wrap_content">

    <EditText
        android:id="@+id/your_et"
        android:layout_width="match_parent"
        android:layout_height="wrap_content"
        android:hint="@string/your_label"
        android:maxLines="1"
        android:inputType="textNoSuggestions"
        android:textAppearance="@style/TextAppearance.AppCompat.Medium"
        android:focusable="false"
        style="@style/Base.Widget.AppCompat.Spinner.Underlined"/>
</android.support.design.widget.TextInputLayout>

通过DialogFragment(AlertDialog)创建自定义Spinner SpinnerFragment.java:
public class SpinnerFragment extends DialogFragment {

private static final String TITLEID = "titleId";
private static final String LISTID = "listId";
private static final String EDITTEXTID = "editTextId";

public static SpinnerFragment newInstance(int titleId, int listId, int editTextId) {
    Bundle bundle = new Bundle();
    bundle.putInt(TITLEID, titleId);
    bundle.putInt(LISTID, listId);
    bundle.putInt(EDITTEXTID, editTextId);
    SpinnerFragment spinnerFragment = new SpinnerFragment();
    spinnerFragment.setArguments(bundle);

    return spinnerFragment;
}

@Override
public Dialog onCreateDialog(Bundle savedInstanceState) {
    final int titleId = getArguments().getInt(TITLEID);
    final int listId = getArguments().getInt(LISTID);
    final int editTextId = getArguments().getInt(EDITTEXTID);
    AlertDialog.Builder builder = new AlertDialog.Builder(getActivity());

    try {
        final String[] items = getResources().getStringArray(listId);

        builder.setTitle(titleId)
                .setItems(listId, new DialogInterface.OnClickListener() {
                    public void onClick(DialogInterface dialog, int pos) {
                        EditText et = (EditText) getActivity().findViewById(editTextId);
                        String selectedText = items[pos];
                        if (!TextUtils.isEmpty(selectedText)) {
                            et.setText(selectedText);
                        } else {
                            et.getText().clear();
                        }
                    }
                });

    } catch (NullPointerException e) {
        Log.e(getClass().toString(), "Failed to select option in " + getActivity().toString() + " as there are no references for passed in resource Ids in Bundle", e);
        Toast.makeText(getActivity(), getString(R.string.error_failed_to_select), Toast.LENGTH_LONG).show();
    }

    return builder.create();
}

}

Activity.java:

private void addCustomSpinner() {
    EditText yourEt = (EditText) findViewById(R.id.your_et);
    yourEt.setOnClickListener(new View.OnClickListener() {
        @Override
        public void onClick(View view) {
            showCustomSpinnerDialog(view);
        }
    });
}

private void showCustomSpinnerDialog(View v) {
    int titleId = R.string.your_label;
    int listId = R.array.spinner_selections;
    int editTextId = R.id.your_et;
    SpinnerFragment spinnerFragment = SpinnerFragment.newInstance(titleId, listId, editTextId);
    spinnerFragment.show(getFragmentManager(), "customSpinner");
}

结果

当您点击样式化的Spinner TextInputLayout时,它将触发一个包含您选择列表的警报对话框。一旦选择了一个选项,EditText将被填充为您的选择,并且标签将像您想要的那样浮动。


android:focusable="false"难道不会使得使用键盘或语音与应用程序交互的用户无法访问此视图吗? - sargas
我从未使用键盘或语音与微调器进行交互,但我设置 android:focusable="false" 的原因是为了防止用户输入不在选择范围内的内容。不幸的是,我没有实体的安卓手机来测试行为,无法告诉你结果。 - Kenny Li

3

这是我的技巧,

好处是一切都会按照您想要的方式运作,

但坏处是它会增加布局层次结构,您必须在代码中处理功能,并且这是一个丑陋的解决方案:

    <RelativeLayout
        android:layout_width="match_parent"
        android:layout_height="wrap_content">

        <android.support.design.widget.TextInputLayout
            android:id="@+id/til"
            android:layout_width="match_parent"
            android:layout_height="wrap_content">

            <EditText
                android:id="@+id/edt"
                android:layout_width="match_parent"
                android:layout_height="@dimen/edt_height"
                android:hint="@string/create_gcc_visa_txt_step" />

        </android.support.design.widget.TextInputLayout>

        <Spinner
            android:id="@+id/spn"
            style="@style/MyAppTheme.Base.Spinner"
            android:layout_height="@dimen/edt_height"
            android:layout_alignBottom="@id/til" />

    </RelativeLayout>

覆盖Spinner的适配器,使选定的值透明

public class MySpinnerAdapter extends SimpleAdapter {
    Context mContext;

    public MySpinnerAdapter(Context context, List<String> data, int resource, String[] from, int[] to) {
        super(context, data, resource, from, to);
        mContext = context;
    }

    @Override
    public View getView(int position, View convertView, ViewGroup parent) {
        convertView = super.getView(position, convertView, parent);

        TextView tv = (TextView) convertView.findViewById(android.R.id.text1);
            tv.setTextColor(ContextCompat.getColor(mContext, R.color.transparent));
        return convertView;
    }
}

在选择下拉框中的选项后,只需获取所选文本并将其设置到EditText中,它将具有相同的动画效果。

yourSpinnerView.setOnItemSelectedListener(new AdapterView.OnItemSelectedListener() {
        @Override
        public void onItemSelected(AdapterView<String> adapterView, View view, int i, long l) {
            //get your selected text from adapter or from where you want 
            String selectedText = adapterView.getItemAtPosition(i));

            if (i != 0) { 
                edt.setText(selectedText);
            } else { 
                // if in case your spinner have first empty text, 
                // then when spinner selected, just empty EditText.
                edt.setText("");
            }
        }

        @Override
        public void onNothingSelected(AdapterView<?> adapterView) {

        }
    });

如果你有任何问题,请问我。


你能帮我吗?我卡住了。我有多个编辑文本,所以在布局的onCreate中,焦点会转到第一个编辑文本,而当我直接按下Spinner时,上面的编辑文本代码不会获得焦点。但是我需要在单击Spinner时获得焦点,怎么办? - sunita
@sunita,你能告诉我视图的顺序吗?因为当我尝试时,我只能集中在下拉框上。 - Damir Mailybayev

1

0

SpinnerCustom.java

package com.pozitron.tfkb.customviews;

import android.content.Context;
import android.content.res.TypedArray;
import android.support.annotation.Nullable;
import android.text.SpannableString;
import android.util.AttributeSet;
import android.view.LayoutInflater;
import android.view.View;
import android.widget.LinearLayout;

import com.pozitron.commons.customviews.TextViewFont;
import com.pozitron.tfkb.R;

import butterknife.BindView;
import butterknife.ButterKnife;

/**
 * Created by so12607 on 31/01/2018.
 */

public class SpinnerCustom extends LinearLayout {

    @BindView(R.id.layoutSpinnerCustomLabel)
    TextViewFont layoutSpinnerCustomLabel;

    @BindView(R.id.layoutSpinnerCustomSpinner)
    TextViewFont layoutSpinnerCustomSpinner;

    @BindView(R.id.layoutSpinner)
    LinearLayout layoutSpinner;

    private View v;

    public SpinnerCustom(Context context) {
        this(context, null);
    }

    public SpinnerCustom(Context context, @Nullable AttributeSet attrs) {
        this(context, attrs, 0);

    }

    public SpinnerCustom(Context context, @Nullable AttributeSet attrs, int defStyleAttr) {
        super(context, attrs, defStyleAttr);

        v = LayoutInflater.from(context).inflate(R.layout.layout_spinner_custom, this, true);
        ButterKnife.bind(this);

        if (!isInEditMode()) {

            TypedArray array = context.obtainStyledAttributes(attrs, R.styleable.SpinnerCustom, 0, 0);
            final String label = array.getString(R.styleable.SpinnerCustom_label);
            final boolean enable = array.getBoolean(R.styleable.SpinnerCustom_enabled, true);
            layoutSpinnerCustomLabel.setText(label);

            layoutSpinnerCustomLabel.setEnabled(enable);
            layoutSpinnerCustomSpinner.setEnabled(enable);
            layoutSpinner.setEnabled(enable);
            layoutSpinner.setClickable(enable);
            v.setEnabled(enable);
            v.setClickable(enable);
            array.recycle();
        }
    }

    public void setText(String text) {
        layoutSpinnerCustomSpinner.setText(text);
    }

    public void setText(SpannableString text) {
        layoutSpinnerCustomSpinner.setText(text);
    }

    public void setText(CharSequence text) {
        layoutSpinnerCustomSpinner.setText(text);
    }

    public void setLabel(String text) {
        layoutSpinnerCustomLabel.setText(text);
    }

    public void setError(SpannableString text) {
        layoutSpinnerCustomSpinner.setError(text);
    }

    public void setEnabled(boolean enable) {
        layoutSpinnerCustomLabel.setEnabled(enable);
        layoutSpinnerCustomSpinner.setEnabled(enable);
        layoutSpinner.setEnabled(!enable);
        layoutSpinner.setClickable(!enable);
    }
}

layout_spinner_custom.xml

<?xml version="1.0" encoding="utf-8"?>
<LinearLayout xmlns:android="http://schemas.android.com/apk/res/android"
    xmlns:tools="http://schemas.android.com/tools"
    android:id="@+id/layoutSpinner"
    android:layout_width="match_parent"
    android:layout_height="wrap_content"
    android:orientation="vertical">

    <com.pozitron.commons.customviews.TextViewFont
        android:id="@+id/layoutSpinnerCustomLabel"
        style="@style/TextLabel"
        tools:text="label" />

    <com.pozitron.commons.customviews.TextViewFont
        android:id="@+id/layoutSpinnerCustomSpinner"
        style="@style/SpinnerText"
        android:clickable="false" />

</LinearLayout>

style.xml

<style name="TextLabel" parent="android:Widget.TextView">
    <item name="font">@integer/font_GTEestiDisplay_Regular</item>
    <item name="android:layout_width">match_parent</item>
    <item name="android:textSize">14sp</item>
    <item name="android:layout_height">wrap_content</item>
    <item name="android:gravity">bottom</item>
    <item name="android:textColor">@color/greyLabel</item>
</style>

<style name="SpinnerText" parent="EditText">
    <item name="font">@integer/font_GTEestiDisplay_Medium</item>
    <item name="android:gravity">bottom</item>
    <item name="android:textSize">17sp</item>
    <item name="android:minHeight">35dp</item>
    <item name="android:focusable">false</item>
    <item name="android:background">@drawable/spinner_selector</item>
    <item name="android:text">@string/select</item>
    <item name="android:textColor">@color/selector_spinner_text</item>
</style>

网页内容由stack overflow 提供, 点击上面的
可以查看英文原文,
原文链接