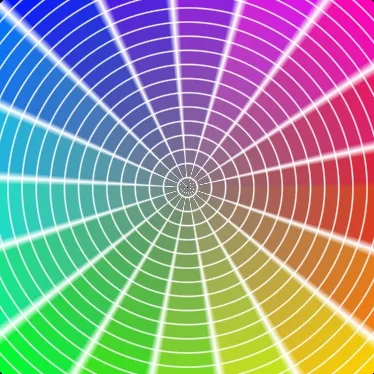
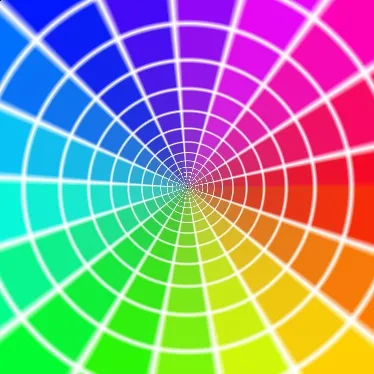
我想将常规全景照片转换为极坐标,以创建“小地球”效果,但我找不到解决方法。我认为有一些有用的核心图形滤镜或第三方库,但我找不到任何信息。
示例: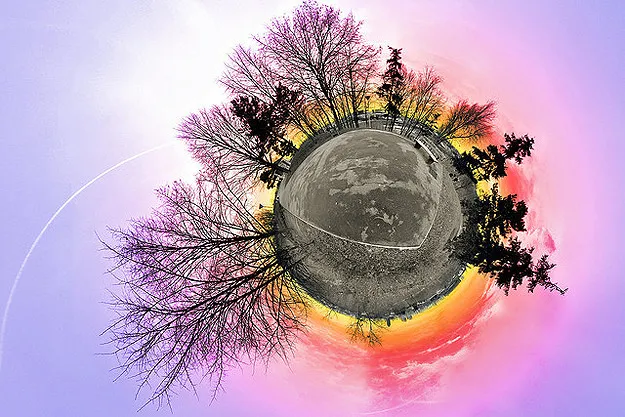
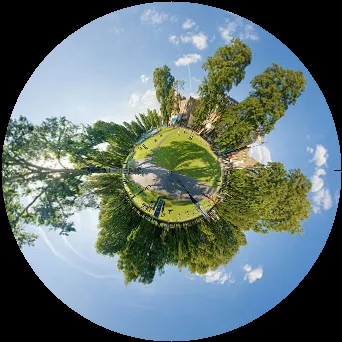
示例:
这其实很简单,只需应用极坐标即可。以下是一个完全注释的示例(使用C++实现,仅使用OpenCV作为数据结构和图像加载和显示):
#include <opencv2/highgui.hpp>

// Function returning the bilinear interpolation of the input image at input coordinates
cv::Vec3b interpolate(const cv::Mat &image, float x, float y)
{
    // Compute bilinear interpolation weights
    float floorx=std::floor(x), floory=std::floor(y);
    float fracx=x-floorx, fracy=y-floory;
    float w00=(1-fracy)*(1-fracx), w01=(1-fracy)*fracx, w10=fracy*(1-fracx), w11=fracy*fracx;

    // Read the input image values at the 4 pixels surrounding the floating point (x,y) coordinates
    cv::Vec3b val00 = image.at<cv::Vec3b>(floory, floorx);
    cv::Vec3b val01 = (floorx<image.cols-1 ? image.at<cv::Vec3b>(floory, floorx+1) : image.at<cv::Vec3b>(floory, 0));       // Enable interpolation between the last right-most and left-most columns
    cv::Vec3b val10 = image.at<cv::Vec3b>(floory+1, floorx);
    cv::Vec3b val11 = (floorx<image.cols-1 ? image.at<cv::Vec3b>(floory+1, floorx+1) : image.at<cv::Vec3b>(floory+1, 0));   // Enable interpolation between the last right-most and left-most columns

    // Compute the interpolated color
    cv::Vec3b val_interp;
    val_interp.val[0] = cv::saturate_cast<uchar>(val00.val[0]*w00+val01.val[0]*w01+val10.val[0]*w10+val11.val[0]*w11);
    val_interp.val[1] = cv::saturate_cast<uchar>(val00.val[1]*w00+val01.val[1]*w01+val10.val[1]*w10+val11.val[1]*w11);
    val_interp.val[2] = cv::saturate_cast<uchar>(val00.val[2]*w00+val01.val[2]*w01+val10.val[2]*w10+val11.val[2]*w11);
    return val_interp;
}

// Main function
void main()
{
    const float pi = 3.1415926535897932384626433832795;

    // Load and display color panorama image
    cv::Mat panorama = cv::imread("../panorama_sd.jpg", cv::IMREAD_COLOR);
    cv::namedWindow("Panorama");
    cv::imshow("Panorama", panorama);

    // Infer the size of the final image from the dimensions of the panorama
    cv::Size result_size(panorama.rows*2, panorama.rows*2);
    float ctrx=result_size.width/2, ctry=result_size.height/2;

    // Initialize an image with black background, with inferred dimensions and same color format as input panorama
    cv::Mat tiny_earth_img = cv::Mat::zeros(result_size, panorama.type());
    cv::Vec3b *pbuffer_img = tiny_earth_img.ptr<cv::Vec3b>();   // Get a pointer to the buffer of the image (sequence of 8-bit interleaved BGR values)

    // Generate the TinyEarth image by looping over all its pixels
    for(int y=0; y<result_size.height; ++y) {
        for(int x=0; x<result_size.width; ++x, ++pbuffer_img) {

            // Compute the polar coordinates associated with the current (x,y) point in the final image
            float dx=x-ctrx, dy=y-ctry;
            float radius = std::sqrt(dx*dx+dy*dy);
            float angle = std::atan2(dy,dx)/(2*pi); // Result in [-0.5, 0.5]
            angle = (angle<0 ? angle+1 : angle);    // Result in [0,1[

            // Map the polar coordinates to cartesian coordinates in the panorama image
            float panx = panorama.cols*angle;
            float pany = panorama.rows-1-radius;    // We want the bottom of the panorama to be at the center

            // Ignore pixels which cannot be linearly interpolated in the panorama image
            if(std::floor(panx)<0 || std::floor(panx)+1>panorama.cols || std::floor(pany)<0 || std::floor(pany)+1>panorama.rows-1)
                continue;

            // Interpolate the panorama image at coordinates (panx, pany), and store this value in the final image
            pbuffer_img[0] = interpolate(panorama, panx, pany);
        }
    }

    // Display the final image
    cv::imwrite("../tinyearth.jpg", tiny_earth_img);
    cv::namedWindow("TinyEarth");
    cv::imshow("TinyEarth", tiny_earth_img);
    cv::waitKey();
}
示例输入全景图像 (来源):

生成的图像:
编辑:
回答您关于黑色边框的问题,您可以调整映射函数(将最终图像中的像素坐标映射到全景图像中的像素坐标),以实现您想要的效果。以下是一些示例:
原始全景图像:
1) 原始映射: 半径大于全景图行数的像素保持不变(因此您可以在那里显示任何背景图像)
float panx = panorama.cols*angle;
float pany = panorama.rows-1-radius;
结果:

2) 最近点映射: 半径大于全景图行数一半的像素会被映射到全景图中最近的有效像素。
float panx = panorama.cols*angle;
float pany = std::max(0.f,panorama.rows-1-radius);
结果:
3) 缩放映射: 将微小的地球图像缩放,以便半径>全景.rows/2 的像素被映射到有效的全景像素上,然而一些全景的部分现在被映射到了微小的地球图像之外 (在上/下/左/右方)
float panx = panorama.cols*angle;
float pany = panorama.rows-1-0.70710678118654752440084436210485*radius;
结果:
4) 对数映射:使用对数函数的非线性映射来最小化全景图中被映射到微型地球图像之外的区域(您可以调整常数100以缩放更多或更少)。
const float scale_cst = 100;
float panx = panorama.cols*angle;
float pany = (panorama.rows-1)*(1-std::log(1+scale_cst*0.70710678118654752440084436210485*radius/panorama.rows)/std::log(1+scale_cst));
结果: