Flutter - 收到通知时更改应用程序栏图标

10
我正在使用FirebaseMessaging来推送应用程序通知。 因此,我可以使用以下代码处理这些通知:
firebaseMessaging.configure(
    onLaunch: (Map<String, dynamic> msg) {
  print("onLaunch called");
}, onResume: (Map<String, dynamic> msg) {
  print("onResume called");
}, onMessage: (Map<String, dynamic> msg) {
  print("onMessage called : " + msg.toString());
});

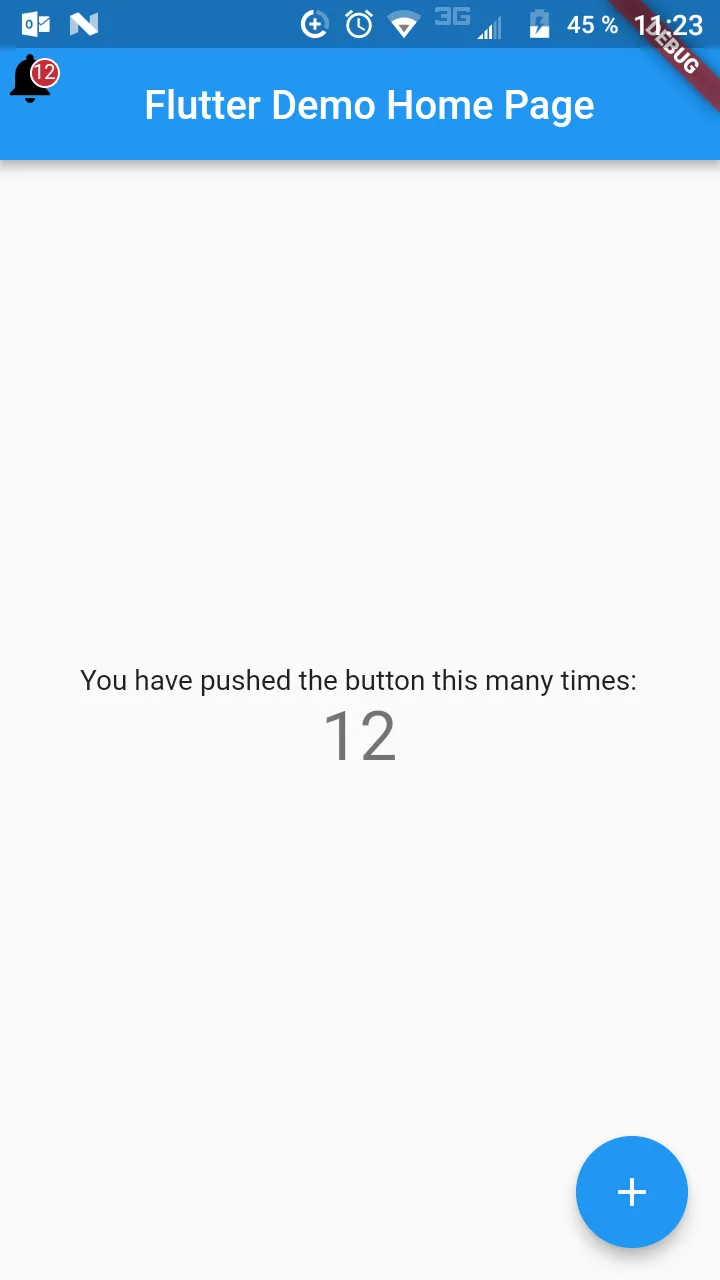
当我收到通知时,我希望在我的应用栏图标上显示这个小的“1”。

icon

我的问题是:我不知道如何动态更改我的应用栏上的铃铛图标,以适用于所有页面(而且我不能在应用栏中调用setState)。

为什么不能调用 setState 函数? - creativecreatorormaybenot
因为我使用了一个无状态小部件...我的错 - Thomas Nicole
4个回答

16

我认为解决你的问题很简单,你只需要使用一个Stateful类和下面片段中的自定义图标:

Widget myAppBarIcon(){
return Container(
  width: 30,
  height: 30,
  child: Stack(
    children: [
      Icon(
        Icons.notifications,
        color: Colors.black,
        size: 30,
      ),
      Container(
        width: 30,
        height: 30,
        alignment: Alignment.topRight,
        margin: EdgeInsets.only(top: 5),
        child: Container(
          width: 15,
          height: 15,
          decoration: BoxDecoration(
              shape: BoxShape.circle,
              color: Color(0xffc32c37),
              border: Border.all(color: Colors.white, width: 1)),
          child: Padding(
            padding: const EdgeInsets.all(0.0),
            child: Center(
              child: Text(
                _counter.toString(),
                style: TextStyle(fontSize: 10),
              ),
            ),
          ),
        ),
      ),
    ],
  ),
);
}

接下来,您可以将此图标包含在应用栏(leading或action)中。您会发现,文本值随任何触摸而更改。我使用的是示例代码作为基础,当您开始一个新的Flutter项目时,它包含一种方法来计算您触摸浮动按钮的次数并更改状态:

void _incrementCounter() {
setState(() {
  _counter++;
});
}

希望这可以帮到你

这是我的例子


谢谢,这非常有用。我使用了你的示例来按照我的方式做一些事情。欢迎来到stackoverflow :) - Thomas Nicole
@ThomasNicole,你是如何在Firebase onMessage回调中更新UI的? - Rakesh
很久没见了^^。 - Thomas Nicole
如果AppBar图标和浮动按钮位于不同的类中,应该如何做到相同的效果? - SantoshKumar

3

通知徽章背后的基本思想

通过使用Stack和Positioned小部件,我们可以将Text小部件叠放在IconButton上以显示通知徽章。

appBar: AppBar(
        leading: IconButton(
          icon: Icon(
            _backIcon(),
            color: Colors.black,
          ),
          alignment: Alignment.centerLeft,
          tooltip: 'Back',
          onPressed: () {

          },
        ),
        title: Text(
          "Title",
          style: TextStyle(
            color: Colors.black,
          ),
        ),
        backgroundColor: Colors.white,
        actions: <Widget>[
          IconButton(
            tooltip: 'Search',
            icon: const Icon(
              Icons.search,
              color: Colors.black,
            ),
            onPressed: _toggle,
          ),
          new Padding(
            padding: const EdgeInsets.all(10.0),
            child: new Container(
              height: 150.0,
              width: 30.0,
              child: new GestureDetector(
                onTap: () {
                },
                child: Stack(
                  children: <Widget>[
                    new IconButton(
                        icon: new Icon(
                          Icons.shopping_cart,
                          color: Colors.black,
                        ),
                        onPressed: () {

                        }),
                    ItemCount == 0
                        ? new Container()
                        : new Positioned(
                            child: new Stack(
                            children: <Widget>[
                              new Icon(Icons.brightness_1,
                                  size: 20.0, color: Colors.orange.shade500),
                              new Positioned(
                                  top: 4.0,
                                  right: 5.0,
                                  child: new Center(
                                    child: new Text(
                                      ItemCount.toString(),
                                      style: new TextStyle(
                                          color: Colors.white,
                                          fontSize: 11.0,
                                          fontWeight: FontWeight.w500),
                                    ),
                                  )),
                            ],
                          )),
                  ],
                ),
              ),
            ),
          )
        ],
      ),

2
你需要创建一个自定义的drawable并将其设置为Appbar图标,然后你需要在自定义的drawable中以文本形式绘制数字。以下链接已经为您完成了此操作。 如何在操作栏中制作带有通知数的图标? 最初的回答:您需要创建一个自定义的Drawable,并将其设置为AppBar图标,然后在自定义的Drawable中绘制数字作为文本。以下链接已经为您完成了此操作。

1
你可以创建类型为 IconData 的变量并更改其值。在查看下面的示例后,您将获得更多想法。
导入 'package:flutter/material.dart';
void main() => runApp(MyHome());

class MyHome extends StatefulWidget {
  @override
  _MyHomeState createState() => _MyHomeState();
}

class _MyHomeState extends State<MyHome> {

  IconData _iconData= Icons.notifications;
  @override
  Widget build(BuildContext context) {
    return MaterialApp(
      theme: ThemeData(
        primaryColor: Color(0xffFF5555),
      ),
      home: Scaffold(
        appBar: new AppBar(
          title: new Text("Title"),
          actions: <Widget>[
            Icon(_iconData)
          ],
        ),
        body: Center(
          child: new Text("Demo")
        ),
        floatingActionButton: FloatingActionButton(
          child: Icon(Icons.check_circle_outline),
            onPressed: (){
              if(_iconData == Icons.notifications){
                setState(() {
                  _iconData = Icons.notifications_active;
                });
              }else{
                setState(() {
                  _iconData = Icons.notifications;
                });
              }
            }
        ),
      ),
    );
  }
}

网页内容由stack overflow 提供, 点击上面的
可以查看英文原文,
原文链接