我已经在TableLayout中定义了六个按钮,如下所示:-
<?xml version="1.0" encoding="utf-8"?>
<TableLayout xmlns:android="http://schemas.android.com/apk/res/android"
android:layout_width="match_parent"
android:layout_height="match_parent"
android:padding="10dp"
android:shrinkColumns="*"
android:stretchColumns="*" >

<TableRow
    android:layout_width="match_parent"
    android:layout_height="0dp"
    android:layout_weight="1"
    android:gravity="center" >

    <Button
        style="@style/CustomStyleButton2"
        android:layout_width="match_parent"
        android:layout_height="match_parent"
        android:layout_span="1"
        android:text="Btn1" />

    <Button
        style="@style/CustomStyleButton2"
        android:layout_width="match_parent"
        android:layout_height="match_parent"
        android:layout_span="1"
        android:text="Btn1" />
</TableRow>

<TableRow
    android:layout_width="match_parent"
    android:layout_height="0dp"
    android:layout_weight="1" >

    <Button
        style="@style/CustomStyleButton2"
        android:layout_width="match_parent"
        android:layout_height="match_parent"
        android:layout_span="1"
        android:text="Btn1" />

    <Button
        style="@style/CustomStyleButton2"
        android:layout_width="match_parent"
        android:layout_height="match_parent"
        android:layout_span="1"
        android:padding="5dp"
        android:text="Btn1" />
</TableRow>

<TableRow
    android:layout_width="match_parent"
    android:layout_height="0dp"
    android:layout_weight="1" >

    <Button
        style="@style/CustomStyleButton2"
        android:layout_width="match_parent"
        android:layout_height="match_parent"
        android:layout_span="1"
        android:text="Btn1" />

    <Button
        style="@style/CustomStyleButton2"
        android:layout_width="match_parent"
        android:layout_height="match_parent"
        android:layout_span="1"
        android:text="Btn1" />
</TableRow>

</TableLayout>
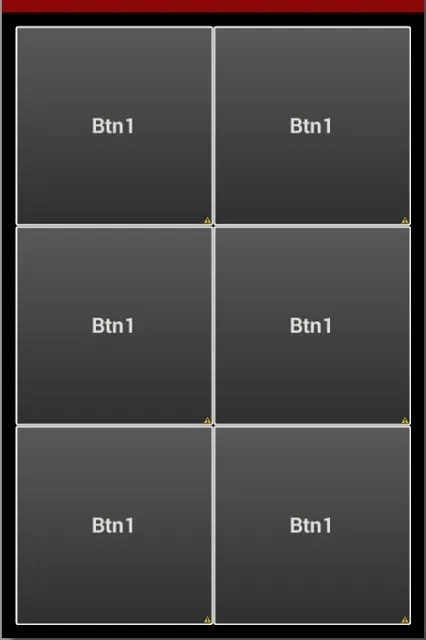
其显示效果如下:
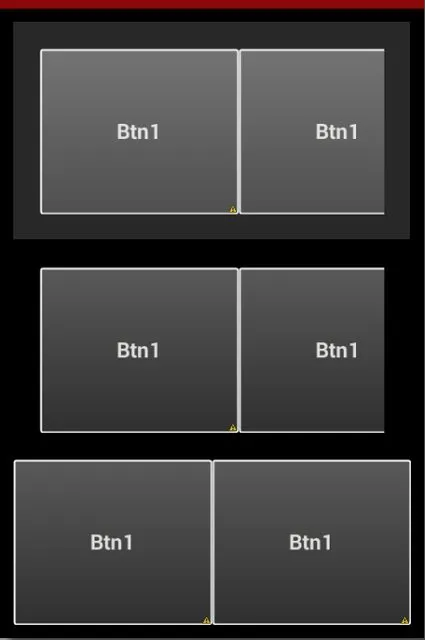
这里我想要将所有按钮分开。当我应用填充或边距时,位于右侧的按钮不能适应屏幕并且部分被裁剪。
这里我给第一行添加了20个填充和第二行添加了20个边距,然后它看起来像:
代码:
<?xml version="1.0" encoding="utf-8"?>
<TableLayout xmlns:android="http://schemas.android.com/apk/res/android"
android:layout_width="match_parent"
android:layout_height="match_parent"
android:padding="10dp"
android:shrinkColumns="*"
android:stretchColumns="*" >

<TableRow
    android:layout_width="match_parent"
    android:layout_height="0dp"
    android:layout_weight="1"
    android:padding="20dp" >

    <Button
        style="@style/CustomStyleButton2"
        android:layout_width="match_parent"
        android:layout_height="match_parent"
        android:layout_span="1"
        android:text="Btn1" />

    <Button
        style="@style/CustomStyleButton2"
        android:layout_width="match_parent"
        android:layout_height="match_parent"
        android:layout_span="1"
        android:text="Btn1" />
</TableRow>

<TableRow
    android:layout_width="match_parent"
    android:layout_height="0dp"
    android:layout_weight="1"
    android:layout_margin="20dp" >

    <Button
        style="@style/CustomStyleButton2"
        android:layout_width="match_parent"
        android:layout_height="match_parent"
        android:layout_span="1"
        android:text="Btn1" />

    <Button
        style="@style/CustomStyleButton2"
        android:layout_width="match_parent"
        android:layout_height="match_parent"
        android:layout_span="1"
        android:padding="5dp"
        android:text="Btn1" />
</TableRow>

<TableRow
    android:layout_width="match_parent"
    android:layout_height="0dp"
    android:layout_weight="1" >

    <Button
        style="@style/CustomStyleButton2"
        android:layout_width="match_parent"
        android:layout_height="match_parent"
        android:layout_span="1"
        android:text="Btn1" />

    <Button
        style="@style/CustomStyleButton2"
        android:layout_width="match_parent"
        android:layout_height="match_parent"
        android:layout_span="1"
        android:text="Btn1" />
</TableRow>

</TableLayout>
如何解决这个问题?
风格:
<style name="CustomStyleButton2" parent="@android:style/Widget.Button">
    <item name="android:textSize">16sp</item>
    <item name="android:textStyle">bold</item>
    <item name="android:textColor">#dedfdc</item>
    <item name="android:gravity">center</item>
    <item name="android:shadowColor">#000000</item>
    <item name="android:shadowDx">1</item>
    <item name="android:shadowDy">1</item>
    <item name="android:shadowRadius">0.6</item>
    <item name="android:background">@drawable/custom_button2</item>
    <item name="android:padding">10dip</item>
</style>
背景:
<?xml version="1.0" encoding="utf-8"?>
<selector xmlns:android="http://schemas.android.com/apk/res/android">
    <item android:state_pressed="true">
        <shape>
            <solid android:color="#151515" />
            <stroke android:width="1dp" android:color="#FFFFFF" />
            <corners android:radius="3dp" />
            <padding android:bottom="10dp" android:left="10dp" android:right="10dp" android:top="10dp" />
        </shape>
    </item>
    <item>
        <shape>
            <gradient android:angle="270" android:endColor="#2E2E2E" android:startColor="#585858" />
            <stroke android:width="1dp" android:color="#FFFFFF" />
            <corners android:radius="3dp" />
            <padding android:bottom="10dp" android:left="10dp" android:right="10dp" android:top="10dp" />
        </shape>
    </item>
</selector>
 只需将这些代码添加到您的样式中