在Flutter AppBar中调整前导部件的大小

11

我正在制作一个自定义的AppBar,它比典型的AppBar要高。我想要调整前导小部件/图标的大小,并利用automaticallyImplyLeading的默认行为(以便菜单图标和返回图标被自动实现)。

这是我想要实现的解决方案:

class AppAppBar extends PreferredSize{
  AppAppBar(String title) : super(
    preferredSize: Size.fromHeight(56.0),
    child: AppBar(
      centerTitle: true,
      title: Text(title, style: textStyle)
    )) {
    (child as AppBar).leading = 
        SizedBox(width: 30.0, height: 30.0, child: (child as AppBar).leading);
  }

  static const textStyle = TextStyle(fontSize: 32.0);
}

当然,这样做是行不通的,因为(child as AppBar).leading是final的。

所以,在下面的AppBar中(为了演示目的而将文本大小大幅增加),我想使自动添加的汉堡图标变得更大。

enter image description here

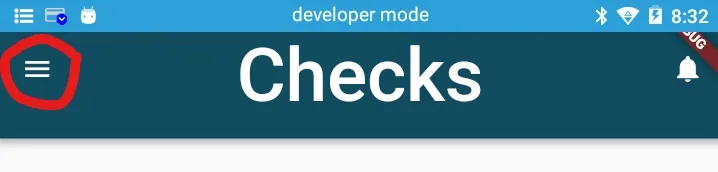
你认为呢?这个问题有解决办法吗,还是我应该放弃自动图标并自己添加它们?

编辑:添加一个图片以说明我的意思。


你能放一张关于你想要的图片吗? - diegoveloper
6个回答

13

您不能这样做,因为它是预定义的小部件。

但您可以使用 Row 小部件绕过它:

Scaffold(
key:_scaffoldKey,
drawer: Drawer(),
appBar: AppBar(
      automaticallyImplyLeading: false
      title: Row(
        mainAxisAlignment: MainAxisAlignment.start,
        crossAxisAlignment: CrossAxisAlignment.center,
        children: <Widget>[
          SizedBox(
              height: 20, // Your Height
              width: 20, // Your width
              child: IconButton( // Your drawer Icon 
                      onPressed: () => _scaffoldKey.currentState.openDrawer()),
                      icon: Icon(Icons.arrow_back, color: Colors.white),
          ),)
          // Your widgets here
        ],
      ),
    ),
)

使用_scaffoldKey.currentState.openDrawer()打开抽屉需要钥匙。

automaticallyImplyLeading: false将防止默认的抽屉图标显示。


7

使用Flutter中的leadingWidth属性可以调整AppBar的前导Widget宽度。

例如:

AppBar(
  title: const Text('Title'),
  leadingWidth: 50,
  leading: Container()
)

6
一个简单的例子来演示Raffi Jonas的答案。
AppBar(
    automaticallyImplyLeading: false,
    title: Row(
      children: [
        Expanded(
          child: Text('One'),
        ),
        Center(
          child: Text('Two'),
        ),
        Expanded(
          child: Align(
            alignment: Alignment.centerRight,
            child: Text('Three'),
          ),
        ),
      ],
    ),
  ),

5

你需要的是在Flutter中创建一个自定义的应用栏。大多数人试图在AppBar中的title参数中提供自己的小部件,但让我向你展示如何正确地完成它。

@override
Widget build(BuildContext context) => Scaffold(
    appBar: _appBar(),
    body: _body(),
);

//Custom AppBar
_appBar() => PreferredSize(

    //kToolBarHeight: Default size used by all AppBar widgets in Flutter.
    //MediaQuery...: viewPadding.top is StatusBar area. viewPadding.bottom is iPhone bottom bar.
    
    preferredSize: PreferredSize.fromHeight(kToolBarHeight + MediaQuery.of(context).viewPadding.top),
    child: Container(
        child: Row(
          //This will spread Row content evenly across the screen.
          mainAxisAlignment: MainAxisAlignment.spaceBetween,
          children: [
            //Leading Widget
            Icon(Icons.home),

            //Title
            Text("Hello World!"),

            //Trailing Widget / Actions
            Icon(Icons.home),
         ],
      ),
    ),
);

Widget _body() => Container(
    color: Colors.blue,
);

2

您可以为高度或宽度设置边距。

AppBar(
    leading: Container(
      margin: EdgeInsets.symmetric(vertical: 15),
      child: IconButton(
        icon: Icon(CupertinoIcons.chevron_left),
        onPressed: () {},
      ),
    ),

2

如果要使用自定义的 appBar leading 按钮,这是代码。

 appBar: AppBar(
    title: Text('hello'),
    // automaticallyImplyLeading: false,
    elevation: 0,
    leadingWidth: 58,

    actions: [
      ProfileBar(),
    ],
    leading: Container(
      width: 14,
      //color: Colors.yellow,
      child: Row( // <--- Using row to avoid force resizing of leading 
        children: [
          Padding( // <--- Padding to make it look more nicer
            padding: const EdgeInsets.only(left: 24.0),
            child: GestureDetector(
              onTap: () {
                Navigator.of(context).pop();
              },
              child: SvgPicture.asset( // <-- Using SvgPicture package
                'assets/svg/icons/backbtn.svg',
                width: 24,
                height: 24,
              ),
            ),
          ),
        ],
      ),
    ),
  ),

网页内容由stack overflow 提供, 点击上面的
可以查看英文原文,
原文链接