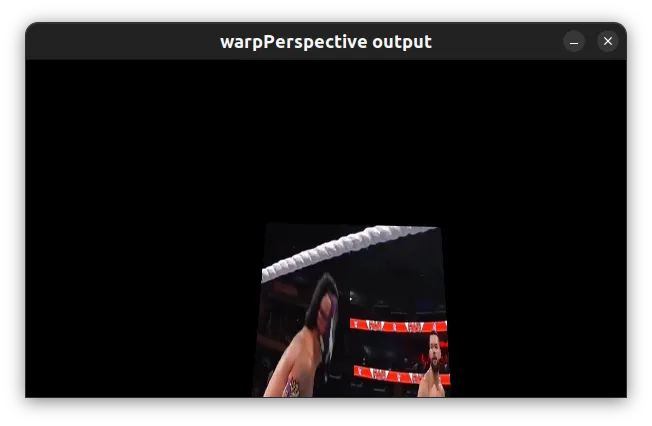
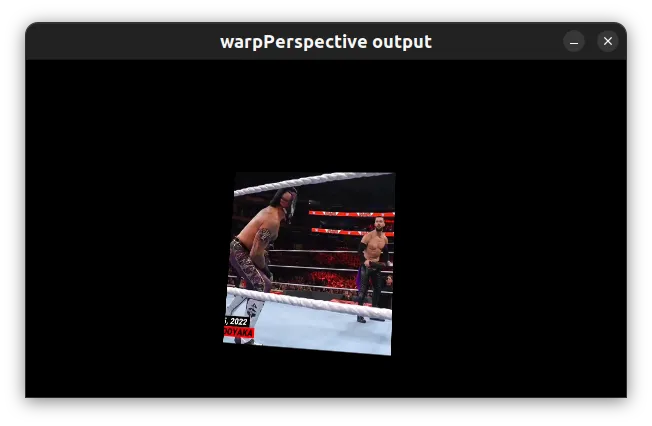
由于某种原因,每当我使用OpenCV的warpPerspective()函数时,最终变形图像并不包含原始图像中的所有内容。图像左侧似乎被剪裁了。我认为这是发生的原因是因为warpPerspective()在画布的最左边位置创建了变形图像。有没有什么办法可以解决这个问题?谢谢。
11个回答
46
问题出现的原因是单应性映射将图像的一部分映射到了负的x、y值,这些值超出了图像区域,因此无法绘制。我们希望做的是将整个变形后的图像向正坐标偏移一定数量的像素,以便使其位于图像区域内。
单应性矩阵可以使用矩阵乘法组合(这就是它们如此强大的原因)。如果A和B是单应性矩阵,则AB表示先应用B,然后再应用A的单应性矩阵。
因此,我们只需要为某个偏移创建一个平移的单应性矩阵,然后将其与我们原始的单应性矩阵进行预乘即可实现输出偏移。
2D单应性矩阵的格式如下:
单应性矩阵可以使用矩阵乘法组合(这就是它们如此强大的原因)。如果A和B是单应性矩阵,则AB表示先应用B,然后再应用A的单应性矩阵。
因此,我们只需要为某个偏移创建一个平移的单应性矩阵,然后将其与我们原始的单应性矩阵进行预乘即可实现输出偏移。
2D单应性矩阵的格式如下:
[R11,R12,T1]
[R21,R22,T2]
[ P , P , 1]
其中,R代表旋转矩阵,T代表平移,P代表透视变换。因此,纯平移单应矩阵如下:
[ 1 , 0 , x_offset]
[ 0 , 1 , y_offset]
[ 0 , 0 ,    1    ]
所以,只需将您的单应性矩阵与类似上述的矩阵进行预乘,您的输出图像就会发生偏移。
(请确保使用矩阵乘法,而不是逐元素相乘!)
- Matt Freeman
2
2似乎 x_offset 和 y_offset 应该乘以 -1。虽然我不确定为什么。我尝试过正数,但它会将图像移动到相反的方向。 - Steve
1这是因为x_offset和y_offset是负值。为了将其移动到相反的方向,我们需要对它们取反。 - I Like
6
马特的回答是一个很好的开端,他正确地指出你需要将你的单应矩阵乘以
[ 1 , 0 , x_offset]
[ 0 , 1 , y_offset]
[ 0 , 0 ,    1    ]
但是他没有具体说明x_offset和y_offset是什么。其他答案说只需进行透视变换,但这是不正确的。您需要进行逆透视变换。
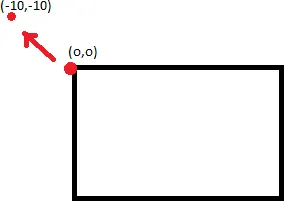
仅仅因为一个点(0,0)被转换为(-10,-10),并不能保证将图像移位10,10就会得到非裁剪的图像。这是因为点(10,10)不一定映射到(0,0)。
要做的是找出哪个点将映射为(0,0),并将图像移动相应的量。为此,您需要取逆矩阵(cv2.invert) ,并应用perspectiveTransform。
 不意味着:
不意味着:
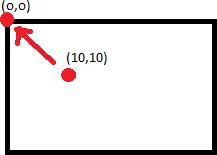
您需要应用反向变换才能找到正确的点。
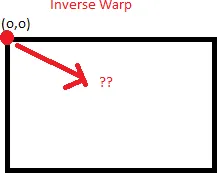
这将获得正确的x_offset和y_offset来对齐您的左上角点。从那里开始,为了找到正确的边界框并完美地适应整个图像,您需要找出扭曲(图像在正常的非反向变换后向左或向上倾斜的程度)并将该量添加到您的x_offset和y_offset中。
编辑:这只是理论。在我的测试中,图片稍微偏移了几个像素,我不知道为什么。
- john ktejik
1
4有一段代码,我认为如果加上它,你想要表达的意思会更加清晰。 - Anubhav Rohatgi
4
我已经完成了一种方法……它是有效的。
  perspectiveTransform(obj_corners,scene_corners,H);
int maxCols(0),maxRows(0);

 for(int i=0;i<scene_corners.size();i++)
{
   if(maxRows < scene_corners.at(i).y)
        maxRows = scene_corners.at(i).y;
   if(maxCols < scene_corners.at(i).x)
        maxCols = scene_corners.at(i).x;
}
我只是找到了x坐标和y坐标的最大值,并将它们放在了...
warpPerspective( tmp, transformedImage, homography, Size( maxCols, maxRows ) );
- Vinoj John Hosan
4
秘密分为两个部分:变换矩阵(单应性)和最终图像大小。
使用getPerspectiveTransform()计算正确的变换。从原始图像中取4个点,计算它们在目标图像中的正确位置,按相同顺序将它们放入两个向量中,并使用它们计算透视变换矩阵。
确保目标图像大小(warpPerspective()的第三个参数)正是您想要的。将其定义为Size(myWidth, myHeight)。
- Sam
3
尝试下面的homography_warp。
void homography_warp(const cv::Mat& src, const cv::Mat& H, cv::Mat& dst);
src 是源图像。
H 是您的单应性矩阵。
dst 是变换后的图像。
homography_warp 调整您的单应性矩阵,如 https://stackoverflow.com/users/1060066/matt-freeman 在他的答案 https://dev59.com/BW025IYBdhLWcg3wT0Lq#8229116 中所描述的那样。
// Convert a vector of non-homogeneous 2D points to a vector of homogenehous 2D points.
void to_homogeneous(const std::vector< cv::Point2f >& non_homogeneous, std::vector< cv::Point3f >& homogeneous)
{
    homogeneous.resize(non_homogeneous.size());
    for (size_t i = 0; i < non_homogeneous.size(); i++) {
        homogeneous[i].x = non_homogeneous[i].x;
        homogeneous[i].y = non_homogeneous[i].y;
        homogeneous[i].z = 1.0;
    }
}

// Convert a vector of homogeneous 2D points to a vector of non-homogenehous 2D points.
void from_homogeneous(const std::vector< cv::Point3f >& homogeneous, std::vector< cv::Point2f >& non_homogeneous)
{
    non_homogeneous.resize(homogeneous.size());
    for (size_t i = 0; i < non_homogeneous.size(); i++) {
        non_homogeneous[i].x = homogeneous[i].x / homogeneous[i].z;
        non_homogeneous[i].y = homogeneous[i].y / homogeneous[i].z;
    }
}

// Transform a vector of 2D non-homogeneous points via an homography.
std::vector<cv::Point2f> transform_via_homography(const std::vector<cv::Point2f>& points, const cv::Matx33f& homography)
{
    std::vector<cv::Point3f> ph;
    to_homogeneous(points, ph);
    for (size_t i = 0; i < ph.size(); i++) {
        ph[i] = homography*ph[i];
    }
    std::vector<cv::Point2f> r;
    from_homogeneous(ph, r);
    return r;
}

// Find the bounding box of a vector of 2D non-homogeneous points.
cv::Rect_<float> bounding_box(const std::vector<cv::Point2f>& p)
{
    cv::Rect_<float> r;
    float x_min = std::min_element(p.begin(), p.end(), [](const cv::Point2f& lhs, const cv::Point2f& rhs) {return lhs.x < rhs.x; })->x;
    float x_max = std::max_element(p.begin(), p.end(), [](const cv::Point2f& lhs, const cv::Point2f& rhs) {return lhs.x < rhs.x; })->x;
    float y_min = std::min_element(p.begin(), p.end(), [](const cv::Point2f& lhs, const cv::Point2f& rhs) {return lhs.y < rhs.y; })->y;
    float y_max = std::max_element(p.begin(), p.end(), [](const cv::Point2f& lhs, const cv::Point2f& rhs) {return lhs.y < rhs.y; })->y;
    return cv::Rect_<float>(x_min, y_min, x_max - x_min, y_max - y_min);
}

// Warp the image src into the image dst through the homography H.
// The resulting dst image contains the entire warped image, this
// behaviour is the same of Octave's imperspectivewarp (in the 'image'
// package) behaviour when the argument bbox is equal to 'loose'.
// See http://octave.sourceforge.net/image/function/imperspectivewarp.html
void homography_warp(const cv::Mat& src, const cv::Mat& H, cv::Mat& dst)
{
    std::vector< cv::Point2f > corners;
    corners.push_back(cv::Point2f(0, 0));
    corners.push_back(cv::Point2f(src.cols, 0));
    corners.push_back(cv::Point2f(0, src.rows));
    corners.push_back(cv::Point2f(src.cols, src.rows));

    std::vector< cv::Point2f > projected = transform_via_homography(corners, H);
    cv::Rect_<float> bb = bounding_box(projected);

    cv::Mat_<double> translation = (cv::Mat_<double>(3, 3) << 1, 0, -bb.tl().x, 0, 1, -bb.tl().y, 0, 0, 1);

    cv::warpPerspective(src, dst, translation*H, bb.size());
}
- Alessandro Jacopson
4
你为什么要翻译-bb.tl().x和-bb.tl().y?为什么要使用“-”符号? - Steve
我没有尝试过。我只是想看看你做了什么。 - Steve
为什么不使用内置的OpenCV函数perspectiveTransform呢? - john k
@johnktejik 请查看 https://dev59.com/NpHea4cB1Zd3GeqPtsak#34117197 - Alessandro Jacopson
1
warpPerspective()的运行良好。 没有必要重新编写它。 您可能使用不正确。
请记住以下提示:
- (0,0)像素不在中心,而是左上角。 因此,如果将图像放大2倍,则会丢失下部和右侧部分,而不是边框(例如在matlab中)。
- 如果您两次变形图像,则最好将转换相乘并激活函数一次。
- 我认为它仅适用于char / int矩阵,而不适用于float / double。
- 当您进行变换时,首先应用缩放/倾斜/旋转/透视,最后是平移。 因此,如果图像的某些部分丢失了,请更改矩阵中最后一列的两个上方行中的平移。
- DanielHsH
2
Mat tmp; cv::resize( imageList[image1], tmp, Size(), scaleFactor, scaleFactor ); warpPerspective( tmp, transformedImage, homography, Size( 2*tmp.cols, 2*tmp.rows ) ); - Hien我不知道如何在注释中进行格式设置 >.< 无论如何,这是我的当前代码片段,它使用了warpPerspective。由于我正在使用高分辨率图像,所以单应性是从2个调整大小的图像中获取的。你能告诉我我做错了什么吗?谢谢。 - Hien
1
一种修复图像扭曲问题的简单方法是将扭曲后的图像平移到正确位置。主要挑战在于找到正确的平移偏移量。
翻译的概念已经在其他回答中讨论过了,因此我将解释如何获取正确的偏移量。想法是,在两个图像中匹配的特征应在最终拼接图像中具有相同的坐标。
假设我们将图像称为以下内容:
- '源图像'(si):需要进行扭曲的图像 - '目标图像'(di):将“源图像”扭曲为其透视图的图像 - '扭曲后的源图像'(wsi):将源图像扭曲为目标图像透视图后的图像
以下是计算平移偏移量所需执行的操作:
翻译的概念已经在其他回答中讨论过了,因此我将解释如何获取正确的偏移量。想法是,在两个图像中匹配的特征应在最终拼接图像中具有相同的坐标。
假设我们将图像称为以下内容:
- '源图像'(si):需要进行扭曲的图像 - '目标图像'(di):将“源图像”扭曲为其透视图的图像 - '扭曲后的源图像'(wsi):将源图像扭曲为目标图像透视图后的图像
以下是计算平移偏移量所需执行的操作:
- 在从单应性中采样出好的匹配并找到掩膜后,将最佳匹配的关键点(具有最小距离且为内点(应在从单应性计算得到的掩膜中获得值1))存储在
si和di中。假设最佳匹配的关键点在si和di中分别是bm_si和bm_di。 - 通过简单地将其与单应性矩阵(
H)相乘来查找bm_si在wsi中的位置。bm_wsi = np.dot(H,bm_si)bm_wsi = [x/bm_wsi[2] for x in bm_wsi] - 根据您要在
si变形(=wsi)的输出上放置di的位置,调整bm_di。例如,如果您想将左图像扭曲到右图像(使左图像为
si,右图像为di),则将在右侧wsi上放置di,因此bm_di[0] += si.shape[0] - 现在,在完成以上步骤之后
x_offset = bm_di[0] - bm_si[0]y_offset = bm_di[1] - bm_si[1] - 使用计算出的偏移量找到新的单应性矩阵并对
si进行变形。T = np.array([[1, 0, x_offset], [0, 1, y_offset], [0, 0, 1]])translated_H = np.dot(T.H)wsi_frame_size = tuple(2*x for x in si.shape)stitched = cv2.warpPerspective(si, translated_H, wsi_frame_size)stitched[0:si.shape[0],si.shape[1]:] = di
bm_si = [x1, y1,1]
bm_di = [x2, y2, 1]
- Vijendra1125
0
这是我的解决方案
由于"warpPerspective()"函数中的第三个参数是一个变换矩阵,
我们可以创建一个变换矩阵,先将图像向后移动,然后旋转图像,最后将图像向前移动。
在我的情况下,我有一张高度为160像素、宽度为160像素的图片。 我想要围绕[80,80]旋转图像,而不是围绕[0,0]旋转。
首先,向后移动图像(即T1)
然后旋转图像(即R)
最后向前移动图像(即T2)
void rotateImage(Mat &src_img,int degree)
{
float radian=(degree/180.0)*M_PI;
Mat R(3,3,CV_32FC1,Scalar(0));
R.at<float>(0,0)=cos(radian);R.at<float>(0,1)=-sin(radian);
R.at<float>(1,0)=sin(radian);R.at<float>(1,1)=cos(radian);
R.at<float>(2,2)=1;
Mat T1(3,3,CV_32FC1,Scalar(0));
T1.at<float>(0,2)=-80;
T1.at<float>(1,2)=-80;
T1.at<float>(0,0)=1;
T1.at<float>(1,1)=1;
T1.at<float>(2,2)=1;
Mat T2(3,3,CV_32FC1,Scalar(0));
T2.at<float>(0,2)=80;
T2.at<float>(1,2)=80;
T2.at<float>(0,0)=1;
T2.at<float>(1,1)=1;
T2.at<float>(2,2)=1;

std::cerr<<T1<<std::endl;
std::cerr<<R<<std::endl;
std::cerr<<T2<<std::endl;
std::cerr<<T2*R*T1<<"\n"<<std::endl;

cv::warpPerspective(src_img, src_img, T2*R*T1, src_img.size(), cv::INTER_LINEAR);
}
- user3094631
0
这可能是一个已经结束的讨论,但我遇到了类似的问题。我试图通过重叠两个框架来进行增强现实。我的相机实时视频(帧1)比我要投影的图像小。因此,我减小了目标图像的尺寸,使其与实时视频相等。之后,cv::warpPerspective给出了正确的输出。扭曲的图像在实时视频框架内。
窗口大小:600*337
原始图像大小:720*900
将图像调整大小(这是cv::warpPerspective的输入)为:600*377,它应该可以工作
扭曲的图像太大而无法适应框架(不调整大小)
调整大小后的正确扭曲图像
- dev vaibhav
0
图像的坐标起点和旋转中心是图像的左上角(在二维笛卡尔坐标系中的第四象限)。将图像顺时针旋转(将图像移动到第三象限)后,向右平移(x轴正向平移,平移距离为原始图像的高度)将使图像回到“框架”中。
然后:
height = 220
scaleX, shearX   = 0.0, -1.0
shearY, scaleY   = 1.0, 0.0
transX, transY   = height, 0
shearXZ, shearYZ = 0.0, 0.0

warpMatrix = np.array([[scaleX, shearX, transX],
                      [shearY, scaleY, transY],
                      [shearXZ, shearYZ, 1]])
print(warpMatrix)
输出:
[[  0.  -1. 220.]
 [  1.   0.   0.]
 [  0.   0.   1.]]
然后:
rotatedImg = cv2.warpPerspective(src         = img,
                                 M           = warpMatrix,
                                 dsize       = (height, width),
                                 flags       = cv2.INTER_LINEAR,
                                 borderMode  = cv2.BORDER_CONSTANT,
                                 borderValue = 0)
- Hadar Pinhas
网页内容由stack overflow 提供, 点击上面的可以查看英文原文,
原文链接
原文链接
- 相关问题
- 4 实现OpenCV中的warpPerspective()方法
- 3 OpenCV:理解warpPerspective / 透视变换
- 4 OpenCv warpPerspective的homography元素含义
- 7 Python OpenCV warpPerspective 的背景设置
- 8 OpenCV warpPerspective - 如何确定目标图像的大小?
- 5 无法在Android上使用OpenCV的warpPerspective函数
- 15 OpenCV warpPerspective参数数量
- 5 OpenCV warpPerspective()中的离群像素
- 7 Android OpenCV中的getPerspectiveTransform和warpPerspective
- 10 理解opencv的warpperspective和warpaffine的最佳方法是什么?