我有一个简单的列表视图,其中包含两行。
每一行都包含两个文本视图。第一个视图和第二个视图。
我想要将每行中的最后一个标签(View two)对齐,使名称标签保持对齐,并且无论字体大小如何都能保持对齐。
第一个标签(View one)也需要被对齐。
我尝试在第一个标签(View one)上设置最小框架宽度,但是不起作用。似乎还不可能在 View One 中设置最小宽度并使文本视图对齐。
有什么想法吗?在 UIKit 中这相当直接。
我找到了一种支持动态类型且不会造成破坏的方法来解决这个问题。答案就是使用PreferenceKeys和GeometryReader!
这个解决方案的本质是每个数字Text都有一个它将以其文本大小绘制的宽度。GeometryReader可以检测到这个宽度,然后我们可以使用PreferenceKey将其传递给List本身,可跟踪最大宽度,然后将其分配给每个数字Text的帧宽度。
PreferenceKey是您创建的类型,具有关联类型(可以是任何符合Equatable的结构体,这是您存储有关首选项的数据的地方),并附加到任何View上。当它被附加时,它会通过视图树向上冒泡,并可以在祖先视图中使用.onPreferenceChange(PreferenceKeyType.self)进行监听。
首先,我们将创建我们的PreferenceKey类型及其包含的数据:
struct WidthPreferenceKey: PreferenceKey {
    typealias Value = [WidthPreference]

    static var defaultValue: [WidthPreference] = []

    static func reduce(value: inout [WidthPreference], nextValue: () -> [WidthPreference]) {
        value.append(contentsOf: nextValue())
    }
}

struct WidthPreference: Equatable {
    let width: CGFloat
}
接下来,我们将创建一个名为WidthPreferenceSettingView的视图,并将其附加到我们想要调整大小的任何背景上(在本例中是数字标签)。这将负责设置偏好项,它将通过PreferenceKeys传递此数字标签的首选宽度。
struct WidthPreferenceSettingView: View {
    var body: some View {
        GeometryReader { geometry in
            Rectangle()
                .fill(Color.clear)
                .preference(
                    key: WidthPreferenceKey.self,
                    value: [WidthPreference(width: geometry.frame(in: CoordinateSpace.global).width)]
                )
        }
    }
}
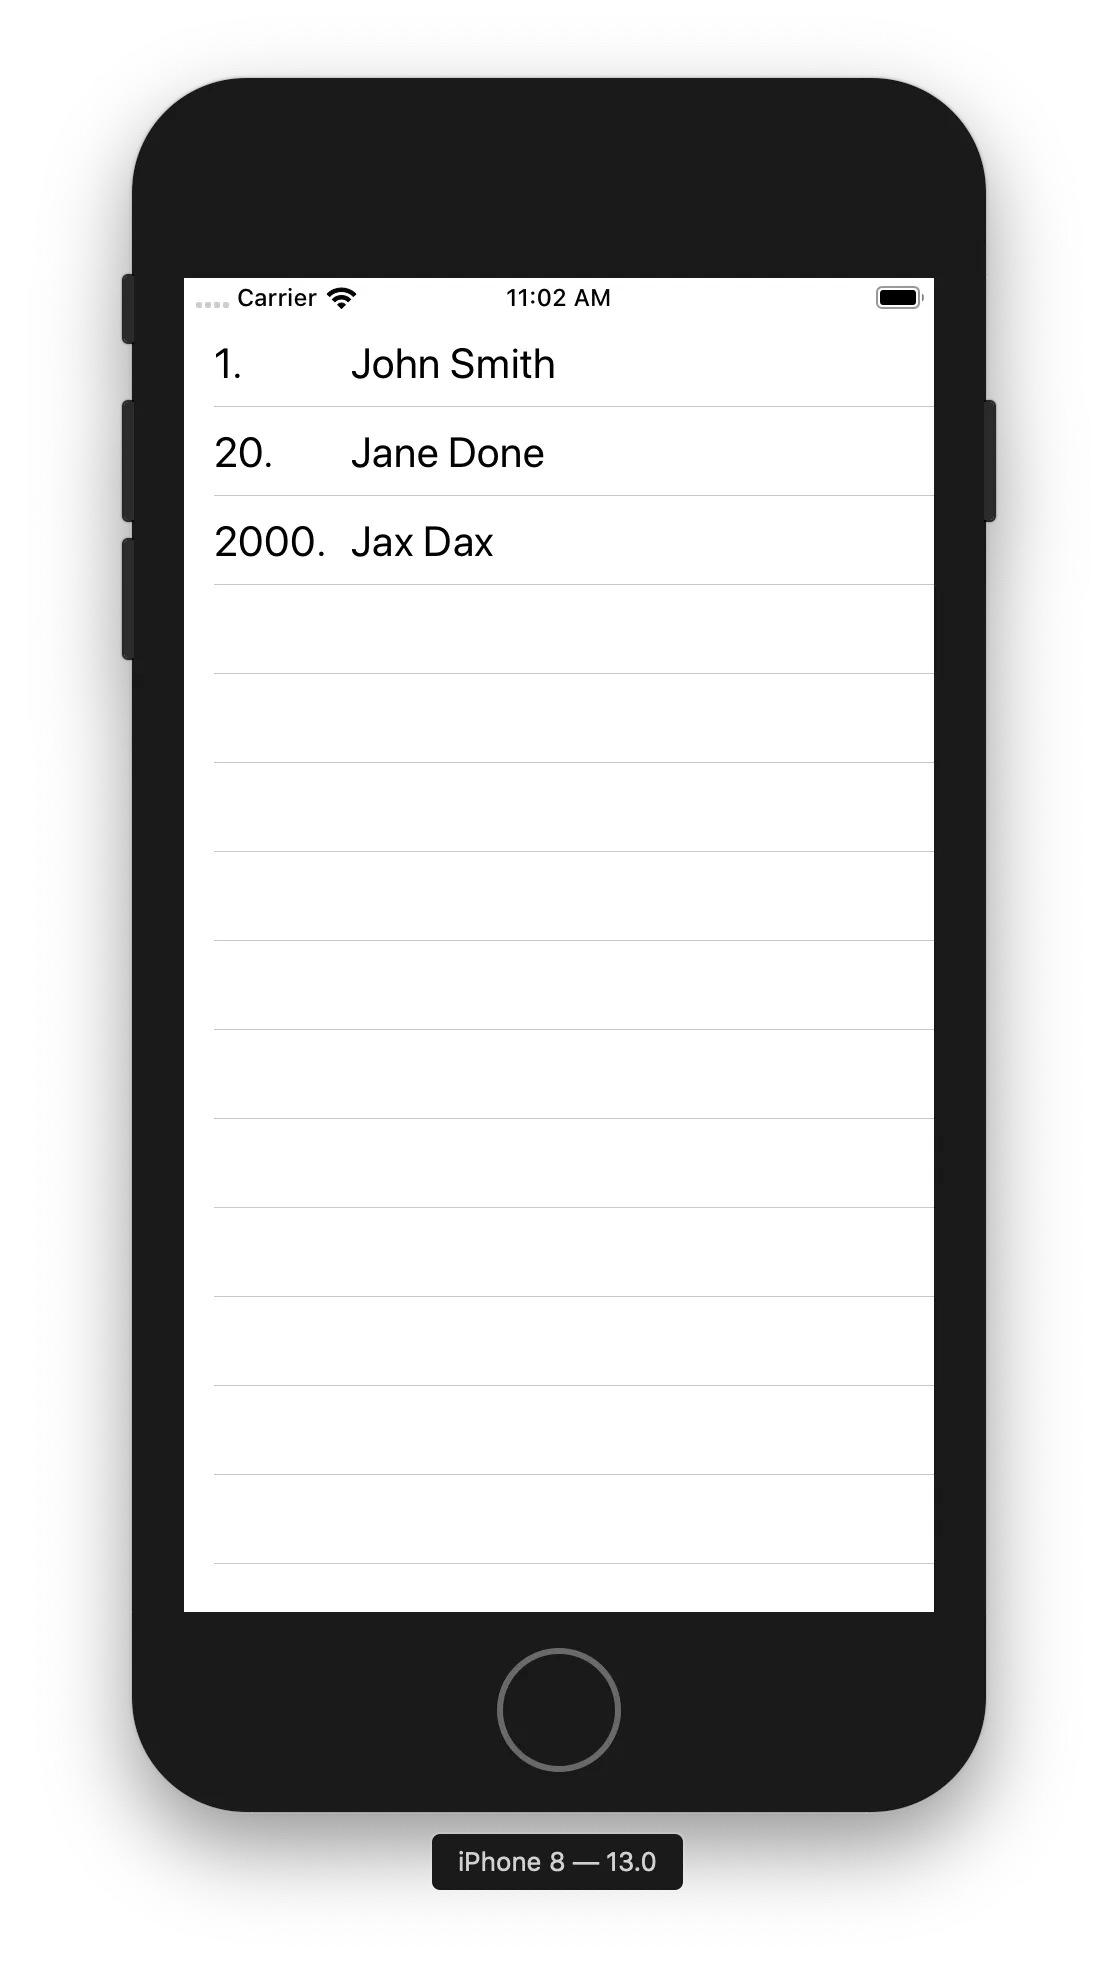
最后是列表本身! 我们有一个@State变量,它是数字“列”的宽度(不是真正意义上的列,因为这些数字在代码中并不直接影响其他数字)。 通过 .onPreferenceChange(WidthPreference.self),我们监听我们创建的首选项的更改,并将最大宽度存储在我们的宽度状态中。 在所有数字标签都被绘制并且它们的宽度由GeometryReader读取之后,宽度会传播回并且最大宽度由.frame(width: width)分配。
struct ContentView: View {
    @State private var width: CGFloat? = nil

    var body: some View {
        List {
            HStack {
                Text("1. ")
                    .frame(width: width, alignment: .leading)
                    .lineLimit(1)
                    .background(WidthPreferenceSettingView())
                Text("John Smith")
            }
            HStack {
                Text("20. ")
                    .frame(width: width, alignment: .leading)
                    .lineLimit(1)
                    .background(WidthPreferenceSettingView())
                Text("Jane Done")
            }
            HStack {
                Text("2000. ")
                    .frame(width: width, alignment: .leading)
                    .lineLimit(1)
                    .background(WidthPreferenceSettingView())
                Text("Jax Dax")
            }
        }.onPreferenceChange(WidthPreferenceKey.self) { preferences in
            for p in preferences {
                let oldWidth = self.width ?? CGFloat.zero
                if p.width > oldWidth {
                    self.width = p.width
                }
            }
        }
    }
}
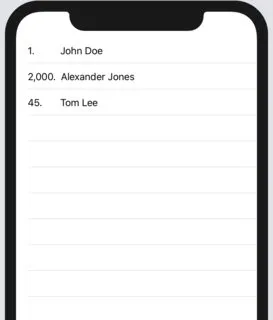
.onPreferenceChange 会对比键值以获取列的最大宽度。要显示结果,这就是打开更大文本时的样子,非常好用 :)。
关于PreferenceKey和检查视图树的文章帮助很大:https://swiftui-lab.com/communicating-with-the-view-tree-part-1/
iOS16起,你可以做到:
struct ContentView: View {
    var rowData: [RowData] = RowData.sample
    var body: some View {
        Grid(alignment: .leading) {
            Text("Some sort of title")
            ForEach(RowData.sample) { row in
                GridRow {
                    Text(row.id)
                    Text(row.name)
                }
            }
        }
        .padding()
    }
}

struct RowData: Identifiable {
    var id: String
    var name: String
    static var sample: [Self] = [.init(id: "1", name: "Joe"), .init(id: "1000", name: "Diana")]
}
之前的回答
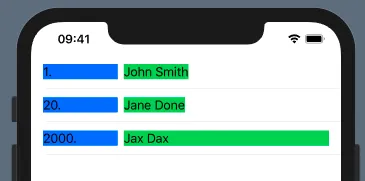
以下是静态执行它的三个选项。
struct ContentView: View {
    @State private var width: CGFloat? = 100

    var body: some View {
        List {
            HStack {
                Text("1. ")
                    .frame(width: width, alignment: .leading)
                    .lineLimit(1)
                    .background(Color.blue)
                // Option 1
                Text("John Smith")
                    .multilineTextAlignment(.leading)
                    //.frame(minWidth: 0, maxWidth: .infinity, alignment: .leading)
                    .background(Color.green)
            }
            HStack {
                Text("20. ")
                    .frame(width: width, alignment: .leading)
                    .lineLimit(1)
                    .background(Color.blue)
                // Option 2 (works mostly like option 1)
                Text("Jane Done")
                    .background(Color.green)
                Spacer()
            }
            HStack {
                Text("2000. ")
                    .frame(width: width, alignment: .leading)
                    .lineLimit(1)
                    .background(Color.blue)
                // Option 3 - takes all the rest space to the right
                Text("Jax Dax")
                    .frame(minWidth: 0, maxWidth: .infinity, alignment: .leading)
                    .background(Color.green)
            }
        }
    }
}
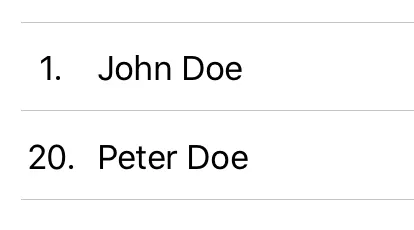
这是它的外观:
根据这个答案的建议,我们可以基于最长的条目计算宽度。
有几个选项可以动态计算宽度。
选项1
import SwiftUI
import Combine

struct WidthGetter: View {
    let widthChanged: PassthroughSubject<CGFloat, Never>
    var body: some View {
        GeometryReader { (g) -> Path in
            print("width: \(g.size.width), height: \(g.size.height)")
            self.widthChanged.send(g.frame(in: .global).width)
            return Path() // could be some other dummy view
        }
    }
}

struct ContentView: View {
    let event = PassthroughSubject<CGFloat, Never>()

    @State private var width: CGFloat?

    var body: some View {
        List {
            HStack {
                Text("1. ")
                    .frame(width: width, alignment: .leading)
                    .lineLimit(1)
                    .background(Color.blue)
                    .background(WidthGetter(widthChanged: event))

                // Option 1
                Text("John Smith")
                    .multilineTextAlignment(.leading)
                    //.frame(minWidth: 0, maxWidth: .infinity, alignment: .leading)
                    .background(Color.green)
            }
            HStack {
                Text("20. ")
                    .frame(width: width, alignment: .leading)
                    .lineLimit(1)
                    .background(Color.blue)
                    .background(WidthGetter(widthChanged: event))
                // Option 2 (works mostly like option 1)
                Text("Jane Done")
                    .background(Color.green)
                Spacer()
            }
            HStack {
                Text("2000. ")
                    .frame(width: width, alignment: .leading)
                    .lineLimit(1)
                    .background(Color.blue)
                    .background(WidthGetter(widthChanged: event))
                // Option 3 - takes all the rest space to the right
                Text("Jax Dax")
                    .frame(minWidth: 0, maxWidth: .infinity, alignment: .leading)
                    .background(Color.green)
            }
        }.onReceive(event) { (w) in
            print("event ", w)
            if w > (self.width ?? .zero) {
                self.width = w
            }
        }
    }
}
选项2
import SwiftUI

struct ContentView: View {

    @State private var width: CGFloat?

    var body: some View {
        List {
            HStack {
                Text("1. ")
                    .frame(width: width, alignment: .leading)
                    .lineLimit(1)
                    .background(Color.blue)
                    .alignmentGuide(.leading, computeValue: { dimension in
                        self.width = max(self.width ?? 0, dimension.width)
                        return dimension[.leading]
                    })

                // Option 1
                Text("John Smith")
                    .multilineTextAlignment(.leading)
                    //.frame(minWidth: 0, maxWidth: .infinity, alignment: .leading)
                    .background(Color.green)
            }
            HStack {
                Text("20. ")
                    .frame(width: width, alignment: .leading)
                    .lineLimit(1)
                    .background(Color.blue)
                    .alignmentGuide(.leading, computeValue: { dimension in
                        self.width = max(self.width ?? 0, dimension.width)
                        return dimension[.leading]
                    })
                // Option 2 (works mostly like option 1)
                Text("Jane Done")
                    .background(Color.green)
                Spacer()
            }
            HStack {
                Text("2000. ")
                    .frame(width: width, alignment: .leading)
                    .lineLimit(1)
                    .background(Color.blue)
                    .alignmentGuide(.leading, computeValue: { dimension in
                        self.width = max(self.width ?? 0, dimension.width)
                        return dimension[.leading]
                    })
                // Option 3 - takes all the rest space to the right
                Text("Jax Dax")
                    .frame(minWidth: 0, maxWidth: .infinity, alignment: .leading)
                    .background(Color.green)
            }
        }
    }
}
结果如下所示:

.frame(minWidth: 100, idealWidth: 150, maxWidth: .infinity, alignment: .leading)对齐了超过3个项目... 这种方法非常有效... - Wahab Khan Jadon在Swift 5.2和iOS 13中,您可以使用PreferenceKey协议,preference(key:value:)方法和onPreferenceChange(_:perform:)方法来解决此问题。
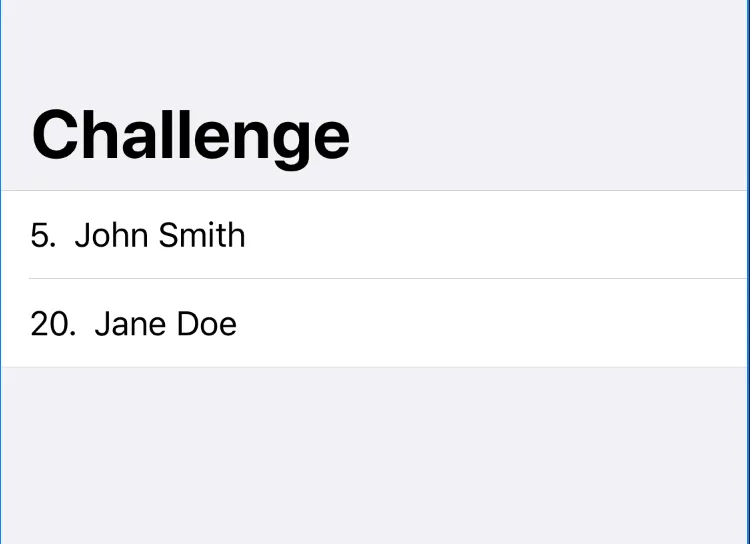
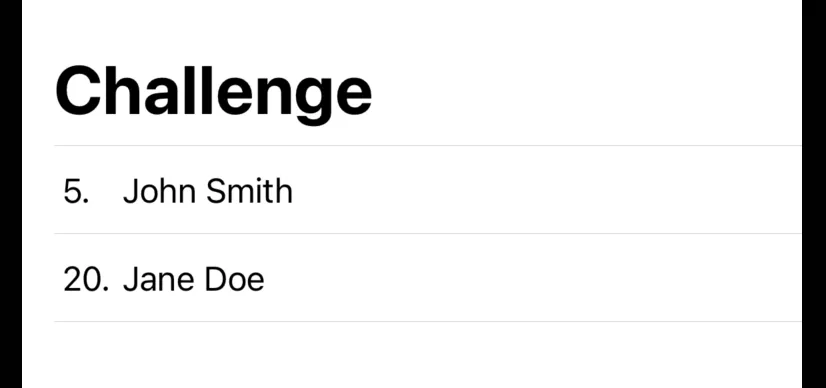
您可以按照以下3个主要步骤实现OP提出的View的代码,如下所示。
import SwiftUI

struct ContentView: View {

    var body: some View {
        NavigationView {
            List {
                HStack {
                    Text("5.")
                    Text("John Smith")
                }
                HStack {
                    Text("20.")
                    Text("Jane Doe")
                }
            }
            .listStyle(GroupedListStyle())
            .navigationBarTitle("Challenge")
        }
    }

}
这里的想法是收集代表排名的所有Text元素的宽度,并将其中最宽的一个分配给ContentView的width属性。
import SwiftUI

struct WidthPreferenceKey: PreferenceKey {

    static var defaultValue: [CGFloat] = []
    static func reduce(value: inout [CGFloat], nextValue: () -> [CGFloat]) {
        value.append(contentsOf: nextValue())
    }

}

struct ContentView: View {

    @State private var width: CGFloat? = nil

    var body: some View {
        NavigationView {
            List {
                HStack {
                    Text("5.")
                        .overlay(
                            GeometryReader { proxy in
                                Color.clear
                                    .preference(
                                        key: WidthPreferenceKey.self,
                                        value: [proxy.size.width]
                                    )
                            }
                        )
                        .frame(width: width, alignment: .leading)
                    Text("John Smith")
                }
                HStack {
                    Text("20.")
                        .overlay(
                            GeometryReader { proxy in
                                Color.clear
                                    .preference(
                                        key: WidthPreferenceKey.self,
                                        value: [proxy.size.width]
                                    )
                            }
                        )
                        .frame(width: width, alignment: .leading)
                    Text("Jane Doe")
                }
            }
            .onPreferenceChange(WidthPreferenceKey.self) { widths in
                if let width = widths.max() {
                    self.width = width
                }
            }
            .listStyle(GroupedListStyle())
            .navigationBarTitle("Challenge")
        }
    }

}
为了使我们的代码可重用,我们可以将preference逻辑重构为一个ViewModifier。
import SwiftUI

struct WidthPreferenceKey: PreferenceKey {

    static var defaultValue: [CGFloat] = []
    static func reduce(value: inout [CGFloat], nextValue: () -> [CGFloat]) {
        value.append(contentsOf: nextValue())
    }

}

struct EqualWidth: ViewModifier {

    func body(content: Content) -> some View {
        content
            .overlay(
                GeometryReader { proxy in
                    Color.clear
                        .preference(
                            key: WidthPreferenceKey.self,
                            value: [proxy.size.width]
                        )
                }
            )
    }

}

extension View {
    func equalWidth() -> some View {
        modifier(EqualWidth())
    }
}

struct ContentView: View {

    @State private var width: CGFloat? = nil

    var body: some View {
        NavigationView {
            List {
                HStack {
                    Text("5.")
                        .equalWidth()
                        .frame(width: width, alignment: .leading)
                    Text("John Smith")
                }
                HStack {
                    Text("20.")
                        .equalWidth()
                        .frame(width: width, alignment: .leading)
                    Text("Jane Doe")
                }
            }
            .onPreferenceChange(WidthPreferenceKey.self) { widths in
                if let width = widths.max() {
                    self.width = width
                }
            }
            .listStyle(GroupedListStyle())
            .navigationBarTitle("Challenge")
        }
    }

}
结果看起来像这样:
我刚刚不得不处理这个问题。那些依赖于固定宽度的frame的解决方案无法适用于动态类型,因此我无法使用它们。我解决的方式是将可伸缩项(在这种情况下为左侧数字)放在一个ZStack中,并使用包含最宽允许内容的占位符,然后将占位符的不透明度设置为 0:
ZStack {
    Text("9999")
        .opacity(0)
        .accessibility(visibility: .hidden)
    Text(id)
}
虽然有些巧妙,但至少它支持动态类型 ♂️
完整示例如下!
import SwiftUI
struct Person: Identifiable {
var name: String
var id: Int
}
struct IDBadge : View {
var id: Int
var body: some View {
ZStack(alignment: .trailing) {
Text("9999.") // The maximum width dummy value
.font(.headline)
.opacity(0)
.accessibility(visibility: .hidden)
Text(String(id) + ".")
.font(.headline)
}
}
}
struct ContentView : View {
var people: [Person]
var body: some View {
List(people) { person in
HStack(alignment: .top) {
IDBadge(id: person.id)
Text(person.name)
.lineLimit(nil)
}
}
}
}
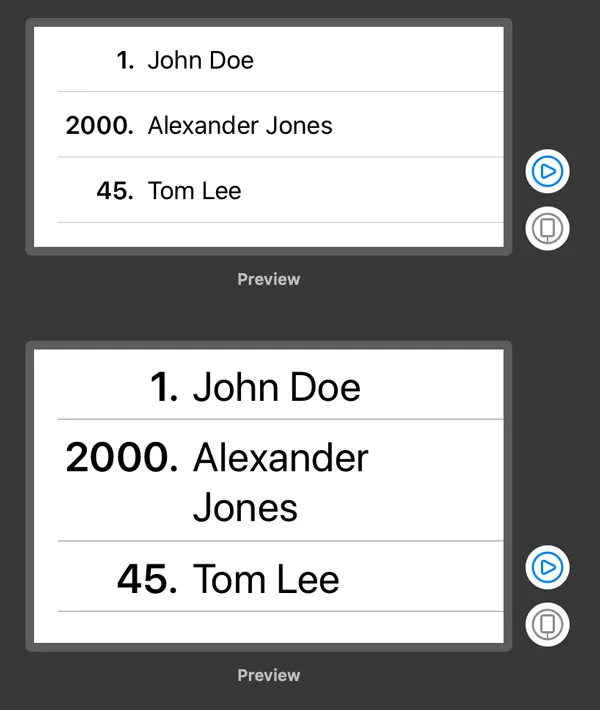
#if DEBUG
struct ContentView_Previews : PreviewProvider {
static let people = [Person(name: "John Doe", id: 1), Person(name: "Alexander Jones", id: 2000), Person(name: "Tom Lee", id: 45)]
static var previews: some View {
Group {
ContentView(people: people)
.previewLayout(.fixed(width: 320.0, height: 150.0))
ContentView(people: people)
.environment(\.sizeCategory, .accessibilityMedium)
.previewLayout(.fixed(width: 320.0, height: 200.0))
}
}
}
#endif
Text元素时,我会在.trailing上得到一个错误;但是如果我只有一个Text元素,我就不会。错误是“静态成员'trailing'不能用于类型实例'Alignment'”。这是因为Text元素的数量引起的吗?你有什么想法吗? - tng.accessibility(hidden: true)。 - tngHStack中放置两个Text和一个Spacer。 Spacer将把您的Text向左推,如果任一Text由于其内容长度而改变大小,则所有内容都会自动调整:HStack {
Text("1.")
Text("John Doe")
Spacer()
}
.padding()

这些Text技术上是居中对齐的,但由于视图自动调整大小并且只占据文本内部的空间(因为我们没有明确设置框架大小),并且被Spacer向左推,它们看起来是左对齐的。与设置固定宽度相比,这样做的好处是您不必担心文本被截断。
此外,我添加了HStack的填充以使其看起来更漂亮,但如果您想调整Text之间的距离,可以手动设置任何一侧的填充。(您甚至可以设置负填充以将项目推得比其自然间距更近)。
编辑
没意识到OP也需要第二个Text垂直对齐。我有一种方法可以做到,但它很“hacky”,在没有更多工作的情况下无法适用于更大的字体大小:
这些是数据对象:
class Person {
    var name: String
    var id: Int
    init(name: String, id: Int) {
        self.name = name
        self.id = id
    }
}

class People {
    var people: [Person]
    init(people: [Person]) {
        self.people = people
    }
    func maxIDDigits() -> Int {
        let maxPerson = people.max { (p1, p2) -> Bool in
            p1.id < p2.id
        }
        print(maxPerson!.id)
        let digits = log10(Float(maxPerson!.id)) + 1
        return Int(digits)
    }
    func minTextWidth(fontSize: Int) -> Length {
        print(maxIDDigits())
        print(maxIDDigits() * 30)
        return Length(maxIDDigits() * fontSize)
    }
}
View:var people = People(people: [Person(name: "John Doe", id: 1), Person(name: "Alexander Jones", id: 2000), Person(name: "Tom Lee", id: 45)])
var body: some View {
List {
ForEach(people.people.identified(by: \.id)) { person in
HStack {
Text("\(person.id).")
.frame(minWidth: self.people.minTextWidth(fontSize: 12), alignment: .leading)
Text("\(person.name)")
}
}
}
}
minTextWidth(fontSize:) 中。Text 之间没有相互交互,因此它们无法知道如何与彼此保持垂直对齐)。
编辑2
上面的代码生成了这个:
Text视图设置固定宽度。这将使此Text组件具有固定大小。
HStack {
        Text(item.number)
            .multilineTextAlignment(.leading)
            .frame(width: 30)
        Text(item.name)
}
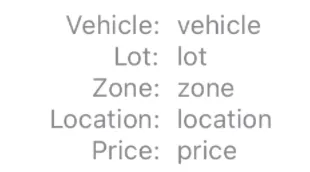
Group {
    HStack {
        VStack(alignment: .trailing) {
            Text("Vehicle:")
            Text("Lot:")
            Text("Zone:")
            Text("Location:")
            Text("Price:")
        }
        VStack(alignment: .leading) {
            Text("vehicle")
            Text("lot")
            Text("zone")
            Text("location")
            Text("price")
        }
    }
    .lineLimit(1)
    .font(.footnote)
    .foregroundColor(.secondary)
}
.frame(maxWidth: .infinity)
Xcode 12.5
如果您知道要将第二个视图偏移的量,则可以将两个视图放置在一个左对齐的ZStack中,并在第二个视图上使用.padding(.horizontal, amount)修饰符来进行偏移。
var body: some View {
    NavigationView {
        List {
            ForEach(persons) { person in
                ZStack(alignment: .leading) {
                    Text(person.number)
                    Text(person.name)
                        .padding(.horizontal, 30)
                }
            }
        }
        .navigationTitle("Challenge")
    }
}
HStack {
            HStack {
                Spacer()
                Text("5.")
            }
            .frame(width: 40)

            Text("Jon Smith")
        }
但这只适用于固定宽度。
.frame(minWidth: 40)由于Space()会填充整个视图。
.multilineTextAlignment(.leading)在我的测试中没有任何效果。
在尝试了整整一天后,我想出了这个解决方案:
import SwiftUI

fileprivate extension Color {
    func exec(block: @escaping ()->Void) -> Self {
        block()
        return self
    }
}

fileprivate class Deiniter {
    let block: ()->Void
    init(block: @escaping ()->Void) {
        self.block = block
    }
    deinit {
       block()
    }
}
struct SameWidthContainer<Content: View>: View {
    private var id: UUID
    private let deiniter: Deiniter
    @ObservedObject private var group: WidthGroup
    private var content: () -> Content

    init(group: WidthGroup, content: @escaping ()-> Content) {
        self.group = group
        self.content = content

        let id = UUID()
        self.id = id


        WidthGroup.widths[group.id]?[id] = 100.0
        self.deiniter = Deiniter() {
            WidthGroup.widths[group.id]?.removeValue(forKey: id)
        }
    }


    var body: some View {
        ZStack(alignment: .leading) {
            Rectangle()
                .frame(width: self.group.width, height: 1)
                .foregroundColor(.clear)

            content()
                .overlay(
                    GeometryReader { proxy in
                        Color.clear
                            .exec {
                                WidthGroup.widths[self.group.id]?[self.id] = proxy.size.width
                                let newWidth = WidthGroup.widths[group.id]?.values.max() ?? 0
                                if newWidth != self.group.width {
                                    self.group.width = newWidth
                                }
                            }
                    }
                )
        }
    }
}

class WidthGroup: ObservableObject {

    static var widths: [UUID: [UUID: CGFloat]] = [:]
    @Published var width: CGFloat = 0.0

    let id: UUID

    init() {
        let id = UUID()
        self.id = id

        WidthGroup.widths[id] = [:]
    }

    deinit {
        WidthGroup.widths.removeValue(forKey: id)
    }
}

struct SameWidthText_Previews: PreviewProvider {

    private static let GROUP = WidthGroup()

    static var previews: some View {
        Group {
            SameWidthContainer(group: Self.GROUP) {
                Text("One")
            }

            SameWidthContainer(group: Self.GROUP) {
                Text("Two")
            }
            SameWidthContainer(group: Self.GROUP)  {
                Text("Three")
            }
        }
    }
}
然后它被这样使用:
struct SomeView: View {

    @State private var group1 = WidthGroup()
    @State private var group2 = WidthGroup()

    var body: some View {
        VStack() {
            ForEach(9..<12) { index in
                HStack {
                    SameWidthContainer(group: group1) {
                        Text("All these will have same width in group 1 \(index)")
                    }

                    Text("Some other text")

                    SameWidthContainer(group: group2) {
                        Text("All these will have same width in group 2 \(index)")
                    }
                }
            }
        }
    }
}
onPreferenceChange的action闭包可以简化为self.width = preferences.map(\.width).max()。你的版本非常冗长;所有代码需要做的就是将self.width设置为首选项中最大的宽度。 - Peter SchornCenteringView这个名称?这个视图并没有居中任何东西。它测量的是位于其后面的视图的宽度。 - Peter Schorn