图像之间的互相关

4
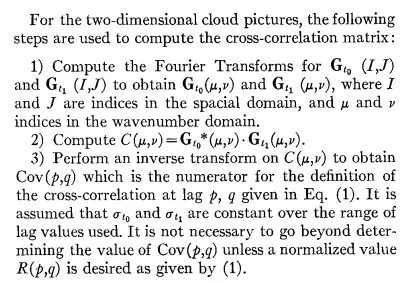
我希望使用快速傅里叶变换来计算交叉相关,以跟踪云运动,按照下图的步骤进行。

enter image description here

def roi_image(image):
    image = cv.imread(image, 0)
    roi = image[700:900, 1900:2100]
    return roi

def FouTransf(image):
    img_f32 = np.float32(image)
    d_ft = cv.dft(img_f32, flags = cv.DFT_COMPLEX_OUTPUT)
    d_ft_shift = np.fft.fftshift(d_ft)

    rows, cols = image.shape
    opt_rows = cv.getOptimalDFTSize(rows)
    opt_cols = cv.getOptimalDFTSize(cols)
    opt_img = np.zeros((opt_rows, opt_cols))
    opt_img[:rows, :cols] = image 
    crow, ccol = opt_rows / 2 , opt_cols / 2
    mask = np.zeros((opt_rows, opt_cols, 2), np.uint8)
    mask[int(crow-50):int(crow+50), int(ccol-50):int(ccol+50)] = 1

    f_mask = d_ft_shift*mask
    return f_mask


def inv_FouTransf(image):

    f_ishift = np.fft.ifftshift(image)
    img_back = cv.idft(f_ishift)
    img_back = cv.magnitude(img_back[:, :, 0], img_back[:, :, 1])

    return img_back

def rms(sigma):
    rms = np.std(sigma)
    return rms

# Step 1: Import images
a = roi_image(path_a)
b = roi_image(path_b)

# Step 2: Convert the image to frequency domain
G_t0 = FouTransf(a)
G_t0_conj = G_t0.conj()
G_t1 = FouTransf(b)

# Step 3: Compute C(m, v)
C = G_t0_conj * G_t1

# Step 4: Convert the image to space domain to obtain Cov (p, q)
c_w = inv_FouTransf(C)

# Step 5: Compute Cross correlation
R_pq = c_w / (rms(a) * rms(b)) 

我有点困惑,因为我从未使用过那种技术。该应用程序准确吗?
提示:公式(1)为:R(p,q)= Cov(p,q)/(sigma_t0 * sigma_t1)。如果需要更多信息,请参阅论文:“使用交叉相关法从地球同步卫星数据获取云运动的自动化技术”。
我找到了this这个资源,但我不知道它是否能做我想做的事情。
1
这是卷积定理的一个例子,而且是正确的。不确定OpenCV是否支持,但Scipy已经实现了:scipy.signal.correlate - bnaecker
2
我注意到你在Stackoverflow上提了几个问题,但是在所有的问题中都忘记了点击答案旁边的复选框来选择它作为官方问题解决者。这个机制存在的目的是为了帮助未来的访问者更快地找到他们的答案。请花时间回顾一下你的所有问题,并执行以下操作:点击帮助你解决特定问题的答案旁边的复选框。通过遵循该网站的工作方式,你不仅可以帮助保持网站的组织性,还可以增加其他人再次帮助你的机会。 - karlphillip
1个回答

9
如果您想要实现类似于cv2.matchTemplate()的功能,可以在这个代码库中找到一个实现了标准化交叉相关(Normalized Cross-Correlation,NCC)方法的Python实现。
########################################################################################
# Author: Ujash Joshi, University of Toronto, 2017                                     #
# Based on Octave implementation by: Benjamin Eltzner, 2014 <b.eltzner@gmx.de>         #
# Octave/Matlab normxcorr2 implementation in python 3.5                                #
# Details:                                                                             #
# Normalized cross-correlation. Similiar results upto 3 significant digits.            #
# https://github.com/Sabrewarrior/normxcorr2-python/master/norxcorr2.py                #
# http://lordsabre.blogspot.ca/2017/09/matlab-normxcorr2-implemented-in-python.html    #
########################################################################################

import numpy as np
from scipy.signal import fftconvolve


def normxcorr2(template, image, mode="full"):
    """
    Input arrays should be floating point numbers.
    :param template: N-D array, of template or filter you are using for cross-correlation.
    Must be less or equal dimensions to image.
    Length of each dimension must be less than length of image.
    :param image: N-D array
    :param mode: Options, "full", "valid", "same"
    full (Default): The output of fftconvolve is the full discrete linear convolution of the inputs. 
    Output size will be image size + 1/2 template size in each dimension.
    valid: The output consists only of those elements that do not rely on the zero-padding.
    same: The output is the same size as image, centered with respect to the ‘full’ output.
    :return: N-D array of same dimensions as image. Size depends on mode parameter.
    """

    # If this happens, it is probably a mistake
    if np.ndim(template) > np.ndim(image) or \
            len([i for i in range(np.ndim(template)) if template.shape[i] > image.shape[i]]) > 0:
        print("normxcorr2: TEMPLATE larger than IMG. Arguments may be swapped.")

    template = template - np.mean(template)
    image = image - np.mean(image)

    a1 = np.ones(template.shape)
    # Faster to flip up down and left right then use fftconvolve instead of scipy's correlate
    ar = np.flipud(np.fliplr(template))
    out = fftconvolve(image, ar.conj(), mode=mode)

    image = fftconvolve(np.square(image), a1, mode=mode) - \
            np.square(fftconvolve(image, a1, mode=mode)) / (np.prod(template.shape))

    # Remove small machine precision errors after subtraction
    image[np.where(image < 0)] = 0

    template = np.sum(np.square(template))
    out = out / np.sqrt(image * template)

    # Remove any divisions by 0 or very close to 0
    out[np.where(np.logical_not(np.isfinite(out)))] = 0

    return out
normxcorr2()返回的对象是交叉相关矩阵。

1
谢谢您的回答,只是为了确认一下... out 返回的是 R(p, q)(在我的情况下),对吗?那么我需要获得 max[ R(p,q)],这可以通过使用 np.max() 来获取,以便知道最大的交叉相关系数,但是“p”和“q”究竟是什么?那个点的坐标吗? - Chacho Fuva
我假设 max[ R(p,q)] 表示数组中的最大值。当我们在结果相关矩阵中寻找最佳分数(或相关性)时,这正是我们想要的。如果这个答案对你有帮助,请随意点赞,或者点击旁边的复选框将其选择为官方问题解决者。 - karlphillip
2
它不是相同的... 它是类似的!如果你想让它与OpenCV完全相同,你必须将mode更改为'valid' - karlphillip
我不想再深入探讨这个话题了,我认为已经有足够的内容可以让你开始了。由于上面的函数等同于 coor_map = cv2.matchTemplate(target, templ, cv2.TM_CCOEFF_NORMED) 如果你将其调整为使用 mode='valid',你可以滥用OpenCV来找到最佳的分数位置,使用:(cv_minVal, cv_score, cv_minLoc, cv_bestLoc) = cv2.minMaxLoc(coor_map) - karlphillip
这是我并行处理的工作。 - Chacho Fuva
显示剩余3条评论

网页内容由stack overflow 提供, 点击上面的
可以查看英文原文,
原文链接