如何在安卓设备上模糊背景图片
5
最简单的方法是使用一个库。可以看看这个:https://github.com/wasabeef/Blurry
通过使用这个库,你只需要执行以下操作:
Blurry.with(context)
  .radius(10)
  .sampling(8)
  .color(Color.argb(66, 255, 255, 0))
  .async()
  .onto(rootView);
6
我在这篇文章中找到了一种使用Android的RenderScript有效模糊图片的简单方法。
这是一种使用Android的RenderScript有效模糊图像的简易方法,具体步骤可以参考上述链接的文章。
Create a Class called BlurBuilder
public class BlurBuilder {
  private static final float BITMAP_SCALE = 0.4f;
  private static final float BLUR_RADIUS = 7.5f;

  public static Bitmap blur(Context context, Bitmap image) {
    int width = Math.round(image.getWidth() * BITMAP_SCALE);
    int height = Math.round(image.getHeight() * BITMAP_SCALE);

    Bitmap inputBitmap = Bitmap.createScaledBitmap(image, width, height, false);
    Bitmap outputBitmap = Bitmap.createBitmap(inputBitmap);

    RenderScript rs = RenderScript.create(context);
    ScriptIntrinsicBlur theIntrinsic = ScriptIntrinsicBlur.create(rs, Element.U8_4(rs));
    Allocation tmpIn = Allocation.createFromBitmap(rs, inputBitmap);
    Allocation tmpOut = Allocation.createFromBitmap(rs, outputBitmap);
    theIntrinsic.setRadius(BLUR_RADIUS);
    theIntrinsic.setInput(tmpIn);
    theIntrinsic.forEach(tmpOut);
    tmpOut.copyTo(outputBitmap);

    return outputBitmap;
  }
}
Copy any image to your drawable folder
Use BlurBuilder in your activity like this:
@Override
protected void onCreate(Bundle savedInstanceState) {
    super.onCreate(savedInstanceState);
    requestWindowFeature(Window.FEATURE_NO_TITLE);
    getWindow().setFlags(WindowManager.LayoutParams.FLAG_FULLSCREEN,
            WindowManager.LayoutParams.FLAG_FULLSCREEN);
    setContentView(R.layout.activity_login);

    mContainerView = (LinearLayout) findViewById(R.id.container);
    Bitmap originalBitmap = BitmapFactory.decodeResource(getResources(), R.drawable.background);
    Bitmap blurredBitmap = BlurBuilder.blur( this, originalBitmap );
    mContainerView.setBackground(new BitmapDrawable(getResources(), blurredBitmap));
Renderscript is included into support v8 enabling this answer down to api 8. To enable it using gradle include these lines into your gradle file (from this answer)
defaultConfig {
    ...
    renderscriptTargetApi *your target api*
    renderscriptSupportModeEnabled true
}
Result
4
BLUR_RADIUS 设置为您想要的值。 - Mr.Yeah您可以使用:
Glide.with(getContext()).load(R.mipmap.bg)
     .apply(bitmapTransform(new BlurTransformation(22)))
     .into((ImageView) view.findViewById(R.id.imBg));
这需要在你的build.gradle文件中添加以下内容:
implementation 'jp.wasabeef:glide-transformations:4.0.0'
4
BlurTransformation时遇到了“未解决的引用错误”,则需要将implementation 'jp.wasabeef:glide-transformations:4.0.0'添加到你的gradle文件中。请注意,这是一个库的依赖,需要手动添加才能使代码正确编译。 - AyazmonAndroid 12 预览版 1 带有内置的模糊功能,现在我们无需依赖外部库。以下是代码:
imageView.setRenderEffect(
        RenderEffect.createBlurEffect(
            20.0f, 20.0f, SHADER_TITLE_MODE
        )
)
2
I)
Glide.with(context.getApplicationContext())
                        .load(Your Path)
                        .override(15, 15) // (change according to your wish)
                        .error(R.drawable.placeholder)
                        .into(image.score);
否则,您可以按照下面的代码进行操作...
II)
1.创建一个类。(代码如下)
public class BlurTransformation extends BitmapTransformation {

    private RenderScript rs;

    public BlurTransformation(Context context) {
        super( context );

        rs = RenderScript.create( context );
    }

    @Override
    protected Bitmap transform(BitmapPool pool, Bitmap toTransform, int outWidth, int outHeight) {
        Bitmap blurredBitmap = toTransform.copy( Bitmap.Config.ARGB_8888, true );

        // Allocate memory for Renderscript to work with
        Allocation input = Allocation.createFromBitmap(
            rs,
            blurredBitmap,
            Allocation.MipmapControl.MIPMAP_FULL,
            Allocation.USAGE_SHARED
        );
        Allocation output = Allocation.createTyped(rs, input.getType());

        // Load up an instance of the specific script that we want to use.
        ScriptIntrinsicBlur script = ScriptIntrinsicBlur.create(rs, Element.U8_4(rs));
        script.setInput(input);

        // Set the blur radius
        script.setRadius(10);

        // Start the ScriptIntrinisicBlur
        script.forEach(output);

        // Copy the output to the blurred bitmap
        output.copyTo(blurredBitmap);

        toTransform.recycle();

        return blurredBitmap;
    }

    @Override
    public String getId() {
        return "blur";
    }
}
2.使用Glide将图像设置到ImageView中。
例如:
Glide.with(this)
     .load(expertViewDetailsModel.expert.image)
     .asBitmap()
     .transform(new BlurTransformation(this))
     .into(ivBackground);
Android 12(API级别31)具有新的主题参数可应用于窗口以模糊背景:
<style name="BlurryTheme" parent="...">
    <item name="android:windowBackgroundBlurRadius">30dp</item>
    <item name="android:windowBlurBehindEnabled">true</item>
    <item name="android:windowBlurBehindRadius">10dp</item>
</style>
还有一种新的API可以对View应用模糊效果:android.view.View#setRenderEffect:
imageView.setRenderEffect(
    RenderEffect.createBlurEffect(
        20.0f, 20.0f, Shader.TileMode.CLAMP
    )
)
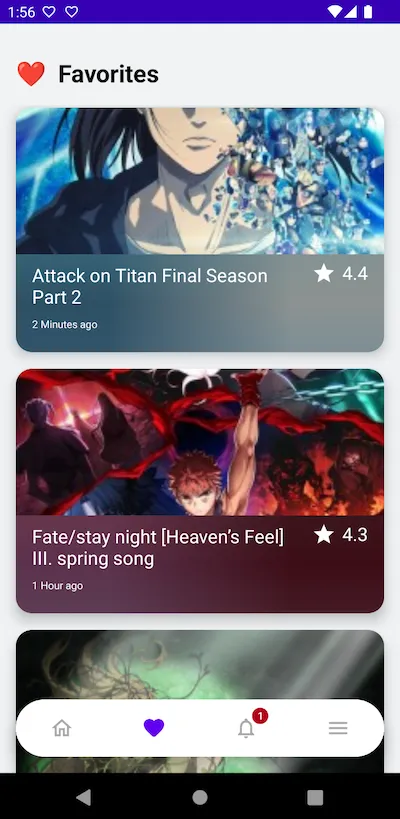
这个方法适用于我。在Android 9和12上测试通过。使用Glide库来缩小位图。
// Glide
implementation 'com.github.bumptech.glide:glide:4.13.0'
kapt 'com.github.bumptech.glide:compiler:4.13.0'
Glide.with(context).asBitmap().load(favorite.coverImage).into(object : CustomTarget<Bitmap>(2, 2) {
                    override fun onResourceReady(resource: Bitmap, transition: Transition<in Bitmap>?) {
                        ivContentHolder.setImageDrawable(BitmapDrawable(itemBinding.root.context.resources, resource))
                    }

                    override fun onLoadCleared(placeholder: Drawable?) {
                        ivContentHolder.setImageDrawable(null)
                    }
CustomTarget(2, 2) 是关键。值越小,模糊效果越强。基本上它被用来缩小图像大小。然后你只需要将缩小的位图设置到你的 imageView 上。最重要的是将 imageView 的 ScaleType 设置为 CenterCrop。
<ImageView
                android:id="@+id/iv_content_holder"
                android:layout_width="match_parent"
                android:layout_height="96dp"
                android:scaleType="centerCrop"
                android:src="@color/purple_700"
                app:layout_constraintBottom_toBottomOf="parent" />
结果将类似于这个样子。模糊效果演示

目前仅适用于Android 12,因此还不是通用解决方案
模糊图像的方法如下:
1. 在build.gradle中将目标SDK和编译SDK设置为Android S。
2. 使用Render Effect。
3. 设置模糊效果如下:
your_view.setRenderEffect(
     RenderEffect.createBlurEffect(
     30f, //radius X
     30f, //Radius Y
     Shader.TileMode.[X]// X=CLAMP,DECAL,MIRROR,REPEAT
)
4种混合模式包括:
CLAMP- 如果着色器绘制超出其原始边界,则复制边缘颜色。
DECAL- 仅在其原始边界内渲染着色器的图像像素。
MIRROR- 水平和垂直重复着色器的图像,交替使用镜像图像,以便相邻图像始终接缝。
REPEAT - 水平和垂直重复着色器的图像。
你可以使用Glide来加载和转换成模糊图像, 1)仅适用于一个视图,
val requestOptions = RequestOptions()
                requestOptions.transform(BlurTransformation(50)) // 0-100
Glide.with(applicationContext).setDefaultRequestOptions(requestOptions)
                        .load(imageUrl).into(view)
2) 如果您正在使用适配器在项目中加载图像,则应该将代码编写在if-else块中,否则所有图像都会变得模糊。
 if(isBlure){
  val requestOptions = RequestOptions()
                requestOptions.transform(BlurTransformation(50))
                Glide.with(applicationContext).setDefaultRequestOptions(requestOptions)
                        .load(imageUrl).into(view )
}else{
 val requestOptions = RequestOptions()
            Glide.with(applicationContext).setDefaultRequestOptions(requestOptions).load(imageUrl).into(view)
}
这可能不是最有效率的解决方案,但因为wasabeef/Blurry库对我无效,所以我必须使用它。如果您想要一些模糊动画,这可能会很有用:
1- 您需要拥有2个版本的图片,一个普通版本和一个用Photoshop或其他工具制作的模糊版本。
2- 在您的XML文件中设置两张图片重叠在一起,其中一张可以看到,那就是上面的那张。
3- 在上面的图片上设置淡出动画:
final Animation fadeOut = new AlphaAnimation(1, 0);
        fadeOut.setInterpolator(new AccelerateInterpolator());
        fadeOut.setDuration(1000);


        fadeOut.setAnimationListener(new Animation.AnimationListener() {
            @Override
            public void onAnimationStart(Animation animation) {}

            @Override
            public void onAnimationEnd(Animation animation) {upperone.setVisibility(View.GONE);}

            @Override
            public void onAnimationRepeat(Animation animation) {}
        });

        upperone.startAnimation(fadeOut);
原文链接

