如何在iOS 13中更改UISegmentedControl中段的颜色?

149

iOS 13中的UISegmentedControl外观有所改变,之前可以通过设置tintColor来更改边框、分段线和选定的段落的背景颜色,然后再使用titleTextAttributes中的前景色属性更改每个段落标题的颜色。

但在iOS 13中,tintColor不起作用了。现在你需要设置分段控件的backgroundColor来修改整个分段控件的颜色,但是找不到任何方法来修改选定段落背景颜色。设置文本属性仍然有效。即使尝试设置标题的背景色,也只会影响标题的背景而不是选定段落的背景颜色。

总之,在iOS 13中如何修改当前选定的UISegmentedControl段落的背景颜色?是否有公共API的正确解决方案,而不需要深入挖掘私有子视图结构?

iOS 13中的UISegmentedControlUIControl没有新属性,UIView的更改也都不相关。

18个回答

6

虽然上面的回答很好,但是它们中的大多数都会错误地获取所选片段内文本的颜色。我创建了一个UISegmentedControl子类,您可以在iOS 13及之前的设备上使用,并像在iOS 13之前的设备上一样使用属性。

    class LegacySegmentedControl: UISegmentedControl {
        private func stylize() {
            if #available(iOS 13.0, *) {
                selectedSegmentTintColor = tintColor
                let tintColorImage = UIImage(color: tintColor)
                setBackgroundImage(UIImage(color: backgroundColor ?? .clear), for: .normal, barMetrics: .default)
                setBackgroundImage(tintColorImage, for: .selected, barMetrics: .default)
                setBackgroundImage(UIImage(color: tintColor.withAlphaComponent(0.2)), for: .highlighted, barMetrics: .default)
                setBackgroundImage(tintColorImage, for: [.highlighted, .selected], barMetrics: .default)
                setTitleTextAttributes([.foregroundColor: tintColor!, NSAttributedString.Key.font: UIFont.systemFont(ofSize: 13, weight: .regular)], for: .normal)

                setDividerImage(tintColorImage, forLeftSegmentState: .normal, rightSegmentState: .normal, barMetrics: .default)
                layer.borderWidth = 1
                layer.borderColor = tintColor.cgColor

// Detect underlying backgroundColor so the text color will be properly matched

                if let background = backgroundColor {
                    self.setTitleTextAttributes([.foregroundColor: background, NSAttributedString.Key.font: UIFont.systemFont(ofSize: 13, weight: .regular)], for: .selected)
                } else {
                    func detectBackgroundColor(of view: UIView?) -> UIColor? {
                        guard let view = view else {
                            return nil
                        }
                        if let color = view.backgroundColor, color != .clear {
                            return color
                        }
                        return detectBackgroundColor(of: view.superview)
                    }
                    let textColor = detectBackgroundColor(of: self) ?? .black

                    self.setTitleTextAttributes([.foregroundColor: textColor, NSAttributedString.Key.font: UIFont.systemFont(ofSize: 13, weight: .regular)], for: .selected)
                }
            }
        }

        override func tintColorDidChange() {
            super.tintColorDidChange()
            stylize()
        }
    }

    fileprivate extension UIImage {
        public convenience init?(color: UIColor, size: CGSize = CGSize(width: 1, height: 1)) {
          let rect = CGRect(origin: .zero, size: size)
          UIGraphicsBeginImageContextWithOptions(rect.size, false, 0.0)
          color.setFill()
          UIRectFill(rect)
          let image = UIGraphicsGetImageFromCurrentImageContext()
          UIGraphicsEndImageContext()

          guard let cgImage = image?.cgImage else { return nil }
          self.init(cgImage: cgImage)
        }
    }

使用tintColorDidChange方法可确保每当片段视图或其底层视图的tintColor属性更改时,stylize方法都会被调用,这是iOS上的首选行为。
结果: enter image description here

5
这是我的对Jonathan.针对Xamarin.iOS(C#)的回答,但修复了图片大小的问题。与Cœur在Colin Blake的答案中的评论类似,我将除分隔符外的所有图像大小设置为分段控件的大小。分隔符的高度为段的1倍。
public static UIImage ImageWithColor(UIColor color, CGSize size)
{
    var rect = new CGRect(0, 0, size.Width, size.Height);
    UIGraphics.BeginImageContext(rect.Size);
    var context = UIGraphics.GetCurrentContext();
    context.SetFillColor(color.CGColor);
    context.FillRect(rect);
    var image = UIGraphics.GetImageFromCurrentImageContext();
    UIGraphics.EndImageContext();
    return image;
}

// https://dev59.com/AFMI5IYBdhLWcg3wV6Jr#56465501
public static void ColorSegmentiOS13(UISegmentedControl uis, UIColor tintColor, UIColor textSelectedColor, UIColor textDeselectedColor)
{
    if (!UIDevice.CurrentDevice.CheckSystemVersion(13, 0))
    {
        return;
    }

    UIImage image(UIColor color)
    {
        return ImageWithColor(color, uis.Frame.Size);
    }

    UIImage imageDivider(UIColor color)
    {
        return ImageWithColor(color, 1, uis.Frame.Height);
    }

    // Must set the background image for normal to something (even clear) else the rest won't work
    //setBackgroundImage(UIImage(color: backgroundColor ?? .clear), for: .normal, barMetrics: .default)
    uis.SetBackgroundImage(image(UIColor.Clear), UIControlState.Normal, UIBarMetrics.Default);

    // setBackgroundImage(tintColorImage, for: .selected, barMetrics: .default)
    uis.SetBackgroundImage(image(tintColor), UIControlState.Selected, UIBarMetrics.Default);

    // setBackgroundImage(UIImage(color: tintColor.withAlphaComponent(0.2)), for: .highlighted, barMetrics: .default)
    uis.SetBackgroundImage(image(tintColor.ColorWithAlpha(0.2f)), UIControlState.Highlighted, UIBarMetrics.Default);

    // setBackgroundImage(tintColorImage, for: [.highlighted, .selected], barMetrics: .default)
    uis.SetBackgroundImage(image(tintColor), UIControlState.Highlighted | UIControlState.Selected, UIBarMetrics.Default);

    // setTitleTextAttributes([.foregroundColor: tintColor, NSAttributedString.Key.font: UIFont.systemFont(ofSize: 13, weight: .regular)], for: .normal)
    // Change: support distinct color for selected/de-selected; keep original font
    uis.SetTitleTextAttributes(new UITextAttributes() { TextColor = textDeselectedColor }, UIControlState.Normal); //Font = UIFont.SystemFontOfSize(13, UIFontWeight.Regular)
    uis.SetTitleTextAttributes(new UITextAttributes() { TextColor = textSelectedColor, }, UIControlState.Selected); //Font = UIFont.SystemFontOfSize(13, UIFontWeight.Regular)

    // setDividerImage(tintColorImage, forLeftSegmentState: .normal, rightSegmentState: .normal, barMetrics: .default)
    uis.SetDividerImage(imageDivider(tintColor), UIControlState.Normal, UIControlState.Normal, UIBarMetrics.Default);

    //layer.borderWidth = 1
    uis.Layer.BorderWidth = 1;

    //layer.borderColor = tintColor.cgColor
    uis.Layer.BorderColor = tintColor.CGColor;
}

5
您可以实现以下方法。
extension UISegmentedControl{
    func selectedSegmentTintColor(_ color: UIColor) {
        self.setTitleTextAttributes([.foregroundColor: color], for: .selected)
    }
    func unselectedSegmentTintColor(_ color: UIColor) {
        self.setTitleTextAttributes([.foregroundColor: color], for: .normal)
    }
}

使用代码

segmentControl.unselectedSegmentTintColor(.white)
segmentControl.selectedSegmentTintColor(.black)

2
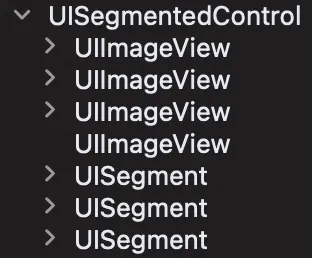
在iOS 13及以上版本中,当我在viewDidLoad中访问分段控件的subviews时,它只有1个UIImageView。一旦我插入了更多的分段,它就相应增加,因此3个分段意味着分段控件的subviews中有3个UIImageView
有趣的是,到了viewDidAppear时,分段控件的subviews变成了3个UISegment(每个都包含一个UISegmentLabel作为其子视图;这是你的文本)和4个UIImageView,如下所示:

viewDidAppear

在 `viewDidLoad` 中,那三个 `UIImageView` 不知何故变成了 `UISegment`,我们不想去碰它们(但你可以尝试设置它们的图片或 `isHidden` 属性来看看它们如何影响 UI)。让我们忽略这些私有类。
那四个 `UIImageView` 实际上是三个“普通” `UIImageView`(加上一个作为垂直分隔符的 `UIImageView` 子视图)和一个“选中” `UIImageView`(即实际上是你的 `selectedSegmentTintColor` 图片,在上面的截图中没有子视图)。
在我的情况下,我需要一个白色背景,所以我必须隐藏灰色背景图片(参见:https://medium.com/flawless-app-stories/ios-13-uisegmentedcontrol-3-important-changes-d3a94fdd6763)。我也想要删除/隐藏分段之间的垂直分隔符。
因此,在viewDidAppear中的简单解决方案,无需设置分隔图像或背景图像(在我的情况下),只需简单地隐藏那前三个UIImageView即可。
// This method might be a bit 'risky' since we are not guaranteed of the internal sequence ordering, but so far it seems ok.
if #available(iOS 13.0, *) {
    for i in 0...(segmentedControl.numberOfSegments - 1) {
        segmentedControl.subviews[i].isHidden = true
    }
}

或者

// This does not depend on the ordering sequence like the above, but this is also risky in the sense that if the UISegment becomes UIImageView one day, this will break.
if #available(iOS 13.0, *) {
    for subview in segmentedControl.subviews {
        if String(describing: subview).contains("UIImageView"),
           subview.subviews.count > 0 {
               subview.isHidden = true
        }
    }
}

选择你的毒药...

我也已经报告了一个错误,当我将背景颜色设置为白色时,外观变成了灰色 (segmentedControl.backgroundColor = UIColor.white). 错误号为FB9746071。 - CyberMew

2
如果您想将背景设置为透明,您需要执行以下操作:
if #available(iOS 13.0, *) {
  let image = UIImage()
  let size = CGSize(width: 1, height: segmentedControl.intrinsicContentSize.height)
  UIGraphicsBeginImageContextWithOptions(size, false, 0.0)
  image.draw(in: CGRect(origin: .zero, size: size))
  let scaledImage = UIGraphicsGetImageFromCurrentImageContext()
  UIGraphicsEndImageContext()
  segmentedControl.setBackgroundImage(scaledImage, for: .normal, barMetrics: .default)
  segmentedControl.setDividerImage(scaledImage, forLeftSegmentState: .normal, rightSegmentState: .normal, barMetrics: .default)
}

结果看起来像这样: 在此输入图片描述


1
几乎可以工作,但我在iOS 14上使用的selectedSegmentTintColor没有显示出来(即所选段选项是白色而不是我选择的颜色)。 - CyberMew

1

iOS 13+中的灰色背景解决方案

自iOS 13以来,引入了更新的UISegmentedControl。不幸的是,没有简单的方法将背景设置为白色,因为框架会添加半透明的灰色背景。结果,UISegmentedControl的背景仍然是灰色的。有一种解决方法(丑陋但有效):

func fixBackgroundColorWorkaround() {
    DispatchQueue.main.asyncAfter(deadline: .now() + 0.1) {
        for i in 0 ... (self.numberOfSegments-1) {
            let bg = self.subviews[i]
            bg.isHidden = true
        }
    }
}

我已经使用了6个月,它运行得非常好。 - Toqir Ahmad

1

分段控制器背景颜色


创建一个自定义的UISegmentedControl子类
  • (如果你不想在分段控件的分段之间看到分隔符imageView):

     final class SegmentedControl: UISegmentedControl {
         override func layoutSubviews() {
             super.layoutSubviews()
             (0..
  • (如果你在分段控件的分段之间看到分隔符imageView):

     final class SegmentedControl: UISegmentedControl {
         override func draw(_ rect: CGRect) {
             for index in 0..
创建一个 SegmentedControl 的实例,别忘了设置 `selectedSegmentTintColor`,`segmentedControl.backgroundColor = .white`。 屏幕截图(无分割线)

-2

iOS 12+

我在背景颜色方面遇到了很多困难。将.clear颜色设置为背景颜色总是会添加默认的灰色。以下是我的解决方法:

self.yourSegmentControl.backgroundColor = .clear //Any Color of your choice

self.yourSegmentControl.setBackgroundImage(UIImage(), for: .normal, barMetrics: .default) //This does the magic

此外,还有关于分隔线颜色的设置

self.yourSegmentControl.setDividerImage(UIImage(), forLeftSegmentState: .normal, rightSegmentState: .normal, barMetrics: .default) // This will remove the divider image.

1
对我来说不起作用,在iOS 14上整个部分都变成了白色(已测试)。 - CyberMew
你将什么颜色设置为背景色了吗? - Kedar Sukerkar
如果我记得正确,我想我使用了白色(或者根本没有设置)。 - CyberMew
尝试将其设置为清除颜色了吗? - Kedar Sukerkar
是的,那是我尝试的第一件事。白色对你也有效吗? - CyberMew
显示剩余2条评论

网页内容由stack overflow 提供, 点击上面的
可以查看英文原文,
原文链接