TensorBoard是可视化TensorFlow图的官方方式,但有时我在Jupyter中工作时只想快速查看这个图。
是否有一个快速解决方案,最好基于TensorFlow工具或标准的SciPy包(如matplotlib),但如果必要,也可以使用第三方库?
TensorBoard是可视化TensorFlow图的官方方式,但有时我在Jupyter中工作时只想快速查看这个图。
是否有一个快速解决方案,最好基于TensorFlow工具或标准的SciPy包(如matplotlib),但如果必要,也可以使用第三方库?
以下是我从Alex Mordvintsev的deep dream 笔记本中复制的食谱。
from IPython.display import clear_output, Image, display, HTML
import numpy as np
def strip_consts(graph_def, max_const_size=32):
"""Strip large constant values from graph_def."""
strip_def = tf.GraphDef()
for n0 in graph_def.node:
n = strip_def.node.add()
n.MergeFrom(n0)
if n.op == 'Const':
tensor = n.attr['value'].tensor
size = len(tensor.tensor_content)
if size > max_const_size:
tensor.tensor_content = "<stripped %d bytes>"%size
return strip_def
def show_graph(graph_def, max_const_size=32):
"""Visualize TensorFlow graph."""
if hasattr(graph_def, 'as_graph_def'):
graph_def = graph_def.as_graph_def()
strip_def = strip_consts(graph_def, max_const_size=max_const_size)
code = """
<script>
function load() {{
document.getElementById("{id}").pbtxt = {data};
}}
</script>
<link rel="import" href="https://tensorboard.appspot.com/tf-graph-basic.build.html" onload=load()>
<div style="height:600px">
<tf-graph-basic id="{id}"></tf-graph-basic>
</div>
""".format(data=repr(str(strip_def)), id='graph'+str(np.random.rand()))
iframe = """
<iframe seamless style="width:1200px;height:620px;border:0" srcdoc="{}"></iframe>
""".format(code.replace('"', '"'))
display(HTML(iframe))
然后可视化当前图形
show_graph(tf.get_default_graph().as_graph_def())
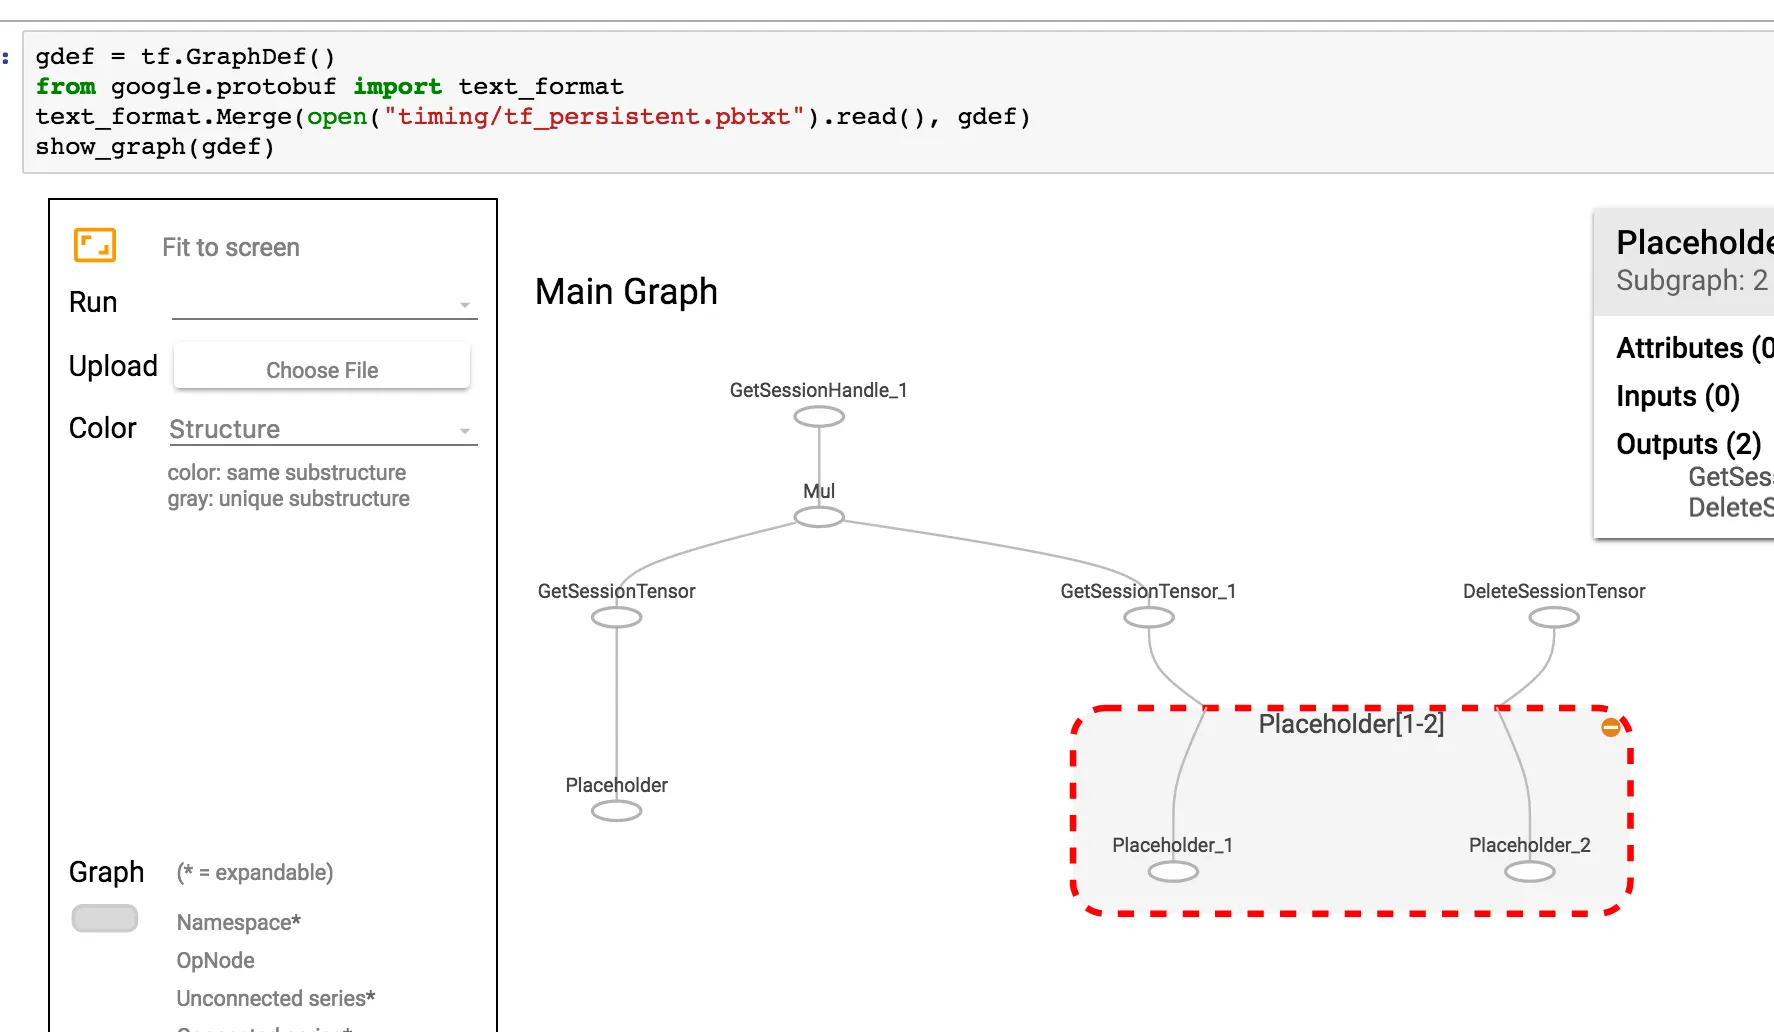
如果你的图被保存为pbtxt格式,你可以这样做
gdef = tf.GraphDef()
from google.protobuf import text_format
text_format.Merge(open("tf_persistent.pbtxt").read(), gdef)
show_graph(gdef)
您将看到类似于以下内容:
TensorFlow 2.0现在支持通过魔术命令(例如%tensorboard --logdir logs/train)在Jupyter中使用TensorBoard。这里是一个链接,其中包含教程和示例。
[编辑1,2]
如@MiniQuark在评论中提到的那样,我们需要首先加载扩展程序(%load_ext tensorboard.notebook)。
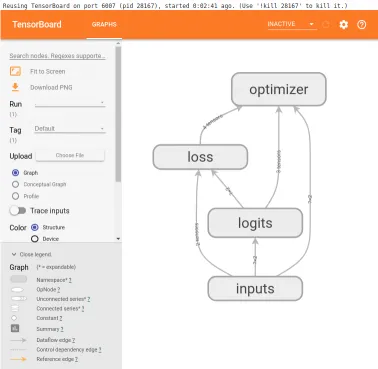
下面是在tensorflow==2.0.0-alpha0中使用图模式、@tf.function和tf.keras的用法示例:
tf.compat.v1.disable_eager_execution())%load_ext tensorboard.notebook
import tensorflow as tf
tf.compat.v1.disable_eager_execution()
from tensorflow.python.ops.array_ops import placeholder
from tensorflow.python.training.gradient_descent import GradientDescentOptimizer
from tensorflow.python.summary.writer.writer import FileWriter
with tf.name_scope('inputs'):
x = placeholder(tf.float32, shape=[None, 2], name='x')
y = placeholder(tf.int32, shape=[None], name='y')
with tf.name_scope('logits'):
layer = tf.keras.layers.Dense(units=2)
logits = layer(x)
with tf.name_scope('loss'):
xentropy = tf.nn.sparse_softmax_cross_entropy_with_logits(labels=y, logits=logits)
loss_op = tf.reduce_mean(xentropy)
with tf.name_scope('optimizer'):
optimizer = GradientDescentOptimizer(0.01)
train_op = optimizer.minimize(loss_op)
FileWriter('logs/train', graph=train_op.graph).close()
%tensorboard --logdir logs/train
@tf.function装饰器进行前向-后向传递,并且不禁用急切执行:%load_ext tensorboard.notebook
import tensorflow as tf
import numpy as np
logdir = 'logs/'
writer = tf.summary.create_file_writer(logdir)
tf.summary.trace_on(graph=True, profiler=True)
@tf.function
def forward_and_backward(x, y, w, b, lr=tf.constant(0.01)):
with tf.name_scope('logits'):
logits = tf.matmul(x, w) + b
with tf.name_scope('loss'):
loss_fn = tf.nn.sparse_softmax_cross_entropy_with_logits(
labels=y, logits=logits)
reduced = tf.reduce_sum(loss_fn)
with tf.name_scope('optimizer'):
grads = tf.gradients(reduced, [w, b])
_ = [x.assign(x - g*lr) for g, x in zip(grads, [w, b])]
return reduced
# inputs
x = tf.convert_to_tensor(np.ones([1, 2]), dtype=tf.float32)
y = tf.convert_to_tensor(np.array([1]))
# params
w = tf.Variable(tf.random.normal([2, 2]), dtype=tf.float32)
b = tf.Variable(tf.zeros([1, 2]), dtype=tf.float32)
loss_val = forward_and_backward(x, y, w, b)
with writer.as_default():
tf.summary.trace_export(
name='NN',
step=0,
profiler_outdir=logdir)
%tensorboard --logdir logs/
tf.keras API:%load_ext tensorboard.notebook
import tensorflow as tf
import numpy as np
x_train = [np.ones((1, 2))]
y_train = [np.ones(1)]
model = tf.keras.models.Sequential([tf.keras.layers.Dense(2, input_shape=(2, ))])
model.compile(
optimizer='sgd',
loss='sparse_categorical_crossentropy',
metrics=['accuracy'])
logdir = "logs/"
tensorboard_callback = tf.keras.callbacks.TensorBoard(log_dir=logdir)
model.fit(x_train,
y_train,
batch_size=1,
epochs=1,
callbacks=[tensorboard_callback])
%tensorboard --logdir logs/
这些示例将在单元格下方生成类似以下内容:
我为tensorboard编写了一个Jupyter扩展程序。它可以:
我写了一个简单的助手,可以在jupyter notebook中启动tensorboard。只需将此函数添加到笔记本顶部的某个位置即可。
def TB(cleanup=False):
    import webbrowser
    webbrowser.open('http://127.0.1.1:6006')

    !tensorboard --logdir="logs"

    if cleanup:
        !rm -R logs/
当你生成摘要时,只需在运行TB()。而不是在同一个jupyter窗口中打开图表,它会:
探索完成后,只需点击选项卡,并停止中断内核。如果您想清理日志目录,则在运行后只需运行TB(1)
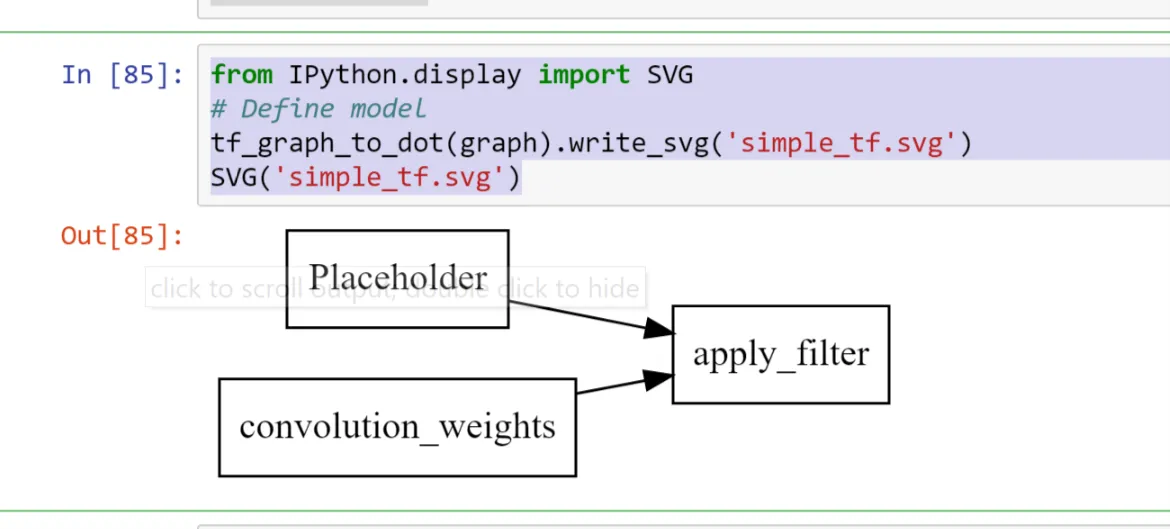
import pydot
from itertools import chain
def tf_graph_to_dot(in_graph):
    dot = pydot.Dot()
    dot.set('rankdir', 'LR')
    dot.set('concentrate', True)
    dot.set_node_defaults(shape='record')
    all_ops = in_graph.get_operations()
    all_tens_dict = {k: i for i,k in enumerate(set(chain(*[c_op.outputs for c_op in all_ops])))}
    for c_node in all_tens_dict.keys():
        node = pydot.Node(c_node.name)#, label=label)
        dot.add_node(node)
    for c_op in all_ops:
        for c_output in c_op.outputs:
            for c_input in c_op.inputs:
                dot.add_edge(pydot.Edge(c_input.name, c_output.name))
    return dot
这可以紧接着被
跟随。from IPython.display import SVG
# Define model
tf_graph_to_dot(graph).write_svg('simple_tf.svg')
SVG('simple_tf.svg')
将图形呈现为静态SVG文件中的记录
for c_node in all_tens_dict.keys() 循环的元素比你最终图中的节点数还要多。 - Lukas代码
def tb(logdir="logs", port=6006, open_tab=True, sleep=2):
    import subprocess
    proc = subprocess.Popen(
        "tensorboard --logdir={0} --port={1}".format(logdir, port), shell=True)
    if open_tab:
        import time
        time.sleep(sleep)
        import webbrowser
        webbrowser.open("http://127.0.0.1:{}/".format(port))
    return proc
用法
tb()               # Starts a TensorBoard server on the logs directory, on port 6006
                   # and opens a new tab in your browser to use it.

tb("logs2", 6007)  # Starts a second server on the logs2 directory, on port 6007,
                   # and opens a new tab to use it.
启动服务器不会阻塞Jupyter(除了2秒钟以确保服务器在打开选项卡之前有足够时间启动)。所有TensorBoard服务器都将在您中断内核时停止。
高级用法
如果您想要更多控制,可以通过编程方式像这样终止服务器:
server1 = tb()
server2 = tb("logs2", 6007)
# and later...
server1.kill()  # stops the first server
server2.kill()  # stops the second server
open_tab=False,如果您不想打开新的标签页。如果您的系统需要的时间不足或过长,您也可以将sleep设置为其他值。wait()方法。这将阻塞Jupyter,直到您中断内核,这将停止此服务器和所有其他服务器。server1.wait()
前提条件
本方案假定您已经安装了TensorBoard(例如使用pip install tensorboard),并且它在您启动Jupyter的环境中是可用的。
致谢
这个答案受到@SalvadorDali答案的启发,他的解决方案很好而且简单,但我希望能够启动多个tensorboard实例而不会阻塞Jupyter。此外,我更喜欢不删除日志目录,而是在根日志目录上启动tensorboard,并且每个TensorFlow运行都记录在不同的子目录中。
在TF 2.x中,另一个快速选项是通过plot_model()函数。它已经内置于更近期的TF工具中。例如:
import tensorflow
from tensorflow.keras.utils import plot_model

plot_model(model, to_file=('output_filename.png'))
<img src="https://www.tensorflow.org/images/graph_vis_animation.gif" width=1300 height=680>