如何将对话框窗口背景设置为透明,而不影响其边距。

15

目前,我拥有以下对话框,我将对其项目执行展开/折叠动画。

输入图片描述

此对话框是通过以下代码创建的:

import android.support.v7.app.AlertDialog;

final AlertDialog.Builder builder = new AlertDialog.Builder(activity);
final AlertDialog dialog = builder.setView(view).create();
final ViewTreeObserver vto = view.getViewTreeObserver();
vto.addOnGlobalLayoutListener(new OnGlobalLayoutListener() {

    public void onGlobalLayout() {
        ViewTreeObserver obs = view.getViewTreeObserver();
        if (android.os.Build.VERSION.SDK_INT >= android.os.Build.VERSION_CODES.JELLY_BEAN) {
            obs.removeOnGlobalLayoutListener(this);
        } else {
            obs.removeGlobalOnLayoutListener(this);
        }

        // https://dev59.com/EnfZa4cB1Zd3GeqPXON7
        int width = dialog.getWindow().getDecorView().getWidth();
        int height = dialog.getWindow().getDecorView().getHeight();
        dialog.getWindow().setLayout(width, height);
    }
});

然而,当进行动画时,这里会有副作用。

在此输入图片描述

请注意,在动画后对话框中不需要的额外白色区域不是由我们的自定义视图引起的。它是对话框本身的系统窗口白色背景。

我倾向于使对话框的系统窗口背景变为透明。

final AlertDialog.Builder builder = new AlertDialog.Builder(activity);
final AlertDialog dialog = builder.setView(view).create();
dialog.getWindow().setBackgroundDrawable(new ColorDrawable(Color.TRANSPARENT));

尽管不希望的白色背景已经不再出现,但对话框的原始边距也消失了。(对话框宽度现在是全屏宽度)

输入图像描述

我该如何使其透明,而不影响其边距?


给你的视图添加“padding”也许有帮助? - Rusheel Jain
不,这样做没有帮助。在自定义视图上添加填充后,它看起来像这样 - http://i.imgur.com/x74qROQ.png - Cheok Yan Cheng
请添加您的布局文件,我猜问题就出在那里。 - rekire
不必创建对话框,您可以创建一个简单的具有透明背景的布局。这样使用和维护都会更加容易。 - Vivek Mishra
你尝试使用DialogFragment了吗? - Droidekas
显示剩余2条评论
6个回答

15

有一种非常简单的方法:

您需要“修改”作为Dialog背景使用的Drawable。那些类型的Dialogs使用InsetDrawable作为背景。

API >= 23

仅SDK API 23+允许您获取由InsetDrawable包装的源DrawablegetDrawable()方法)。有了这个,您可以做任何想做的事情 - 比如将颜色更改为完全不同的颜色(比如RED或其他颜色)。如果您使用此方法,请记住,包装的DrawableGradientDrawable,而不是ColorDrawable

API < 23

对于较低的API,您的(“优雅”的)选择非常有限。

幸运的是,您无需将颜色更改为一些疯狂的值,只需将其更改为TRANSPARENT即可。为此,您可以在InsetDrawable上使用setAlpha(...)方法。

InsetDrawable background = 
            (InsetDrawable) dialog.getWindow().getDecorView().getBackground();
background.setAlpha(0);

编辑(基于Cheok Yan Cheng的评论)

或者你可以直接跳过将InsetDrawable转换成类型,从而获得相同的结果。只需记住这样做会导致在InsetDrawable本身上更改alpha,而不是在InsetDrawable包装的Drawable上更改。


保留间距


看起来是一个很有前途的方法。今晚打算试一下! - Cheok Yan Cheng
我已经尝试过并且它按预期工作。然而,我认为强制转换是不必要的。以下代码同样有效:Drawable background = dialog.getWindow().getDecorView().getBackground(); background.setAlpha(0); - Cheok Yan Cheng
嗨,我在三个不同版本的Android上进行了测试。我可以确认,在没有强制类型转换的情况下对我来说运行良好。 - Cheok Yan Cheng
@CheokYanCheng 很棒,我很高兴我的回答对你有帮助! - Bartek Lipinski
1
透明度只能在 Android 6.0(API 23)及更高版本上工作,在低于该版本的 API 中,根元素的背景颜色仍然保持默认。 - Stefanija
显示剩余4条评论

2

尝试使用以下主题:

<style name="TransaparantDialog">
    <item name="android:windowBackground">@android:color/transparent</item>
    <item name="android:windowFrame">@null</item>
    <item name="android:windowTitleStyle">@null</item>
    <item name="android:windowIsFloating">true</item>
    <item name="android:windowAnimationStyle">@android:style/Animation.Dialog</item>
    <item name="android:windowContentOverlay">@null</item>
    <item name="android:backgroundDimEnabled">false</item>
    <item name="android:background">@android:color/transparent</item>
    <item name="android:windowSoftInputMode">stateUnspecified|adjustPan</item>
</style>

尝试使用以下代码将主题应用到 AlertDialog.Builder

final AlertDialog.Builder builder = new AlertDialog.Builder(new ContextThemeWrapper(activity, R.style.TransaparantDialog));
...
dialog.getWindow().setLayout(WindowManager.LayoutParams.MATCH_PARENT, WindowManager.LayoutParams.MATCH_PARENT);

I hope help you !


0

应该有的是你没有展示的,我不确定它是你不知道还是已经存在了,所以你认为没有必要展示。

将主题设置为对话框(Dialog),这会将整个活动作为一个对话框。我不认为你这样做了,否则AlertDialog就不会出现。

我有点迷失在你的描述中,但有那个小的<shape/> XML比9-patch更强大,并且使用RelativeLayout会有帮助。


0

背景图片 abc_popup_background_mtrl_mult 是兼容库的一部分,图片信息中已经包含了边距。

abc_popup_background_mtrl_mult

这就是为什么当你移除背景图片时,边距会消失的原因。我强烈建议不要使用ViewTreeObserver,它会被多次调用并可能引起性能问题。最好根据屏幕大小进行工作:

Display display = getWindowManager().getDefaultDisplay();
Point size = new Point();
display.getSize(size);
int width = size.x;
int height = size.y;

你的问题可能出在布局上,请尝试使用层次结构查看器检查视图。


我百分之百确定问题不在我的布局上。如果我将对话框布局背景更改为红色,当动画发生时仍会出现额外的白色。如果我使用旧版Sherlock操作栏库中的对话框,则不会出现此问题。 - Cheok Yan Cheng
我更感兴趣的是,您如何找出对话框支持库使用的背景图像,我假设在不同的主题下,背景图像也会有所不同,对吗? - Cheok Yan Cheng
我一个月前搜索过它,基本上我阅读了对话框的源代码并检查了样式。那很痛苦,但如果你多次挖掘,你就会很快发现问题所在。你有用过层级查看器吗?那是一个很好的工具来找出问题出在哪里。 - rekire

0

在展示对话框之后添加此行代码。我更喜欢使用Dialog而不是使用AlertDialog

dialog.getWindow().setLayout(ViewGroup.LayoutParams.WRAP_CONTENT, ViewGroup.LayoutParams.WRAP_CONTENT);

0

让我们从谷歌的建议开始,他们建议使用DialogFragment而不是简单的Dialog。

@rekire说得对,边距由drawable设置,现在可以根据主题使用9 patch或以编程方式设置。

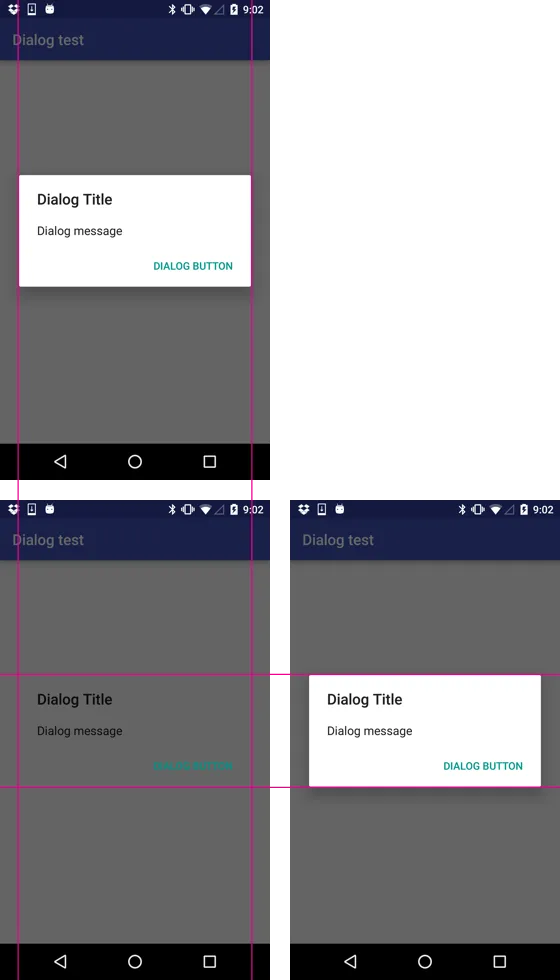
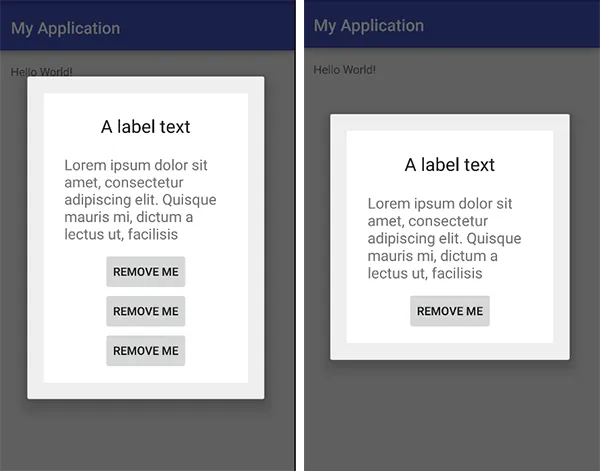
因此,您可以将填充设置为内容视图,或者使用DialogFragment创建对话框。以下是一个示例,它基于其内容更改对话框的高度,请注意,您不需要使用树观察器,因为如前所述,这可能会导致性能问题。

所以这就是示例

dialog_confirm.xml

<?xml version="1.0" encoding="utf-8"?>
<ScrollView xmlns:android="http://schemas.android.com/apk/res/android"
            android:layout_width="match_parent"
            android:layout_height="match_parent"
            android:padding="20dp">

    <LinearLayout android:id="@+id/container"
                  xmlns:android="http://schemas.android.com/apk/res/android"
                  android:layout_width="match_parent"
                  android:layout_height="wrap_content"
                  android:background="@android:color/white"
                  android:orientation="vertical"
                  android:animateLayoutChanges="true"
                  android:padding="15dp">

        <TextView
            android:id="@+id/textView"
            android:layout_width="wrap_content"
            android:layout_height="wrap_content"
            android:layout_gravity="center_horizontal"
            android:padding="10dp"
            android:text="A label text"
            android:textAppearance="?android:attr/textAppearanceLarge"/>

        <TextView
            android:id="@+id/textView2"
            android:layout_width="wrap_content"
            android:layout_height="wrap_content"
            android:layout_gravity="center_horizontal"
            android:padding="10dp"
            android:text="Lorem ipsum dolor sit amet, consectetur adipiscing elit. Quisque mauris mi, dictum a lectus ut, facilisis"
            android:textAppearance="?android:attr/textAppearanceMedium"/>

        <Button
            android:id="@+id/button1"
            android:layout_width="wrap_content"
            android:layout_height="wrap_content"
            android:layout_gravity="center_horizontal"
            android:text="Remove Me"/>

        <Button
            android:id="@+id/button2"
            android:layout_width="wrap_content"
            android:layout_height="wrap_content"
            android:layout_gravity="center_horizontal"
            android:text="Remove Me"/>

        <Button
            android:id="@+id/button3"
            android:layout_width="wrap_content"
            android:layout_height="wrap_content"
            android:layout_gravity="center_horizontal"
            android:text="Remove Me"/>

        <!-- as much content as you need -->

    </LinearLayout>
</ScrollView>

注意:我将所有内容都包装到滚动视图中,并设置了填充,如果您愿意,可以跳过它。

ConfirmDialog.java

//here goes package name and  imports

/**
 * Created by Vilen - virtoos.com;
 * fragment dialog example
 */
public class ConfirmDialog extends DialogFragment implements View.OnClickListener {

    private Button button1;
    private Button button2;
    private Button button3;
    private LinearLayout containerLayout;

    @Override
    public void onCreate(Bundle savedInstanceState) {
        super.onCreate(savedInstanceState);
        setStyle(DialogFragment.STYLE_NO_TITLE, 0);
    }

    @Override
    public View onCreateView(LayoutInflater inflater, ViewGroup container,
                             Bundle savedInstanceState) {
        View v = inflater.inflate(R.layout.dialog_confirm, container, false);
        containerLayout = (LinearLayout)v.findViewById(R.id.container);
        button1 = (Button)v.findViewById(R.id.button1);
        button2 = (Button)v.findViewById(R.id.button2);
        button3 = (Button)v.findViewById(R.id.button3);
        button1.setOnClickListener(this);
        button2.setOnClickListener(this);
        button3.setOnClickListener(this);
        return v;
    }

    @Override
    public void onActivityCreated(Bundle savedInstanceState) {
        super.onActivityCreated(savedInstanceState);
        // make background transparent if you want
        //getDialog().getWindow().setBackgroundDrawable(new ColorDrawable(Color.TRANSPARENT));
    }

    @NonNull
    @Override
    public Dialog onCreateDialog(Bundle savedInstanceState) {

        return super.onCreateDialog(savedInstanceState);

    }

    @Override
    public void onClick(View v) {
        switch (v.getId()){
            case R.id.button1:
                containerLayout.removeView(button1);
                break;
            case R.id.button2:
                containerLayout.removeView(button2);
                break;
            case R.id.button3:
                containerLayout.removeView(button3);
                break;
        }
    }
}

最后,您可以使用以下代码显示对话框:
ConfirmDialog confirmDialog = new ConfirmDialog();
confirmDialog.show(getSupportFragmentManager(), "dialog");

enter image description here

我不会详细解释为什么片段对话框更好,但有一件事是清楚的,你可以封装它的逻辑并拥有单独的类。 希望这能解决你的问题。


网页内容由stack overflow 提供, 点击上面的
可以查看英文原文,
原文链接